


After the unexpected response I received for my Ninja Turtles hat, I am FINALLY posting this tutorial post! Several readers have asked for it and I love knowing I can make atleast 1 person happy with this pattern.
Remember, I in no way consider myself an expert. This is a pattern I drafted up that works for me and I hope to provide it in a clear manner. I am available for any questions. Feel free to use this pattern to create as many hats as you desire, even to sell….Just remember to give credit where its due. Do not claim this pattern as your own. That’s not nice.
*************
What you will need:
- Crochet hook:
>>Size G and H (us size)
- Worsted weight yarn/4 :
>>1 skein green (suggested Vanna’s choice in Kelly Green)
>>second color yarn for the “mask”
>>small amount of white and black (for eyes)
- Scissors
- Crochet needle
Tutorial written in US crochet terms with US size crochet hooks
*******************
Vanna’s Choice Lion Brand yarn

suggested in Kelly Green for the perfect Ninja Turtle color


(if you are not familiar with the magic circle, an easy video tutorial can be found here)
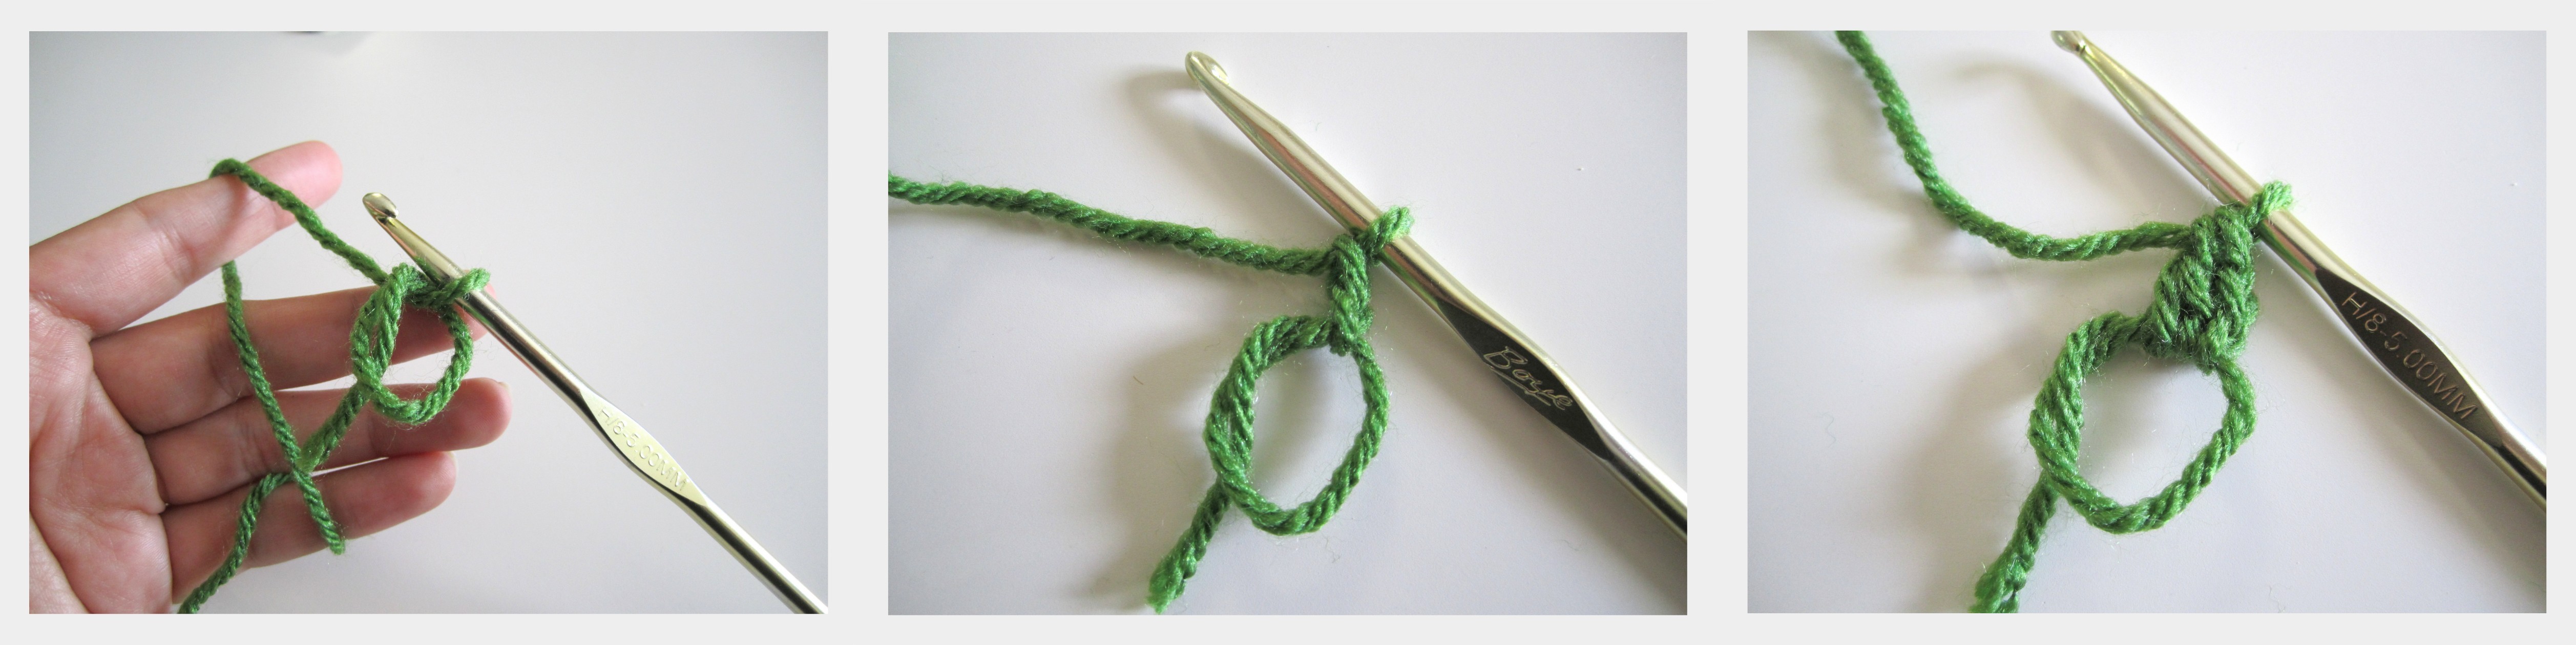
continue with 11 more double crochet into the circle for a total of 12 DC (the initial chain 2 does not count as a DC)
tighten the magic circle

locate the top of the first DC of the round, slip stitch into the top of the stitch.
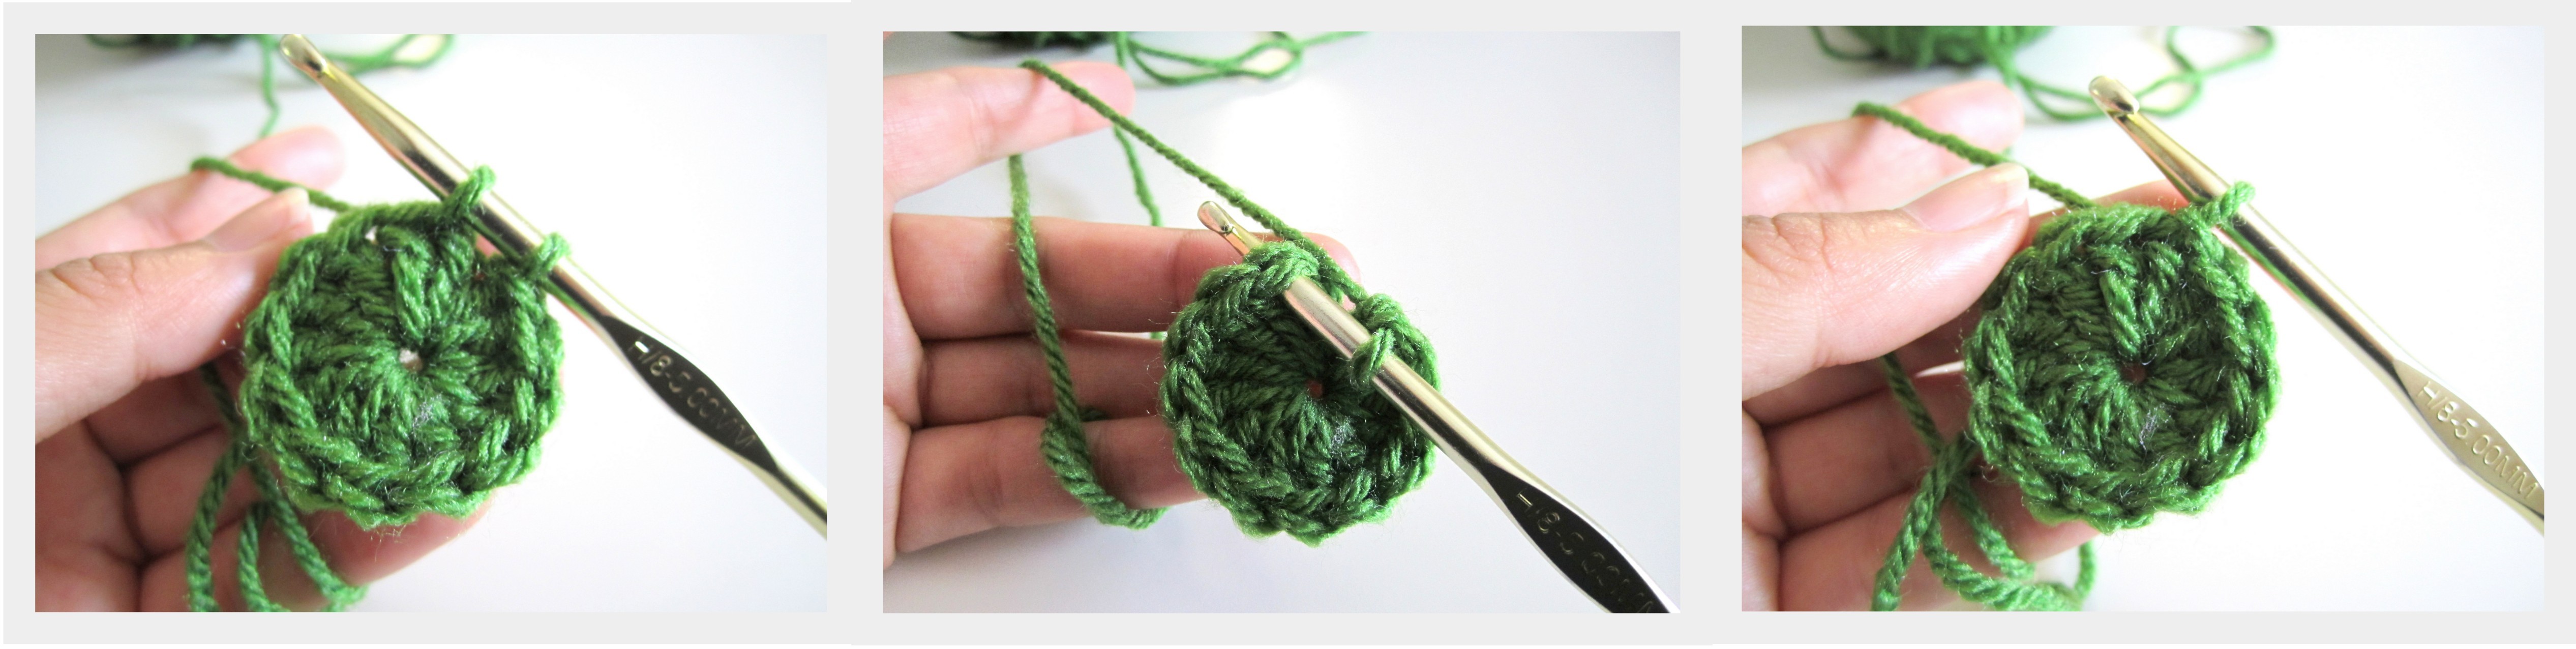
R2: Increase = ch 2, DC into same stitch where ch 2 is, DC again into same stitch, continue with 2 DC in every stitch around. (24 DC)
(remember the ch 2 does not count as a DC)
locate the first DC of the row, slip stitch into the top of the DC
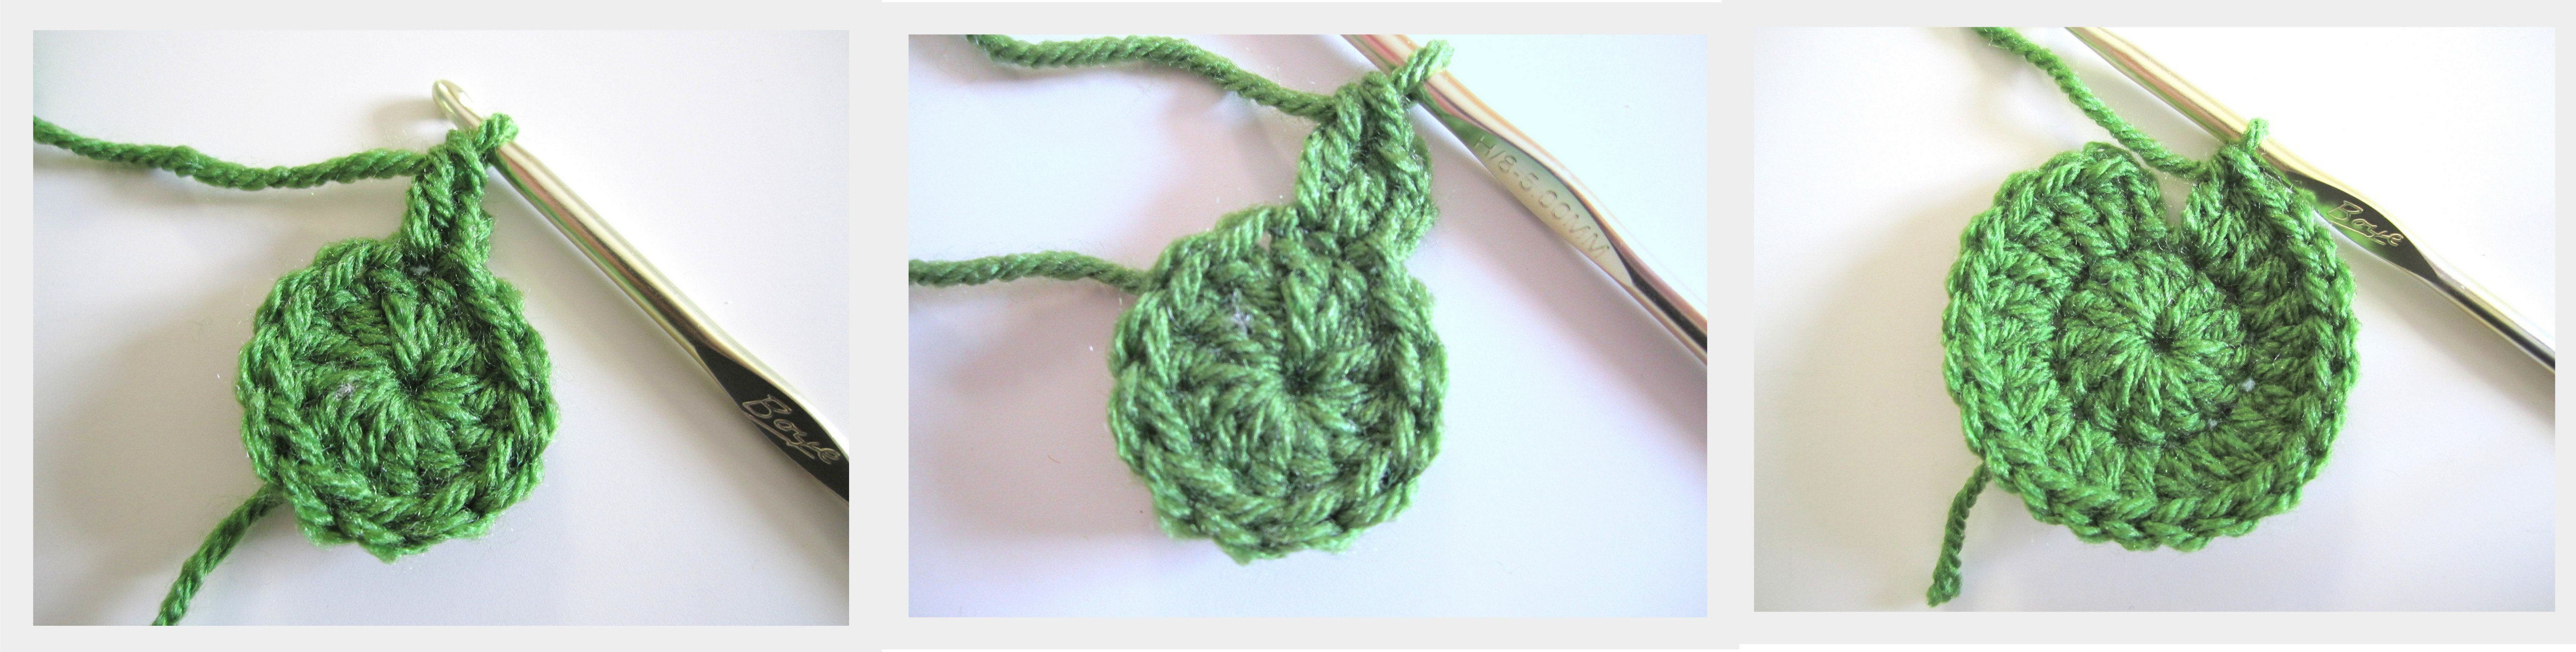
R3: Increase = ch 2, 2 DC into same stitch as ch 2, 1 DC into next stitch
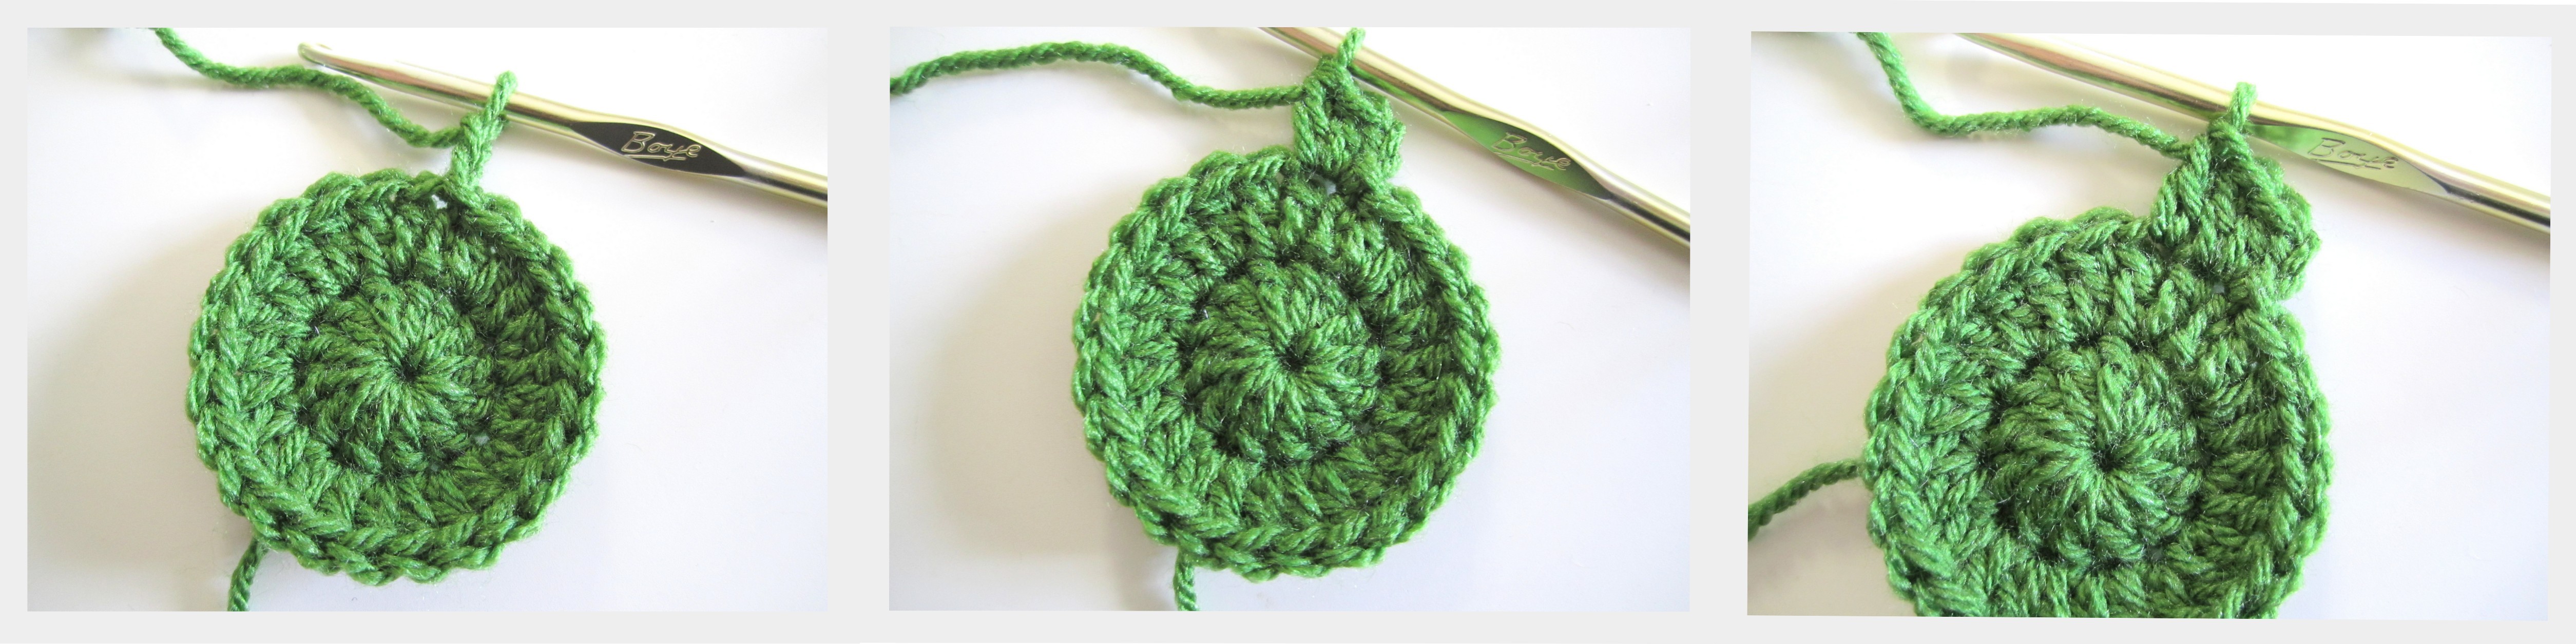
continue with this increase around *2 DC, 1 DC*. (36 DC)


R4: Increase = ch 2, 2 DC into same stitch as ch 2, 1 DC into next stitch, 1 DC into next stitch.
continue with this increase around *2 DC, 1 DC, 1 DC*. (48 DC)
locate the first DC of the row, slip stitch into the top of the DC (like we have been doing)

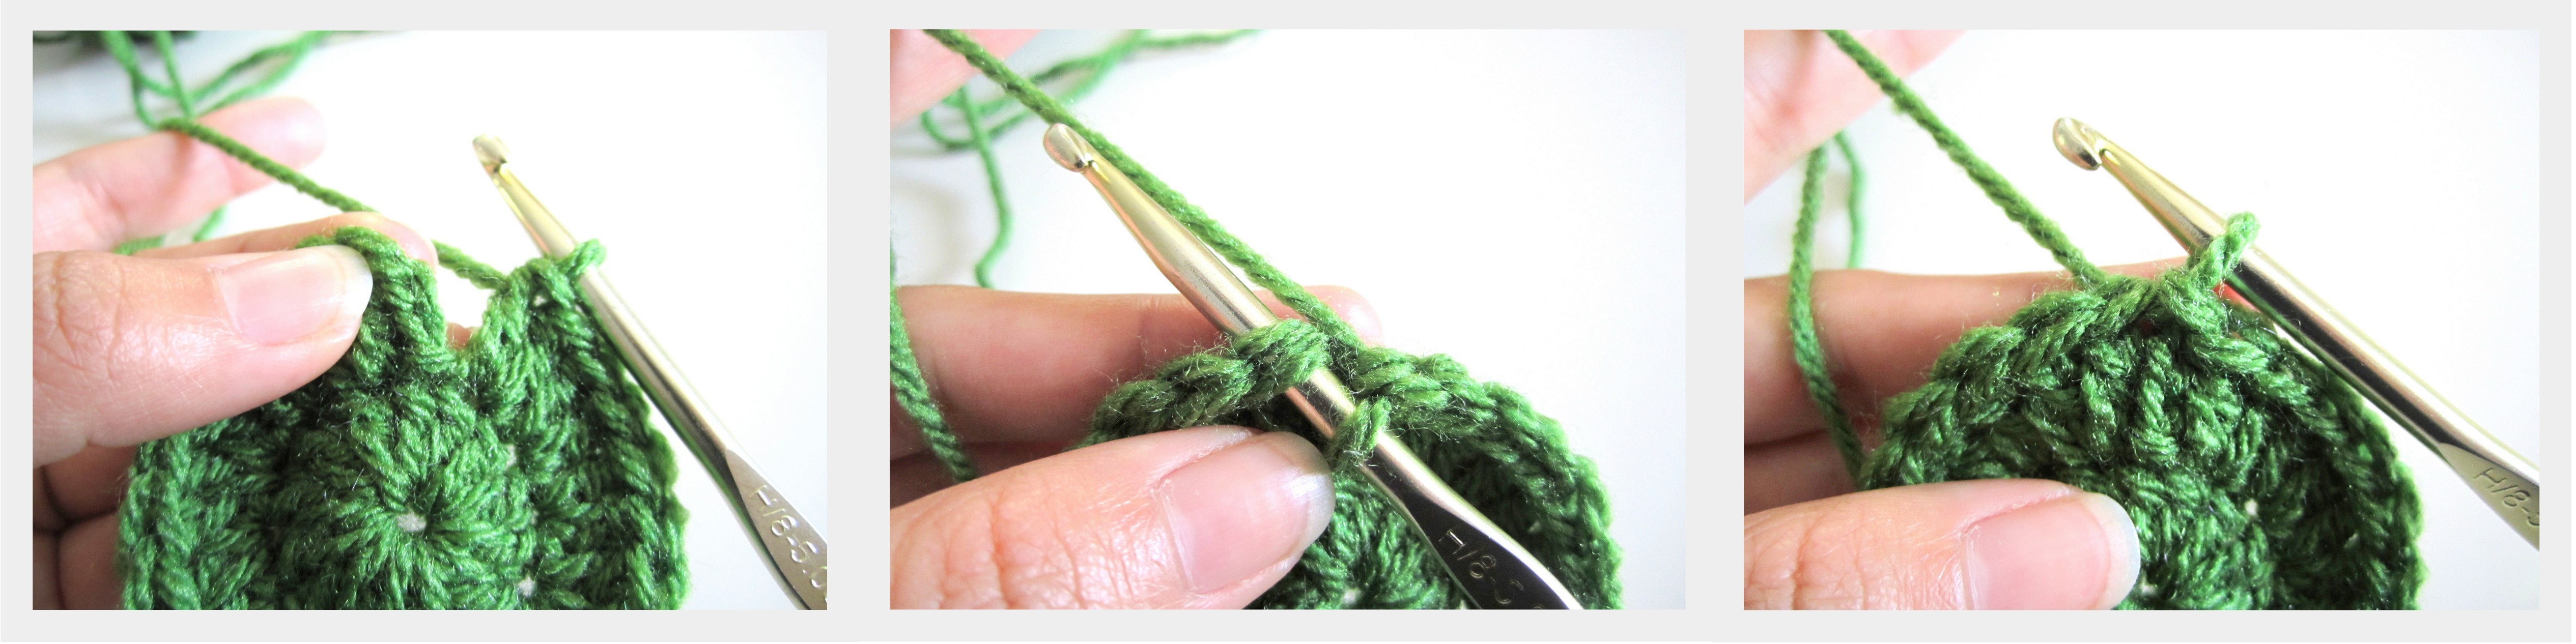
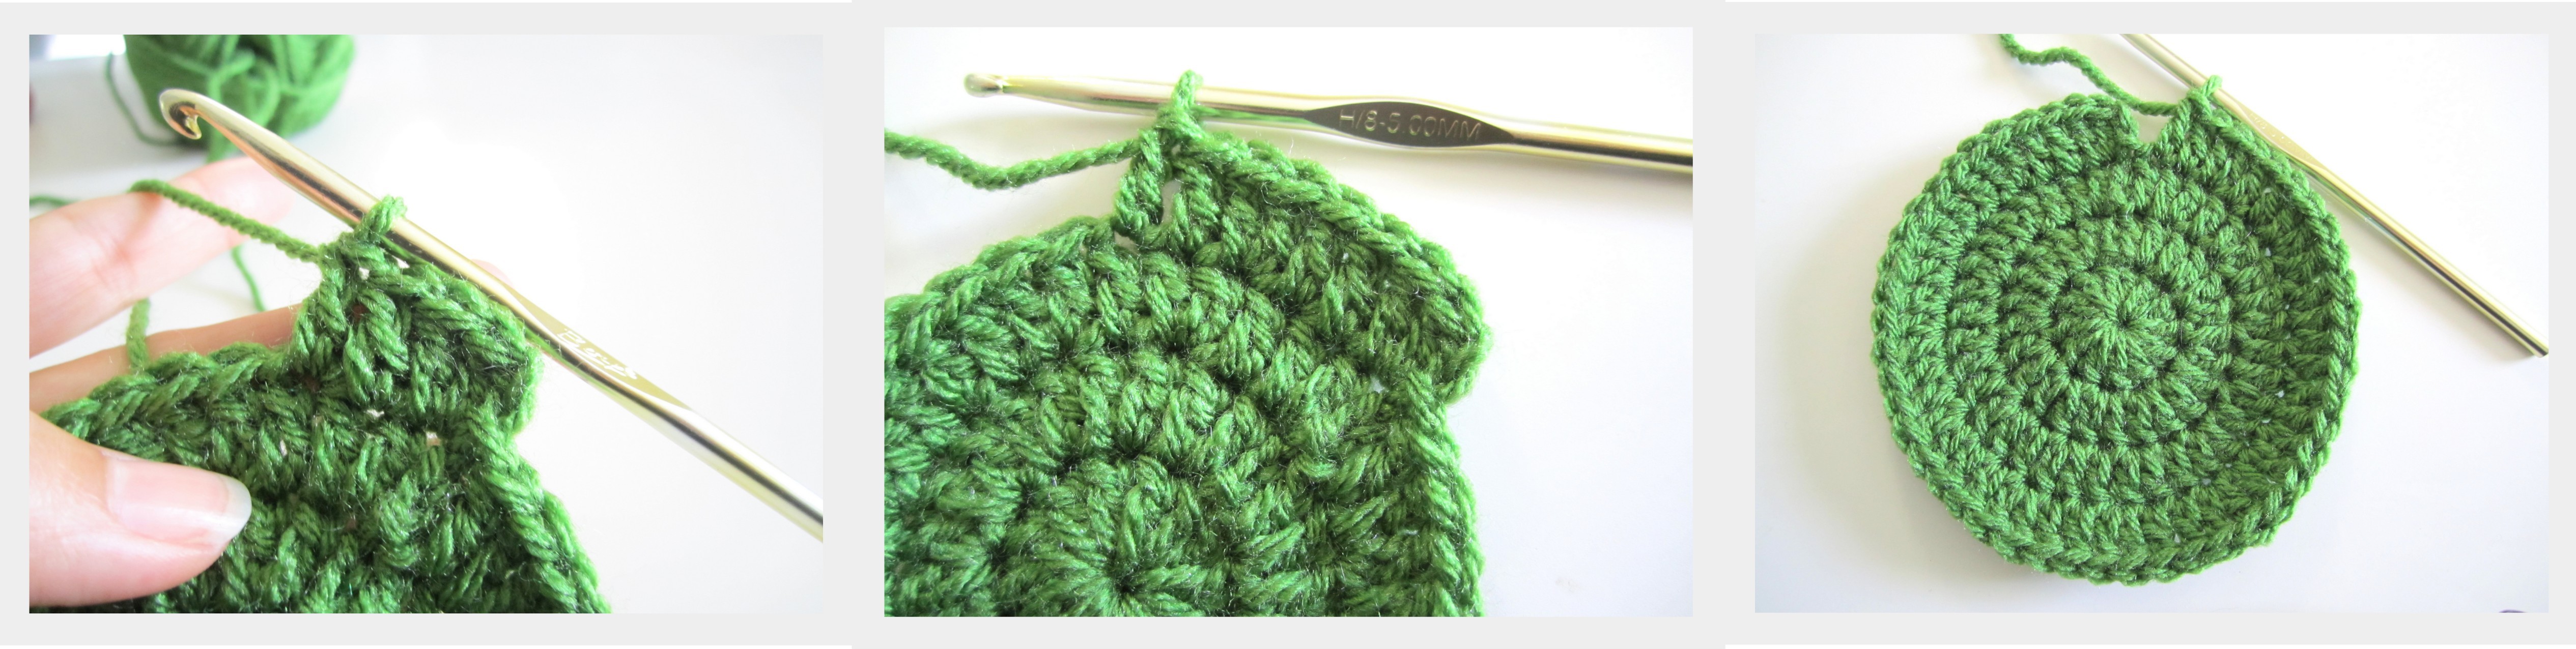
R5: no more increase (for this size only)
ch 2, only 1 DC into same stitch as ch 2, DC in every stitch around

once you reach the end of round 5, slip stitch into the top of the first DC like we have been.

R6: ch 2, 1 DC into same stitch as ch 2, DC in every stitch around
at the end of the round, slip stitch into the top of the first DC

R7: ch 2, 1 DC into same stitch as ch 2, DC in every stitch around
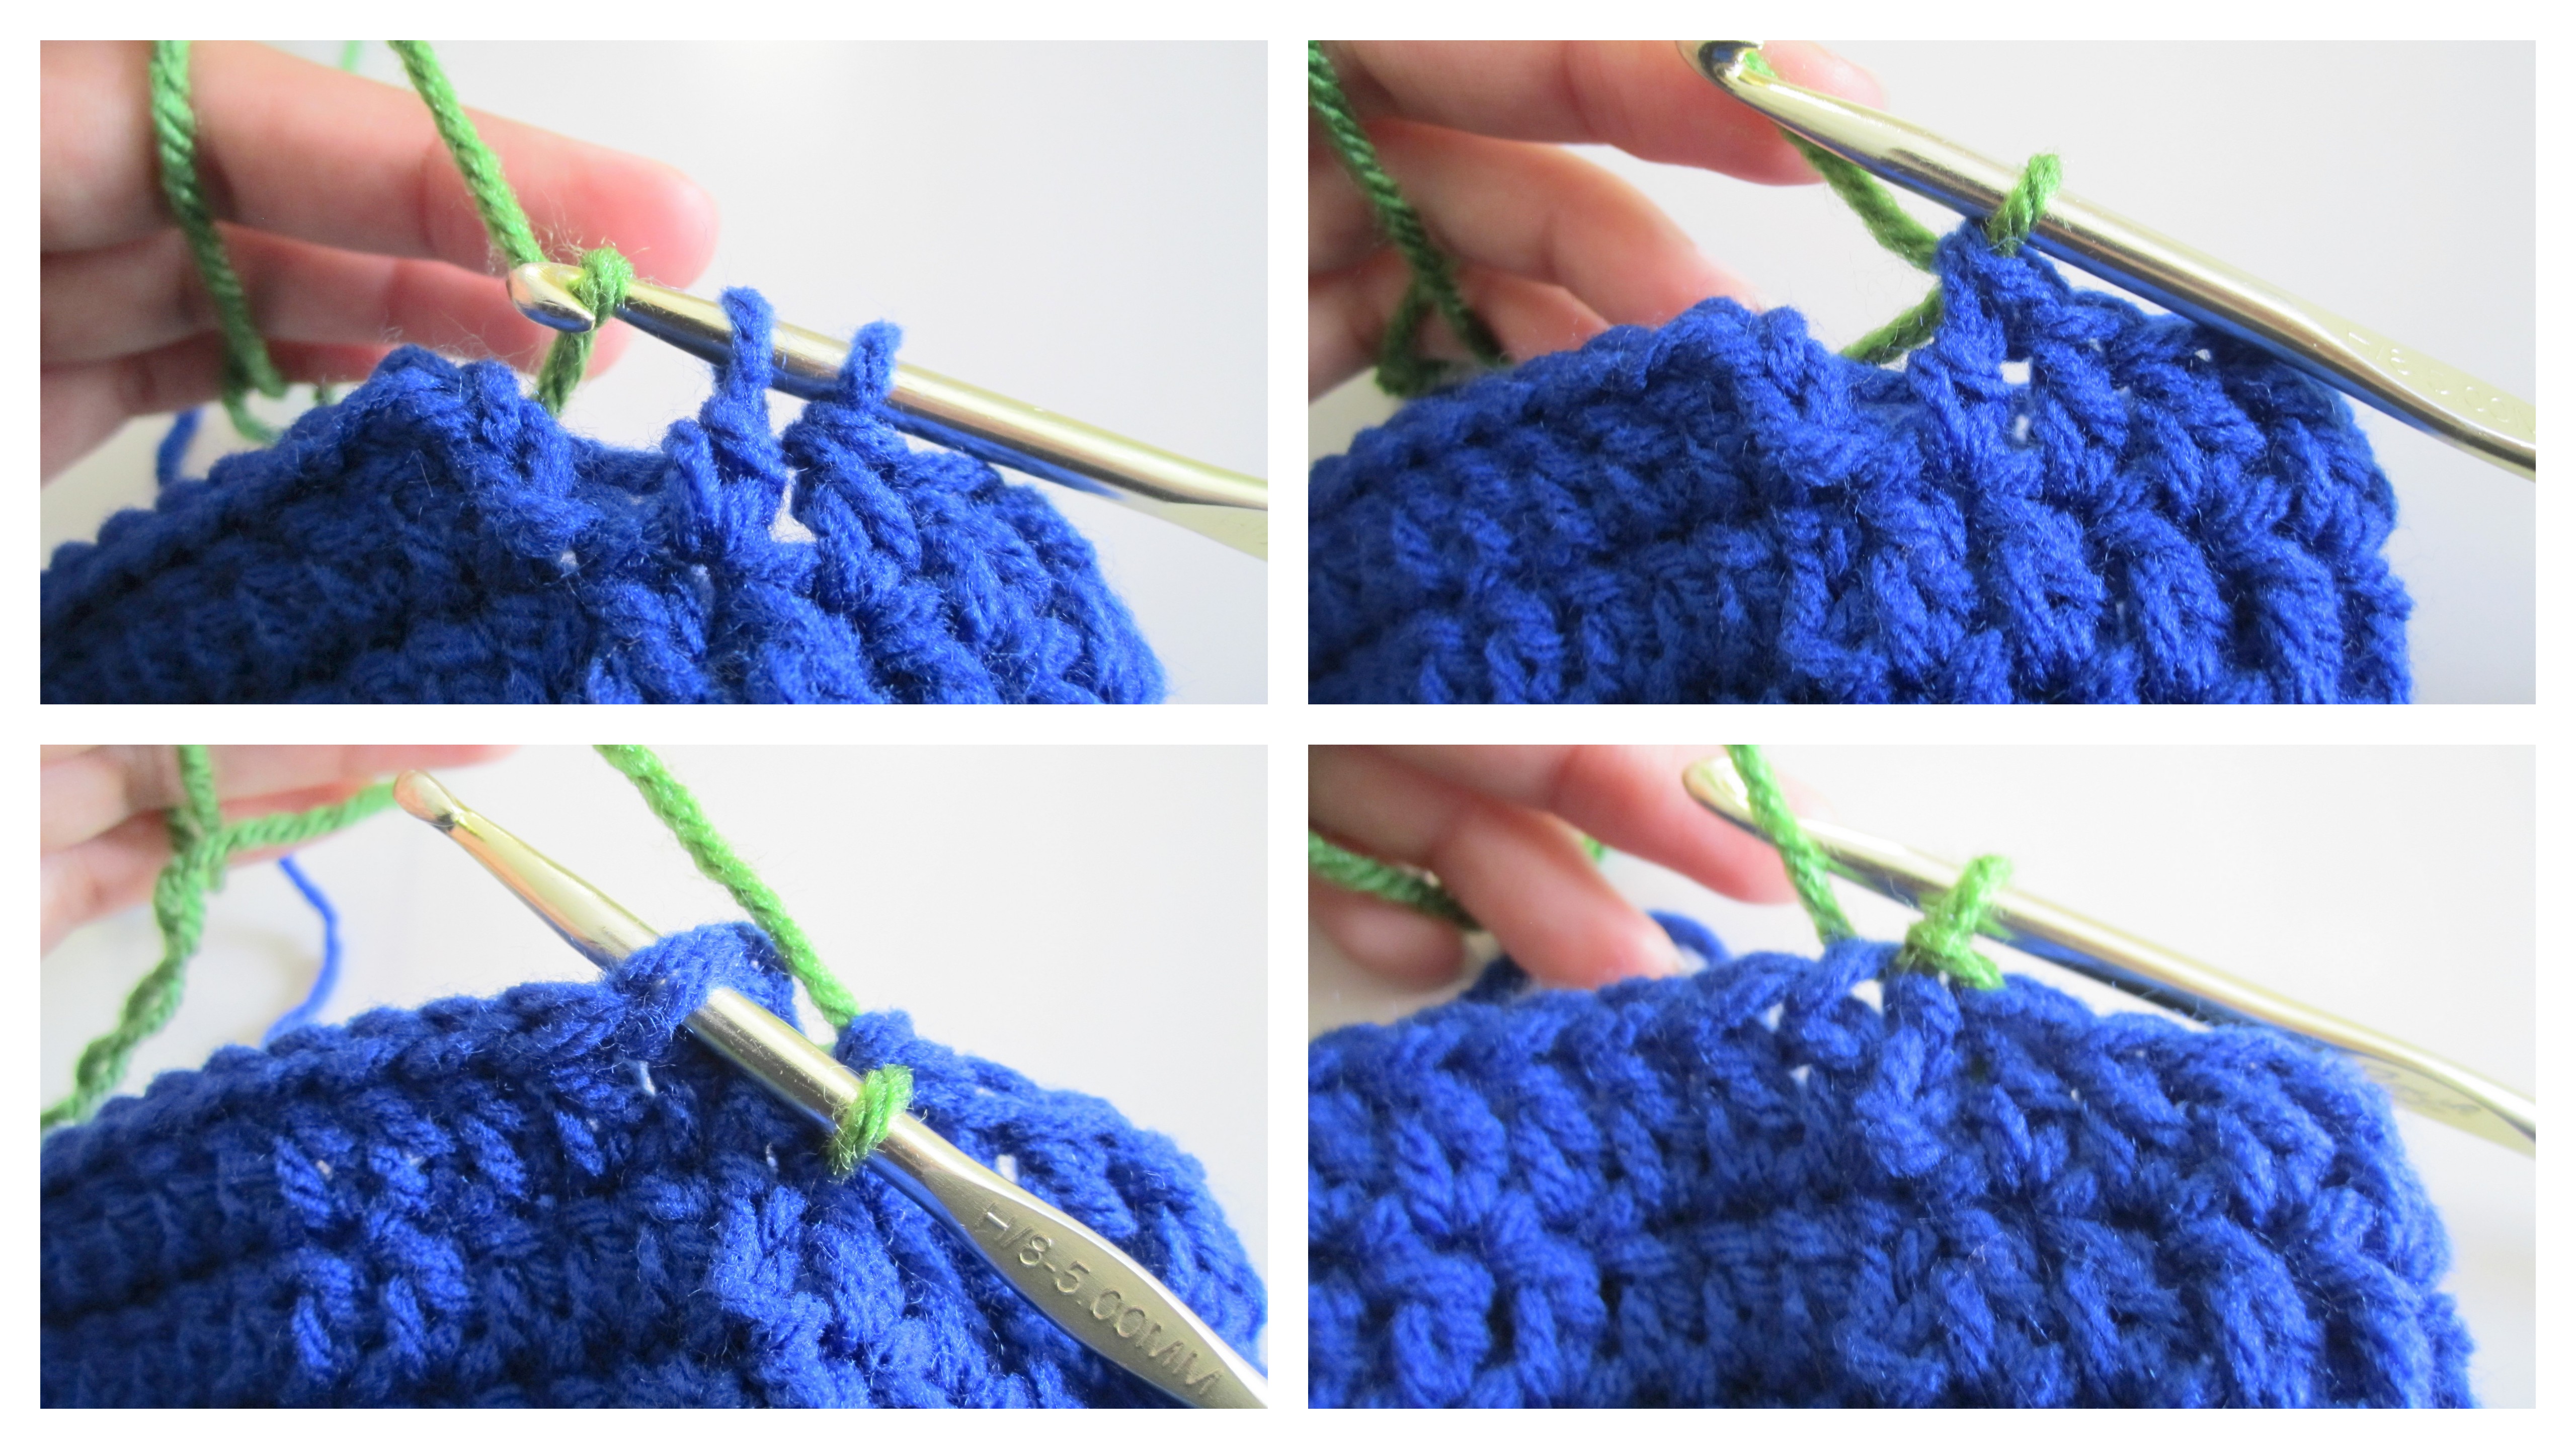
at the end of the round DO NOT slip stitch into the top of the first DC (like I did in this photo here)

start the last DC of the round but do not complete the stitch, leave 2 green ‘circles’ on the hook , slip knot your 2nd color, place new color onto hook

pull 2nd color thru to complete the last DC of the round, tuck the green yarn behind your work (no need to tie off the green, we will be needing it again), and locate the top of the first DC of the round.
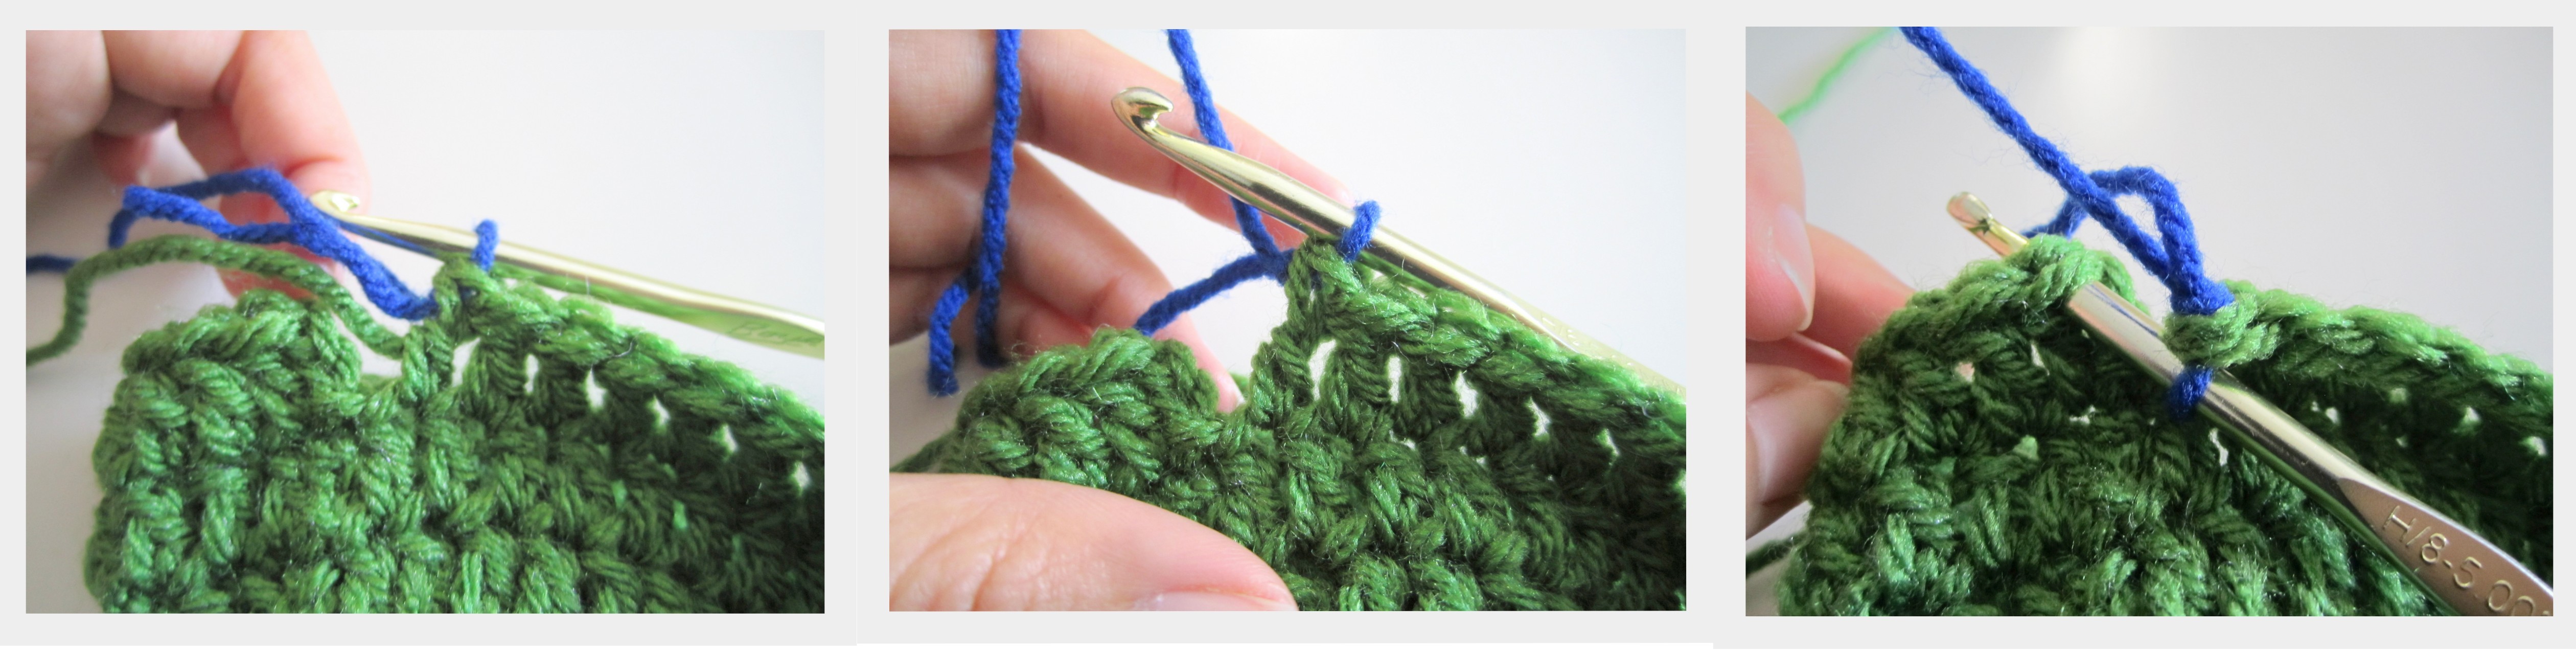
slip stitch thru top of the first DC. There you have it! A smooth color transition.
R8: chain 2
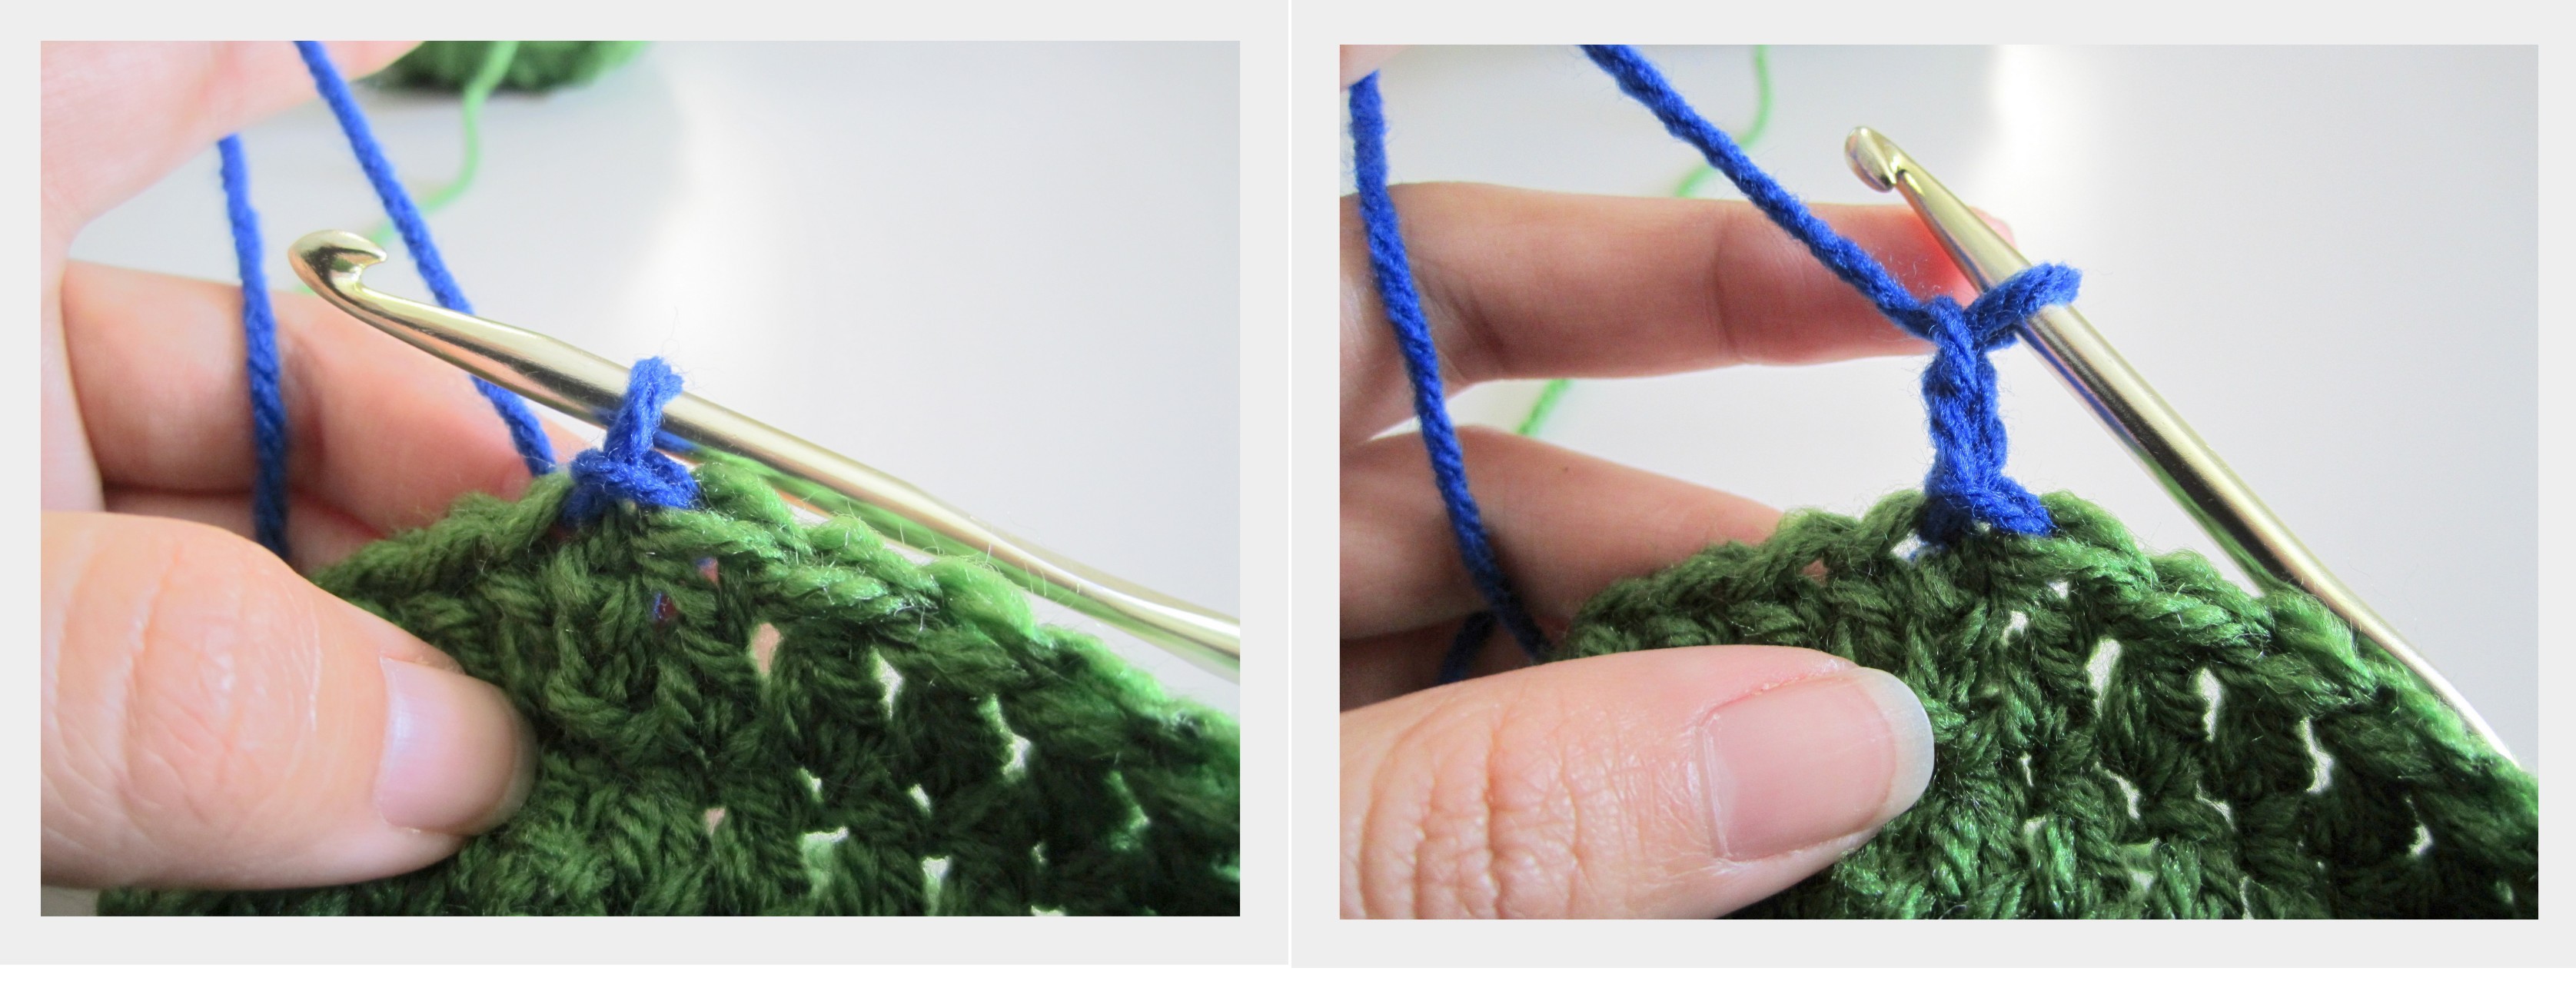
1 DC into same stitch as ch 2, DC around

slip stitch thru top of the first DC. see the hat coming together?

slip stitch thru top of the first DC

R10: ch 2, 1 DC into same stitch as ch 2, DC around
DO NOT slip stitch thru top of the first DC, we will be adding the green yarn back in for the next round.

grab the green yarn with the hook, pull thru the stitch completing the DC, NOW slip stitch into the first DC of the round
R11: tie off the 2nd color yarn now that it has fulfilled its duties, ch 2 with your green, DC into same stitch as ch 2


tie off at the end of this row. Base of the hat is complete!
***************************
Now for the eyes. I am sure there are many ways to create the eyes needed for the TMNT look. Feel free to experiment on your own. Use felt, buttons, or anything you’d like.
This is my way.
Grab your white and black bits of yarn, size G hook, and scissors.

starting with the white (the eyeball)
make a slip knot, chain 3
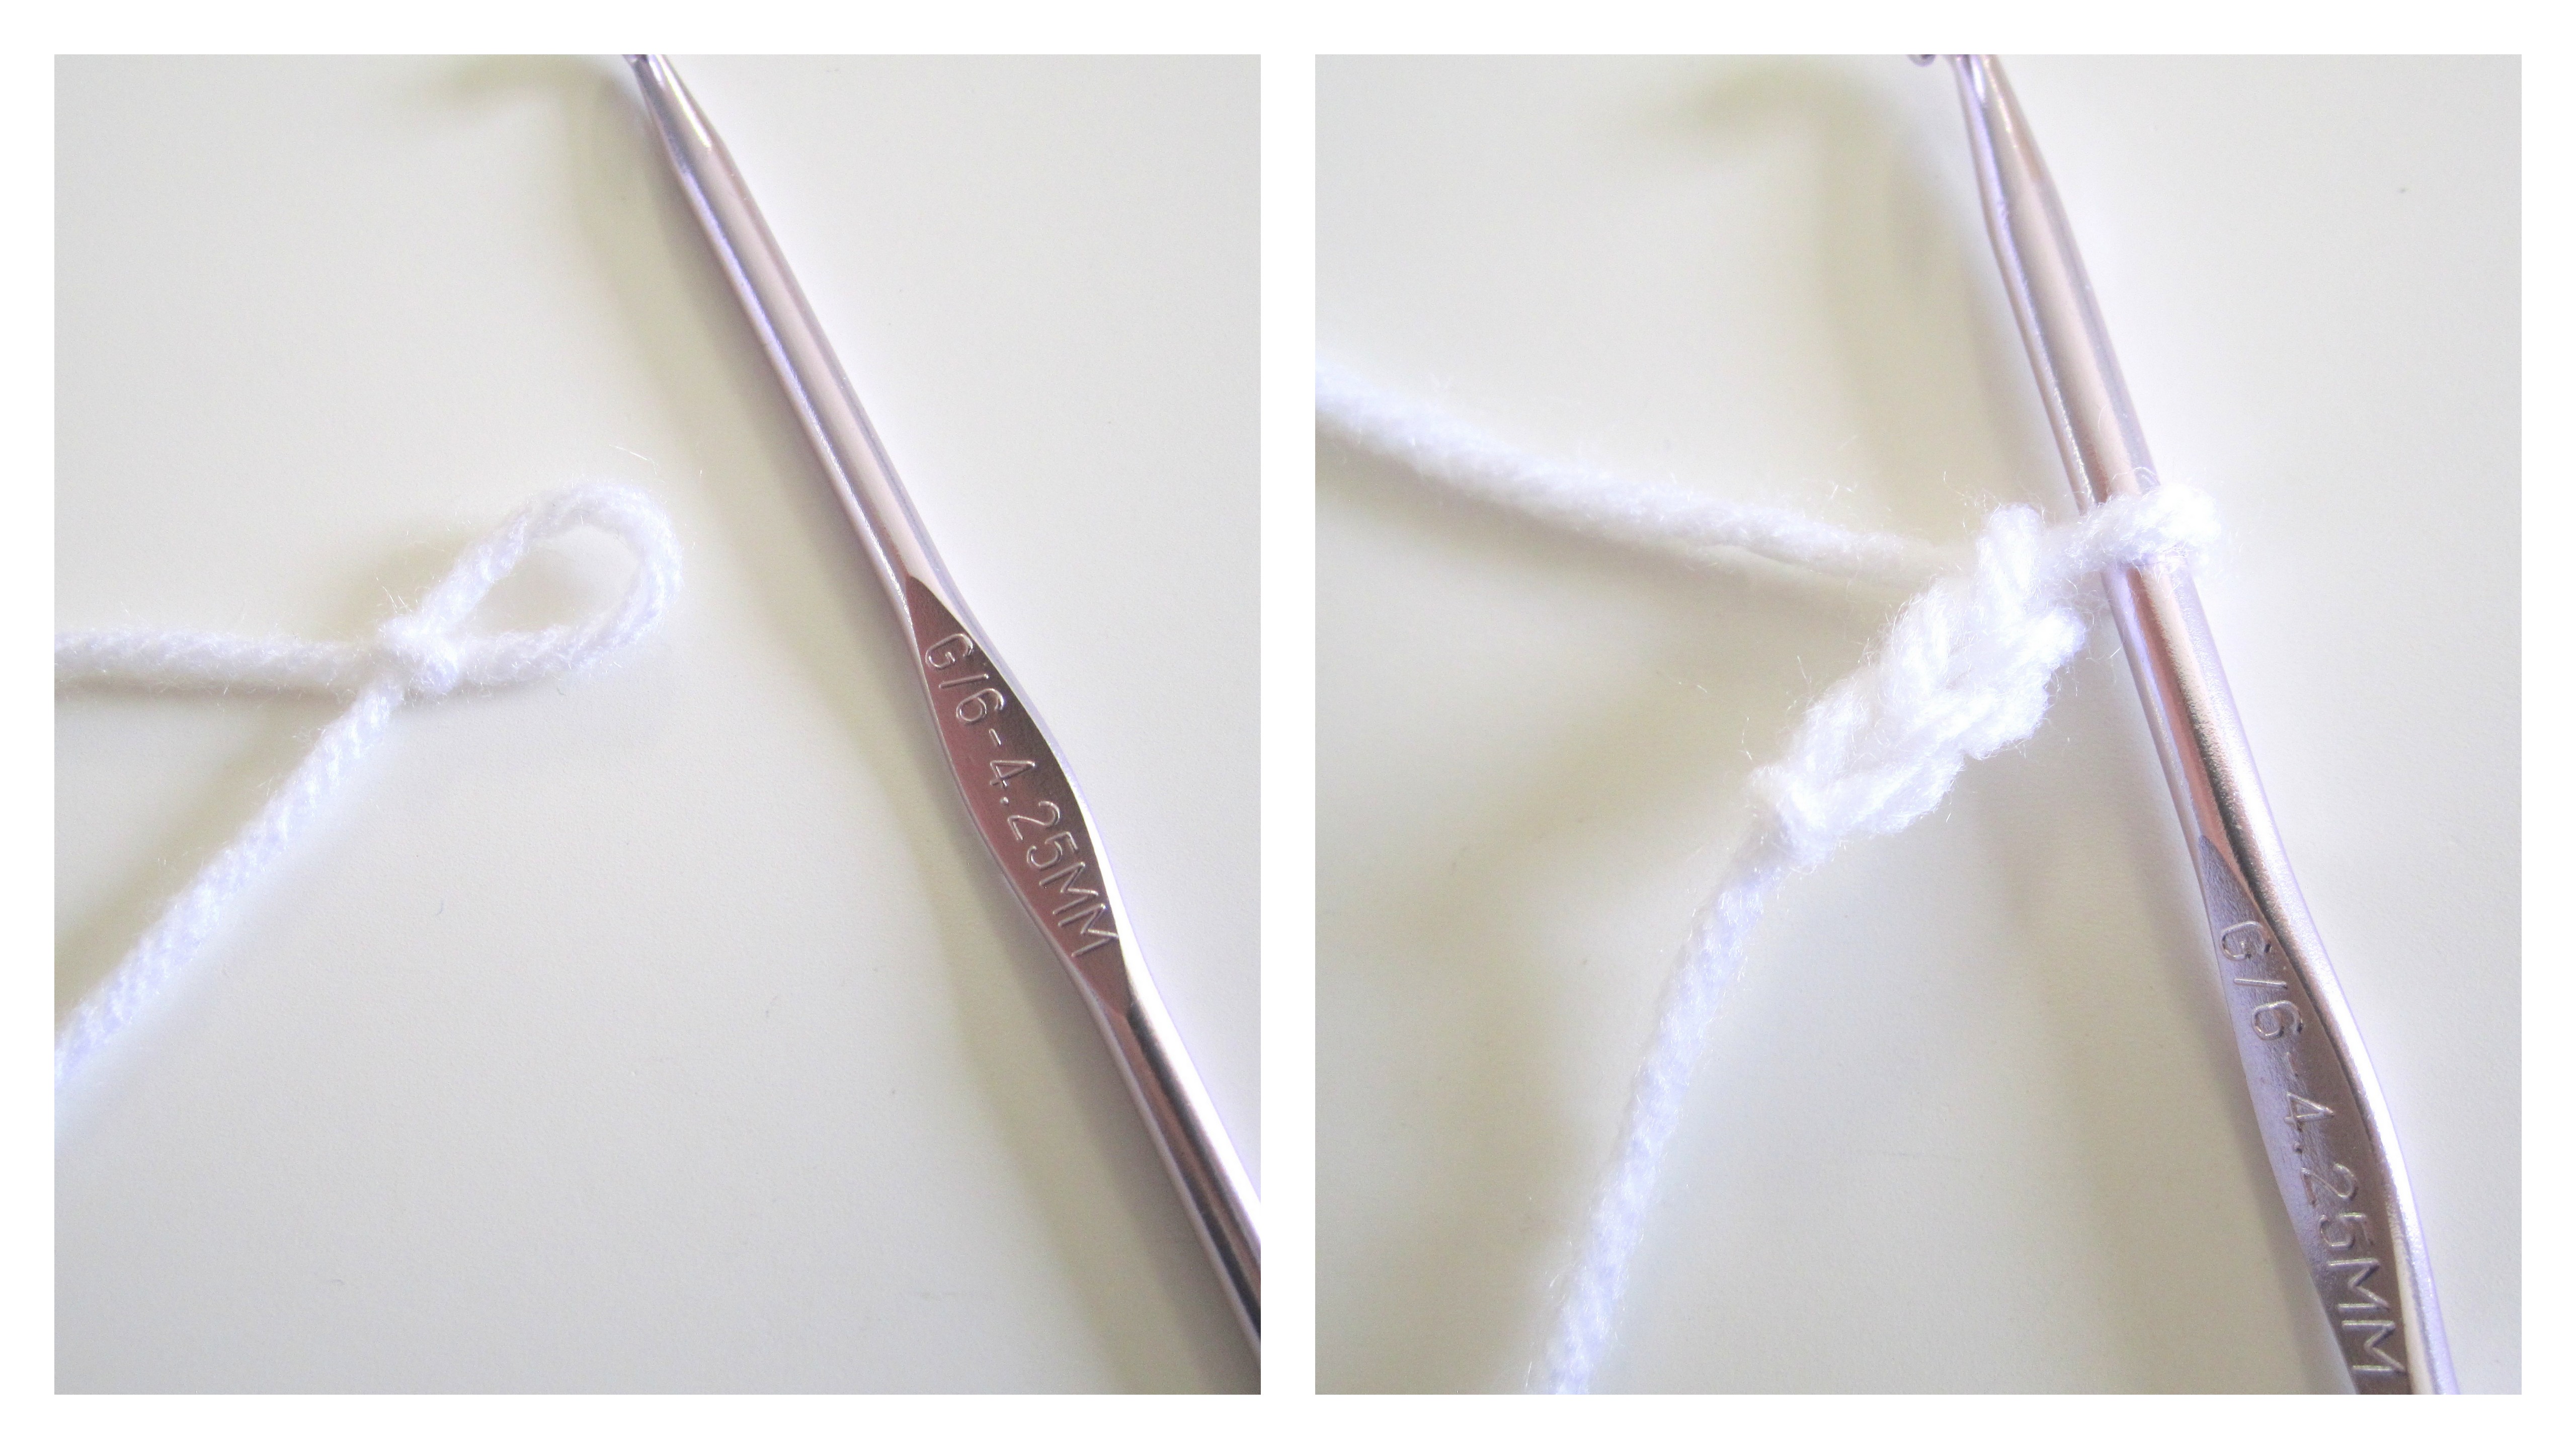
locate the 3rd chain from the hook, DC into that chain
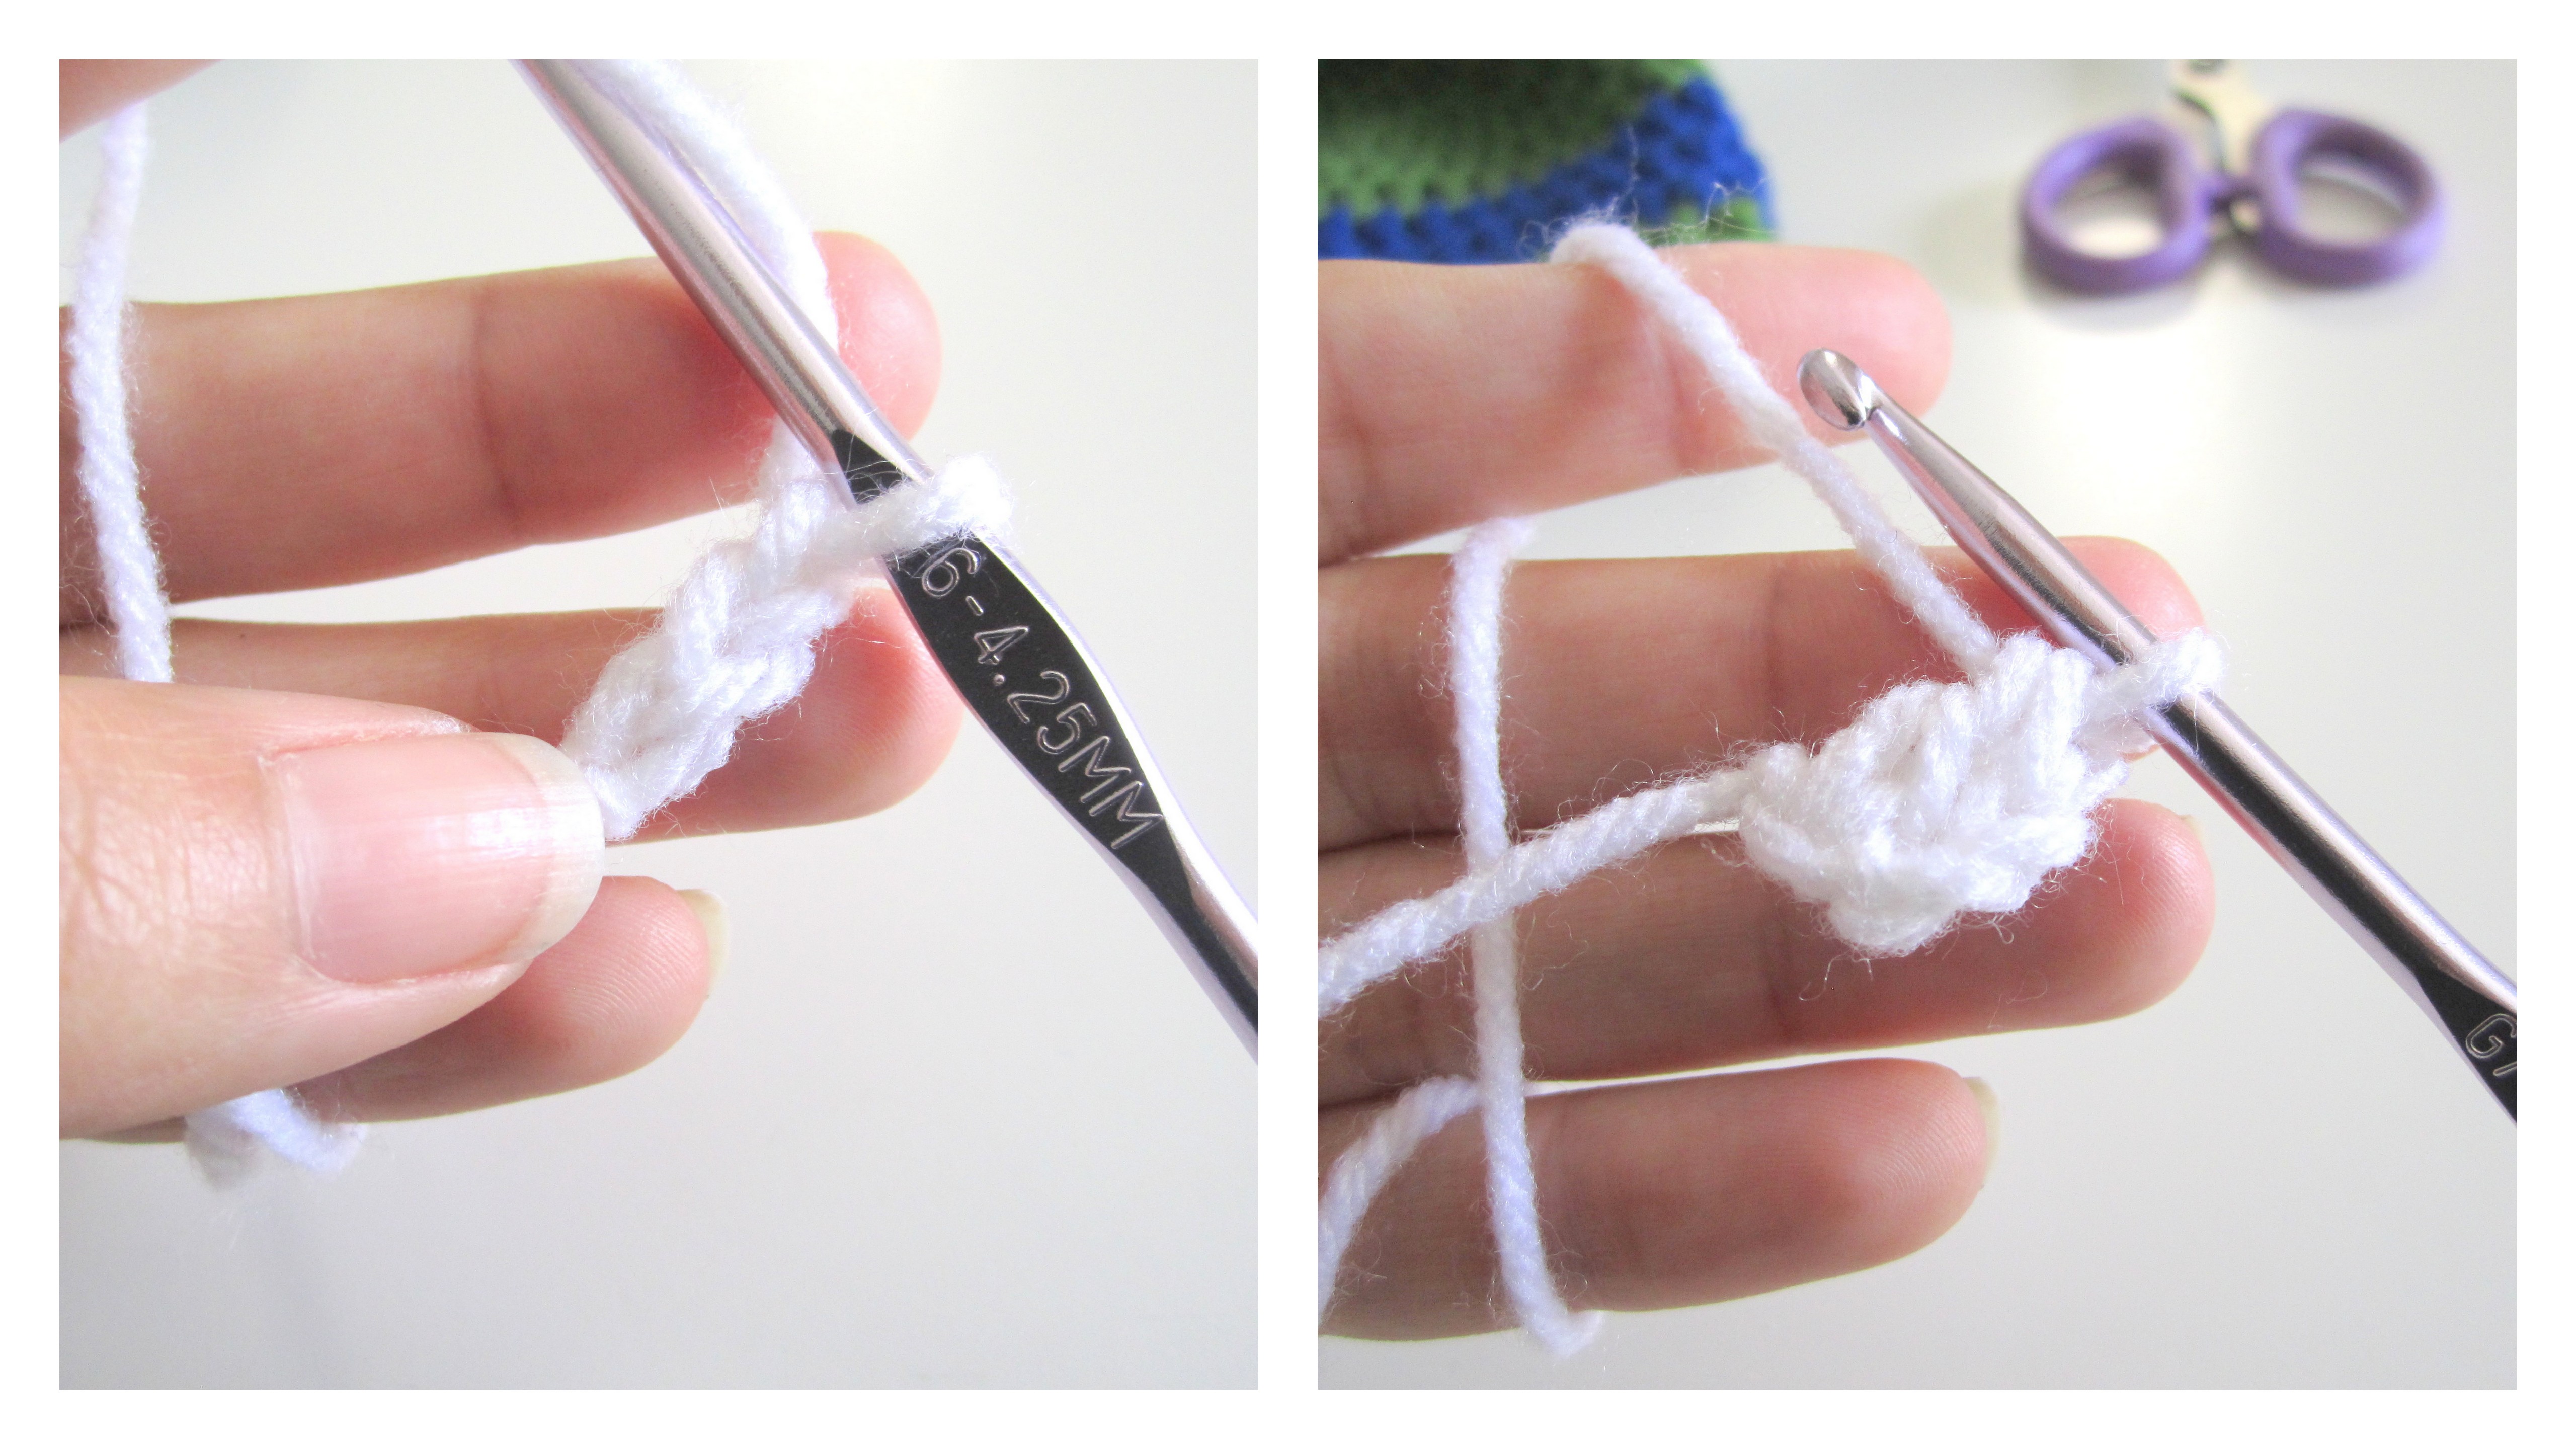
DC 4 more times into the same stitch (5 DC total)
this creates sort of a half circle

in order to achieve this look, treble crochet 2 into the same stitch we are already working in.


Grab your black yarn (pupil) and same G hook
start with a magic circle, 6 single crochets inside the circle, slip stitch to the first sc of the round
tighten your magic circle
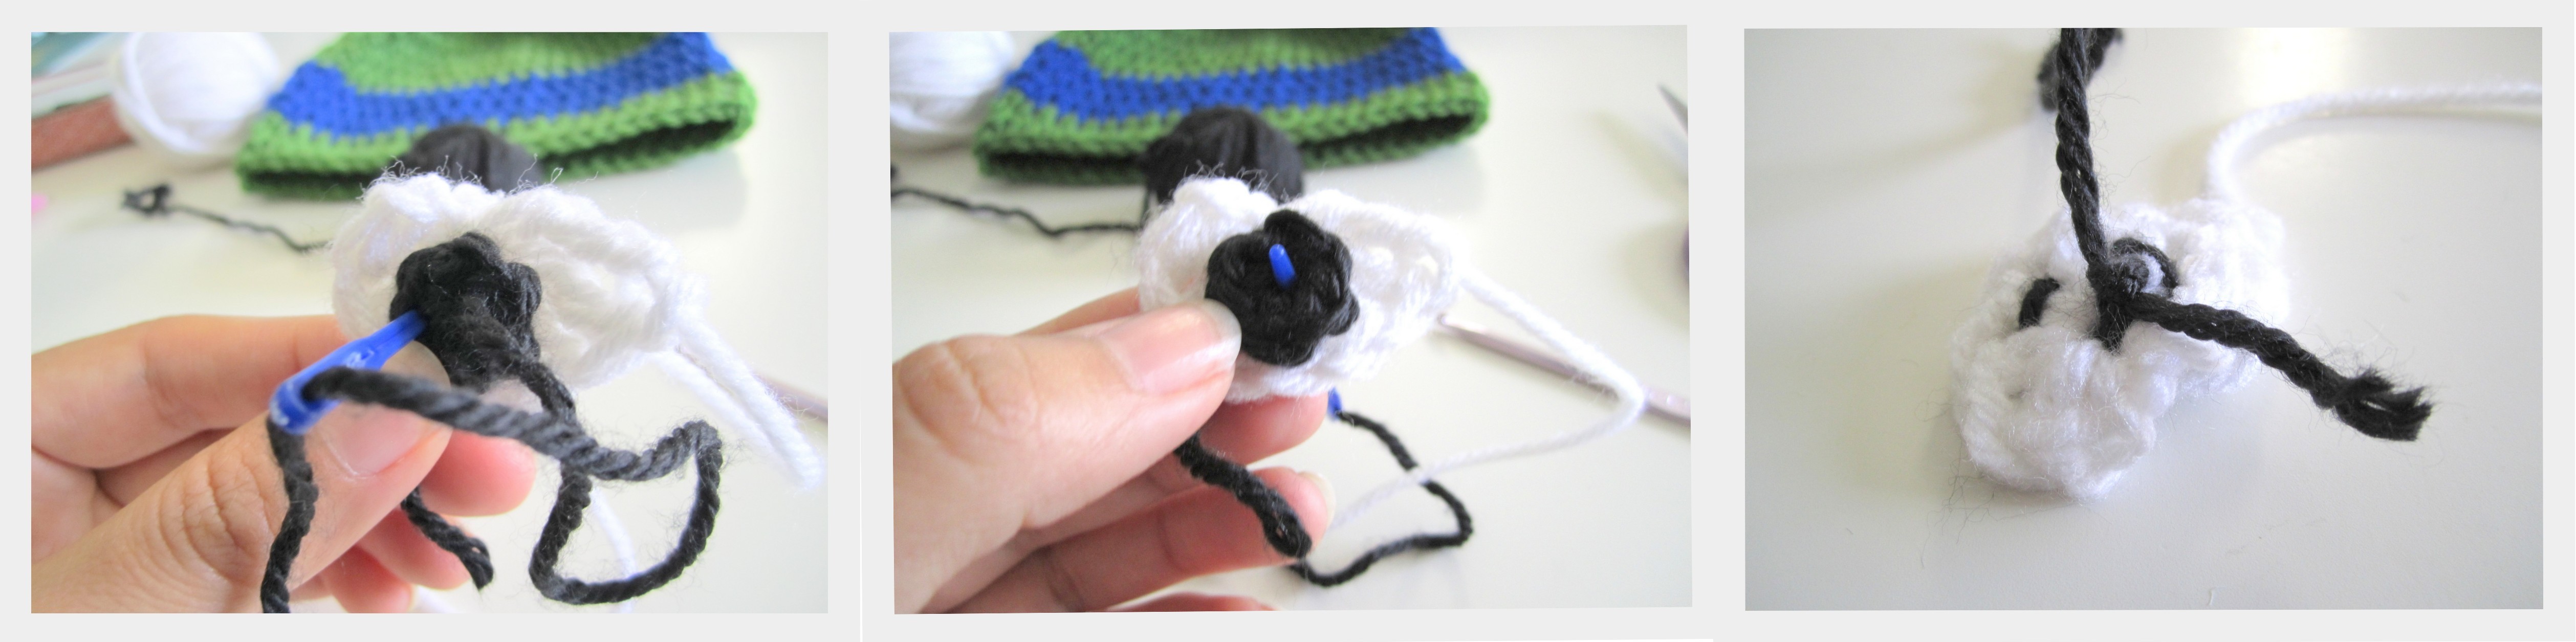
tie off, leaving extra long tail for sewing onto eyeball (white yarn)

we will need to use a tapestry needle to sew the black circle onto the white applique

thread the black yarn onto the needle

place the black circle where you like it, and start threading it directly onto the white piece.
I go thru the center space and into the single crochets on the outside of the circle. Anyway will work, as long as its secure.
I finish by tieing the ends of the black yarn on the backside to keep the pieces from coming apart.

EXCEPT the second “eyeball” (white part) will have to be flipped once complete before adding the black circle. It is necessary to finish the 2nd eye on the reverse due to the “winged” corner of the eye being on one end of the white applique. We want that “winged” end on both outsides of the eyes to give it that realistic face.


thread the long white tail thru your needle

and carefully start sewing the eye onto the hat. There is no wrong way to do this really. I just do it as neatly as possible to hide the stitches on the front. The inside can look like this and its ok! make sure to weave in your ends well.

Now do the other eye.
Tada!

This finished picture tutorial measures 16 inches in circumference, perfect for a baby up to 6 months.
This pattern can easily be increased for larger sizes.
I will provide written patterns for those common larger sizes. All supplies remain the same.
**************************
Toddler 1-3 years old / 19 inches circumference, 7 inches long
R1: Magic Circle, 12 DC
R2: ch 2 (does not count as a DC), 2DC in same stitch, 2 DC in every stitch around (24 DC)
R3: ch 2, 2 DC in same stitch as ch 2, 1 DC in next stitch. *2 DC in next, 1 DC in next*, repeat * * around. (36 DC)
R4: ch 2, 2 DC in same stitch as ch 2, 1 DC in next, 1 DC in next. *2 DC in next, 1 DC in next, 1 DC in next*. repeat * * around (48 DC)
R5: ch 2, 2 DC in same stitch as ch 2, 1 DC into each of the next 7 stitches. *2 DC in next, 1 DC in each of the next 7*. repeat * * around.
R6: ch 2, 1 DC in same stitch as ch2, 1 DC in every stitch around.
R7: ch 2, 1 DC in same stitch as ch2, 1 DC in every stitch around.
R8: ch 2, 1 DC in same stitch as ch2, 1 DC in every stitch around.
R9: , ch 2, 1 DC in same stitch as ch2, 1 DC in every stitch around.
R10: ch 2, 1 DC in same stitch as ch2, 1 DC in every stitch around.
R11: ch 2, 1 DC in same stitch as ch2, 1 DC in every stitch around.
R12: < add green color back in for this round>, ch 2, 1 DC in same stitch as ch2, 1 DC in every stitch around.
R13: ch 2, 1 DC in same stitch as ch2, 1 DC in every stitch around.
tie off, weave in ends
Eyes
Size G hook
– white:
chain 3, 5 DC into 3rd chain from hook, 2 treble crochet, tie off with long tail
– black:
magic circle, 6 sc into circle, tighten circle, slit stitch into top of first sc, tie off with long tail
sew black circle onto white “eyeball” (applique)
>>for 2nd eye, place black circle onto white applique that has been flipped over <<
sew eyes onto “mask” portion of the hat where desired
——————-
Child 4-10 years old / 20 inches circumference, 8 inches long
R1: Magic Circle, 12 DC
R2: ch 2 (does not count as a DC), 2DC in same stitch, 2 DC in every stitch around (24 DC)
R3: ch 2, 2 DC in same stitch as ch 2, 1 DC in next stitch. *2 DC in next, 1 DC in next*, repeat * * around. (36 DC)
R4: ch 2, 2 DC in same stitch as ch 2, 1 DC in next, 1 DC in next. *2 DC in next, 1 DC in next, 1 DC in next*. repeat * * around (48 DC)
R5: ch 2, 2 DC in same stitch as ch 2, 1 DC in next, 1 DC in next, 1 DC in next. *2 DC in next, 1 DC in next, 1 DC in next, 1 DC in next*. repeat * * around (60 DC)
R6: ch 2, 1 DC in same stitch as ch2, 1 DC in every stitch around.
R7: ch 2, 1 DC in same stitch as ch2, 1 DC in every stitch around.
R8: ch 2, 1 DC in same stitch as ch2, 1 DC in every stitch around.
R9: ch 2, 1 DC in same stitch as ch2, 1 DC in every stitch around.
R10: , ch 2, 1 DC in same stitch as ch2, 1 DC in every stitch around.
R11: ch 2, 1 DC in same stitch as ch2, 1 DC in every stitch around.
R12: ch 2, 1 DC in same stitch as ch2, 1 DC in every stitch around.
R13: < add green color back in for this round>, ch 2, 1 DC in same stitch as ch2, 1 DC in every stitch around.
R14: ch 2, 1 DC in same stitch as ch2, 1 DC in every stitch around.
R15: ch 2, 1 DC in same stitch as ch2, 1 DC in every stitch around.
tie off, weave in ends
Eyes
Size G hook
– white:
chain 3, 5 DC into 3rd chain from hook, 2 treble crochet, tie off with long tail
– black:
magic circle, 6 sc into circle, tighten circle, slit stitch into top of first sc, tie off with long tail
sew black circle onto white “eyeball” (applique)
>>for 2nd eye, place black circle onto white applique that has been flipped over <<
sew eyes onto “mask” portion of the hat where desired
*****************************
Like I said at the beginning of this post, I am available for questions. Feel free to use this pattern just remember to give credit where its due. Do not claim this pattern as your own. Thats not nice.