

After an unexpected positive response to my crochet minion kids hat, I was asked about providing a pattern. I thought about trying to draft up a fancy PDF file and post it for sale, but I am no crochet expert and besides, writing a formal pattern would take me f-o-r-e-v-e-r. I would be happier giving crocheters out there a fun tutorial to make their own minion characters.

Anyone else who would like to purchase the finished item can do so thru our Etsy shop where it is listed in various children’s sizes.
The following detailed tutorial is for a child 3-5 years old for a 20 inch head circumference.
An abbreviated pattern for others sizes will be towards the bottom of this post.
I apologize for the poor quality of the photos, as I was very eager to get this post out to those who requested. My vampire schedule makes it difficult to take good photos without the natural daylight. Especially when I’m stuck indoors most of the time.
======================================
What you will need:
Crochet Hook: H/8-5.00mm (US)
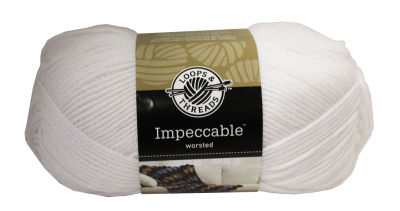
Yarn– Worsted weight medium (4) yarn, I use Loops & Theads Impeccable in the following colors:
> Butterscotch (yellow)
> Popsicle Blue
> Black (small amount)
> White (small amount)
> True Gray (small amount)
======================================
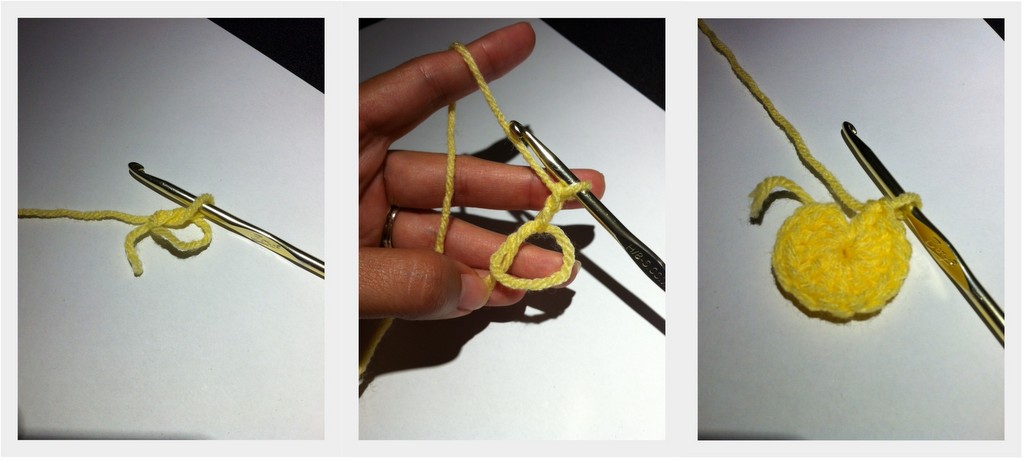
The base of the hat starts with a magic circle. For those not familiar, there are oodles of magic circle tutorials and instructional videos available online. Try this link here for an easy to follow tutorial.
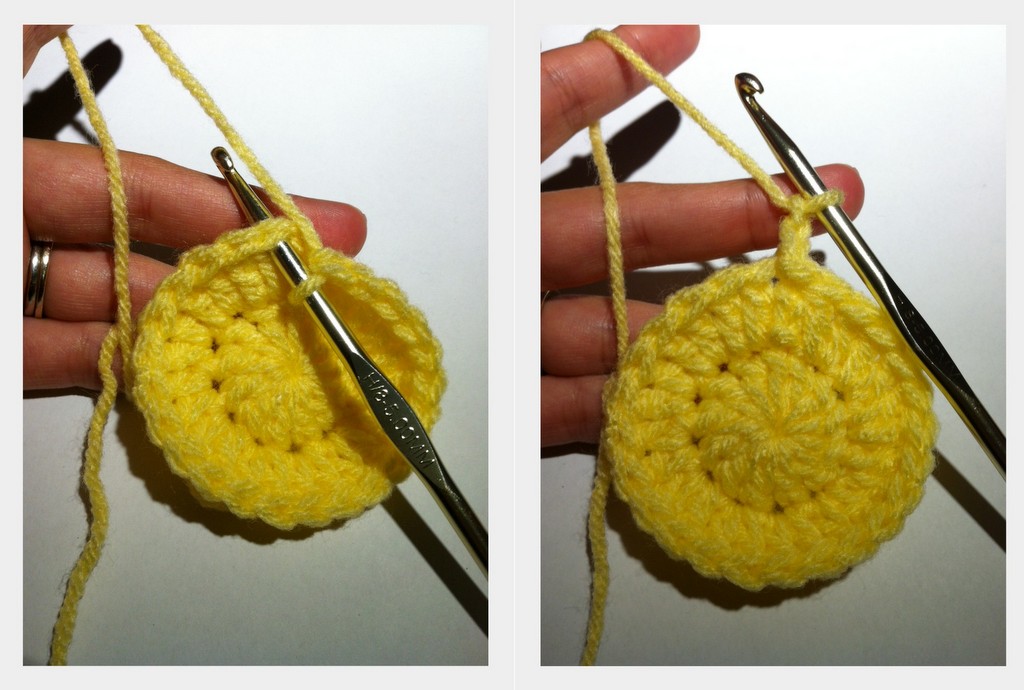
R1: starting the yellow color, create a magic circle.
Once the magic circle has been looped onto the hook, chain 2 ( from here on, ch2 will not count as a stitch for body of the hat)
12 DC (double crochet) into the magic circle, and close up the circle by pulling on the short strand of yarn.
chain 2 (remember does not count as a double crochet)
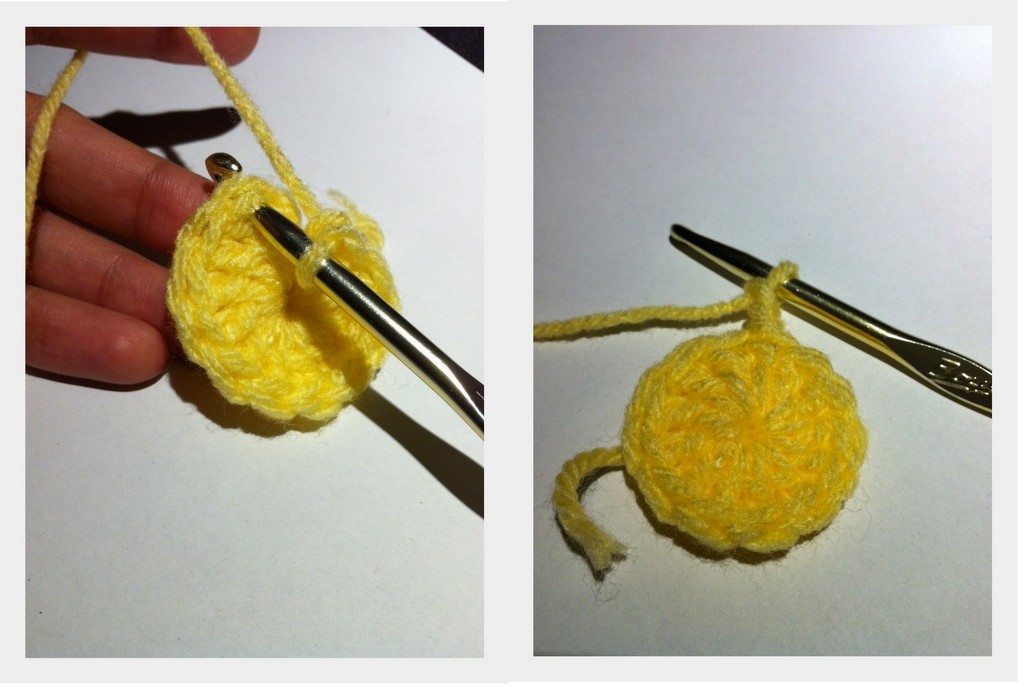
2 DC into the same stitch as the chain 2
2 DC in every stitch around (total 24 DC)
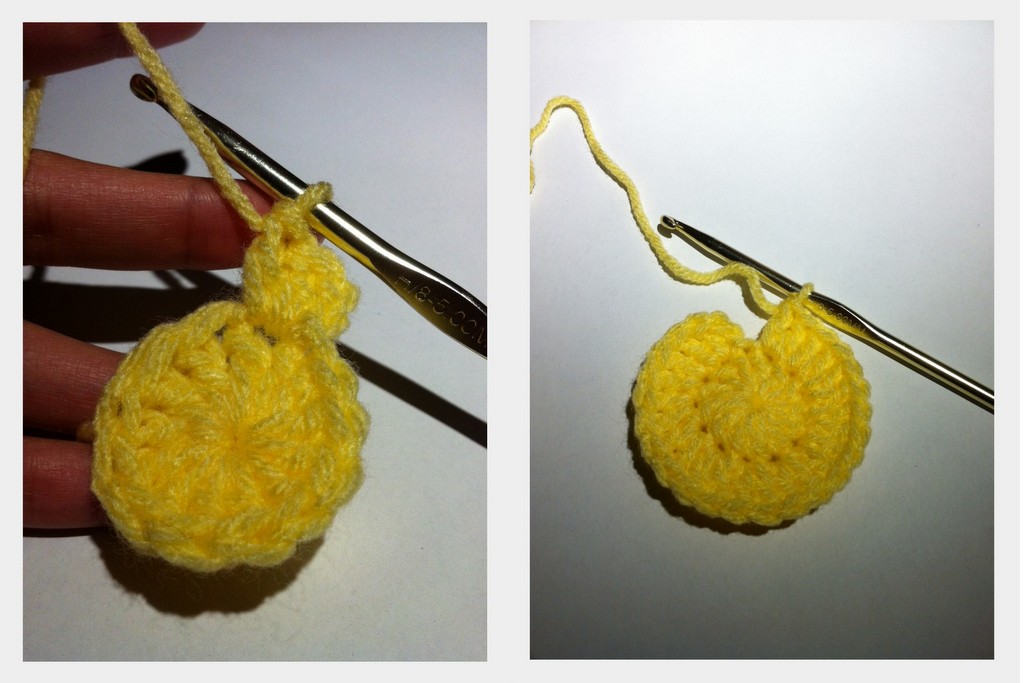
chain 2
2 DC in same stitch as ch2, 1 DC in the next stitch
2 DC in the next stitch, 1 DC in the next
Continue with this increase all the way around (total 36 DC)
slip stitch to the top of the first DC
ch 2
2 DC in same stitch as ch 2, 1 DC in next, 1 DC in next
repeat increase of *2 DC, 1 DC, 1 DC* around (total 48 DC)
slip stitch to the top of the first DC
R5: another increase (not pictured)
ch 2
2 DC in same stitch as ch 2, 1 DC in next, 1 DC in next, 1 DC in next
repeat increase of *2 DC, 1 DC, 1 DC. 1 DC* around (total 60 DC)
slip stitch to the top of the first DC
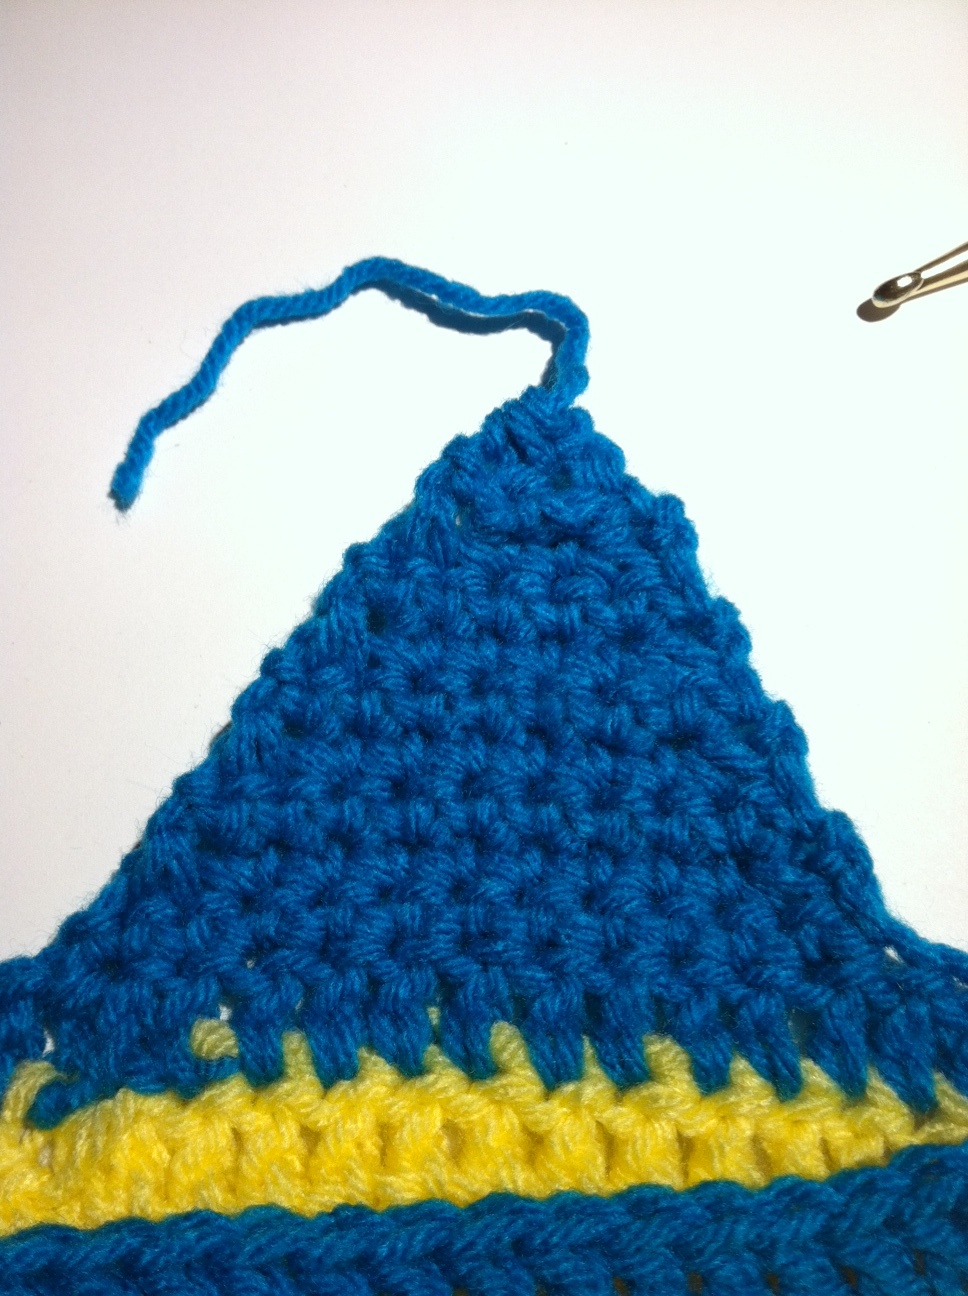
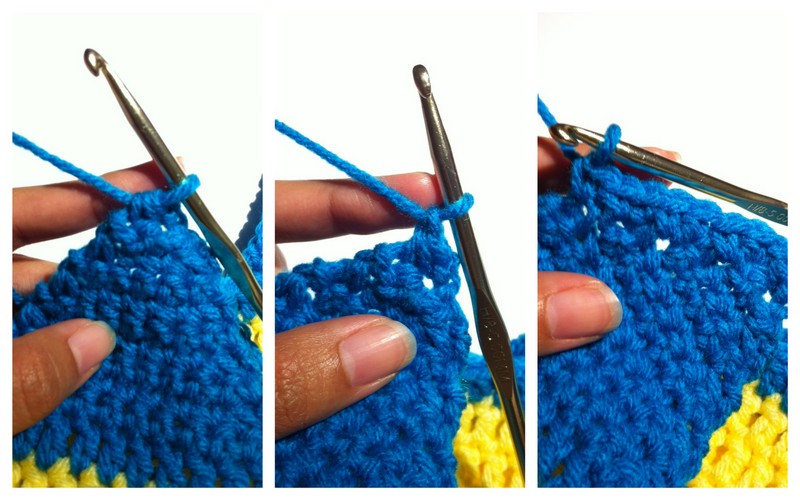
R6: no more increase
ch 2
1 DC in same stitch as ch 2
Continue around with 1 DC in every stitch
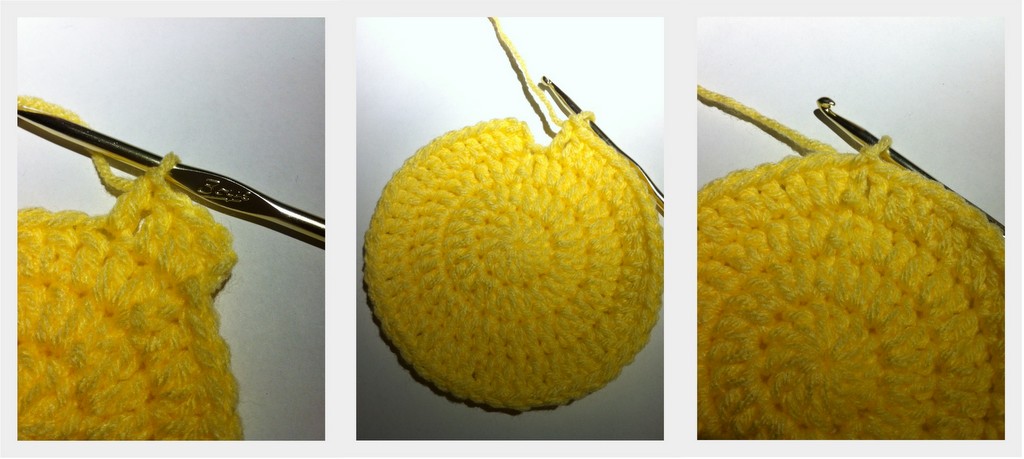
We will be adding the color for the next row in a seamless way
On the last DC from R6, only partially complete the stitch, leaving 2 loops on the hook
Tie a slip knot onto the black yarn, and place onto the hook
Pull black yarn thru the stitch, completing the DC
Find the top of the first DC of the row
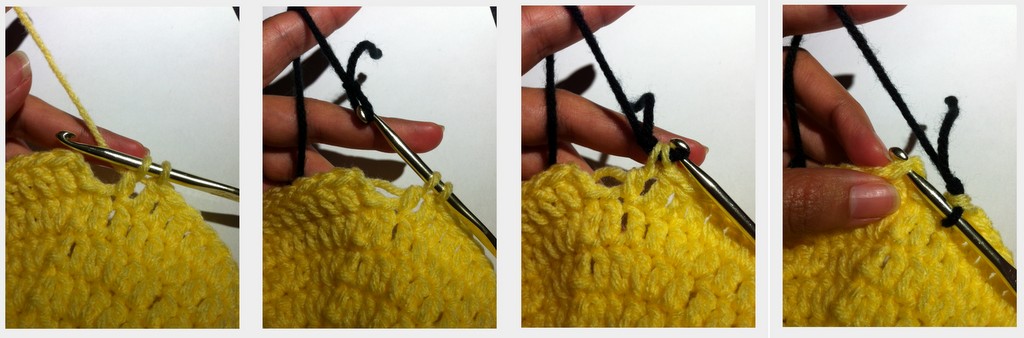
Yarn joining is complete!
chain 2

1 DC in same stitch as ch 2
1 DC in each stitch around
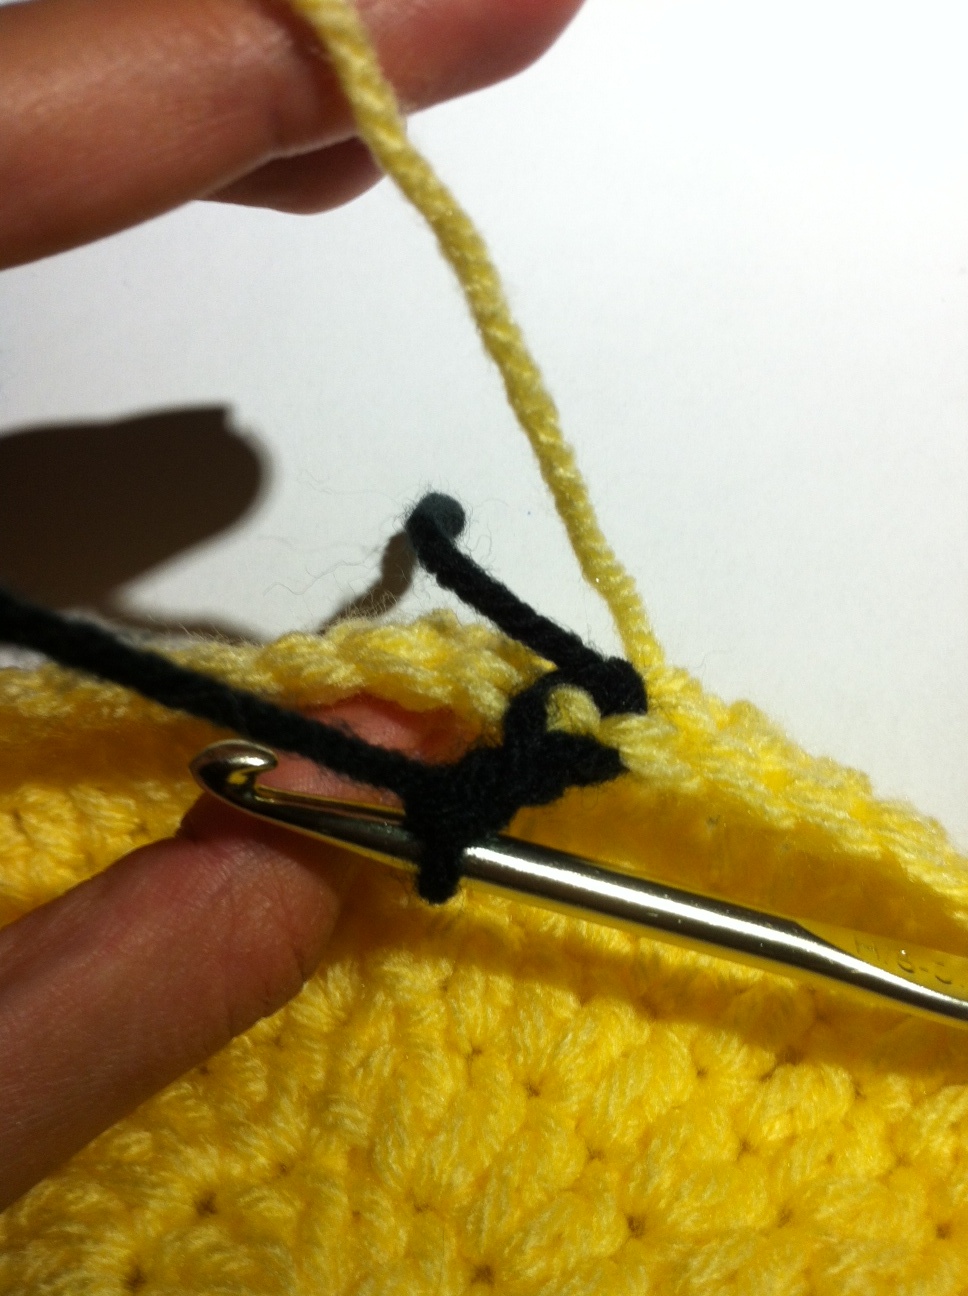
On the last DC, only partially complete the stitch, leaving 2 black loops on the hook
Pick up the yellow yarn and pull thru the stitch, completing the DC
chain 2
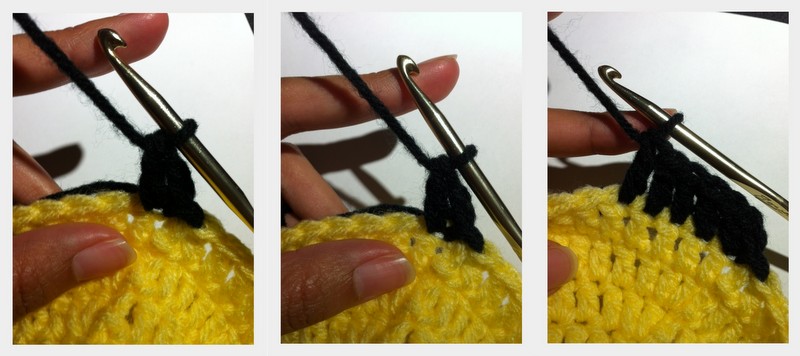
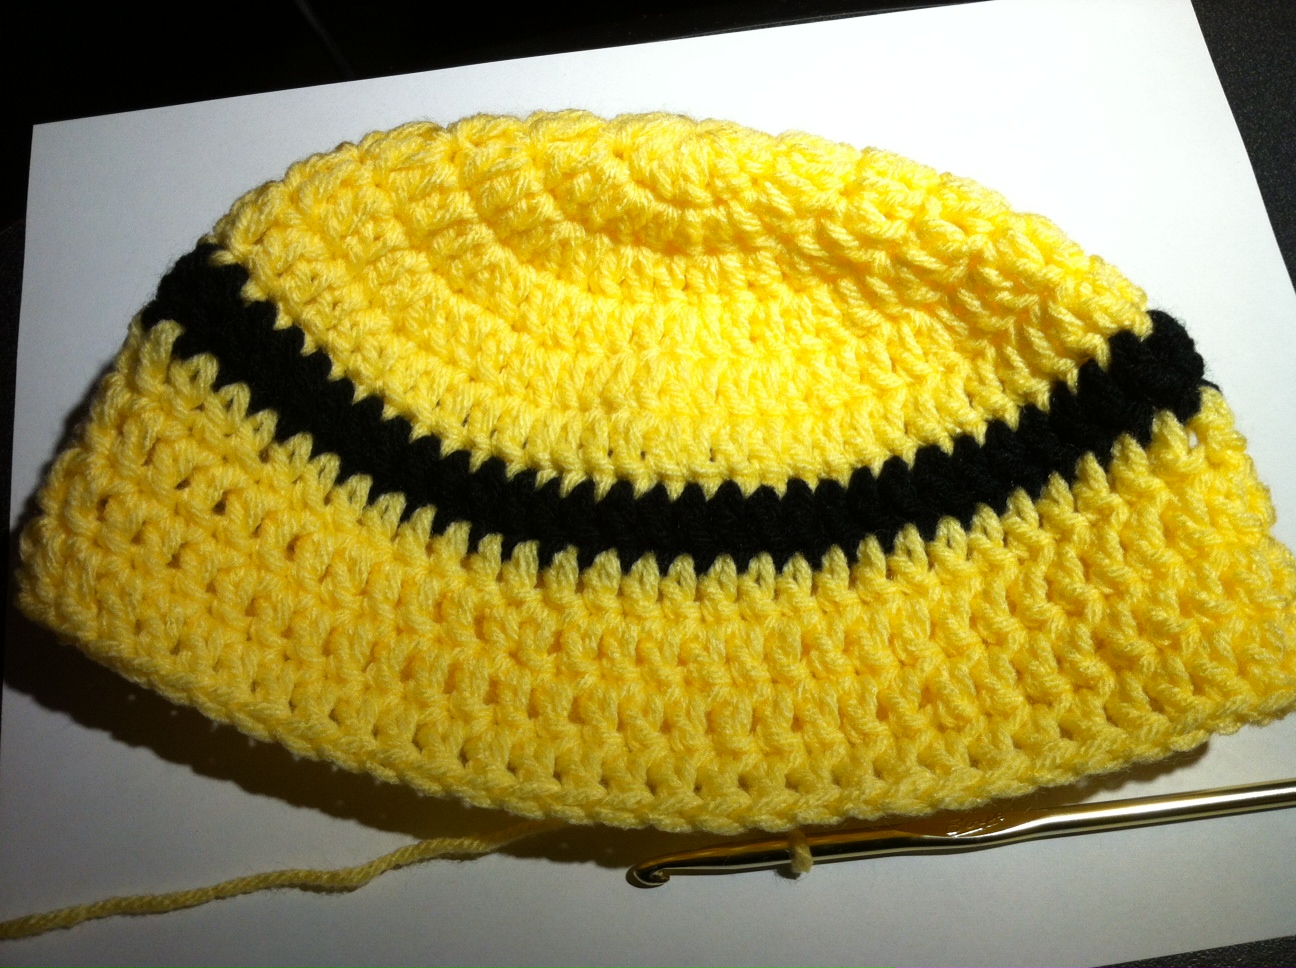
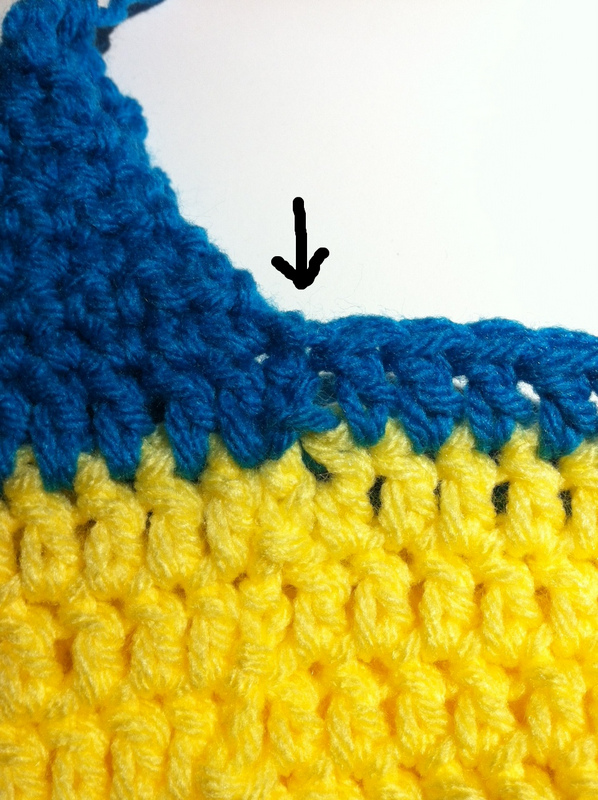
R8: 1 DC into each stitch around, slip stitch into top of first DC
Starting to look like a hat

R9 – R12 : repeat R8
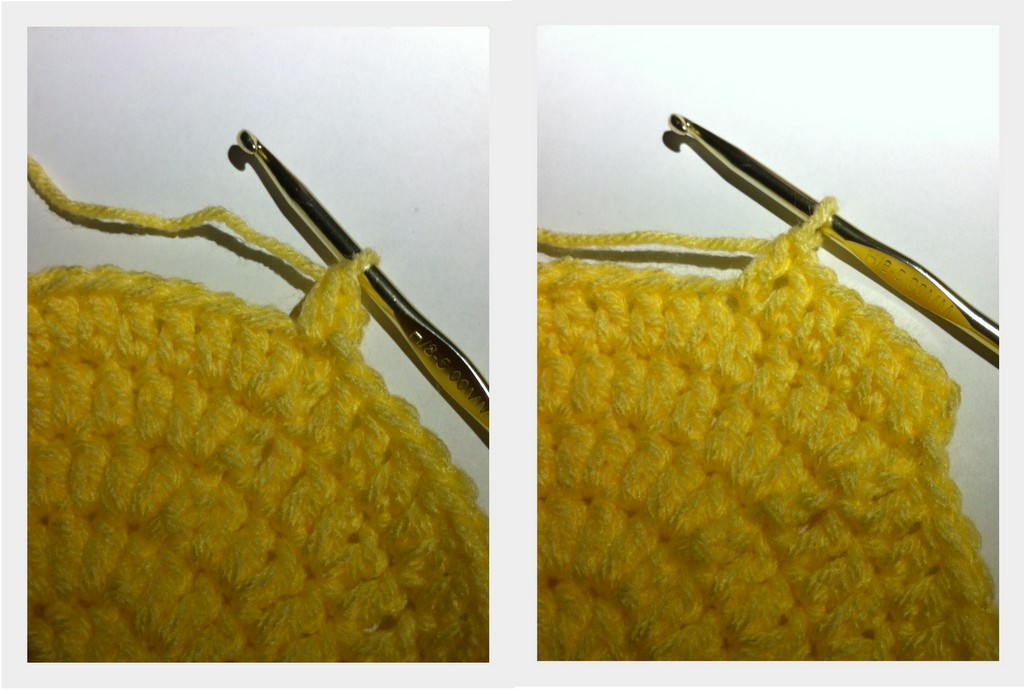
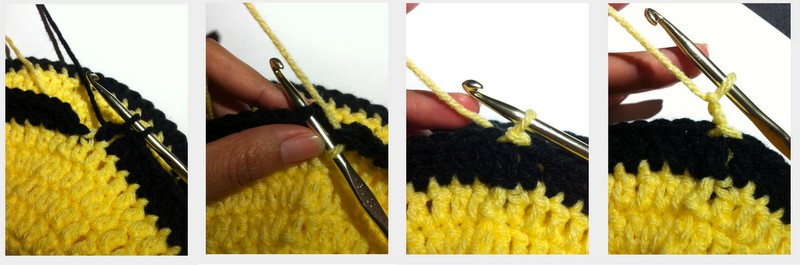
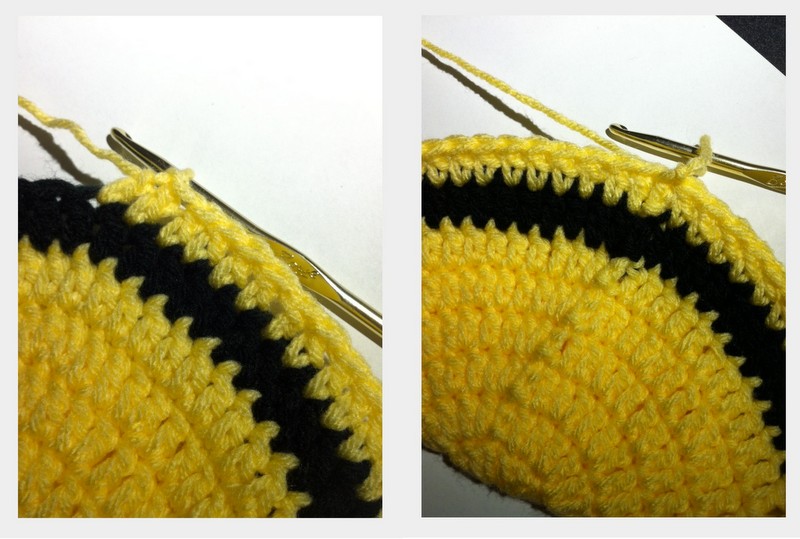
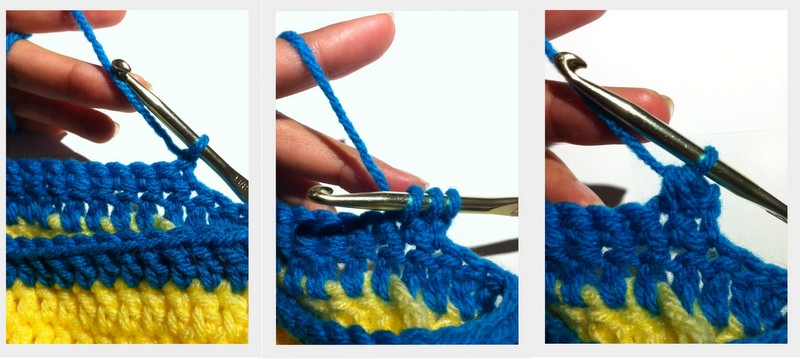
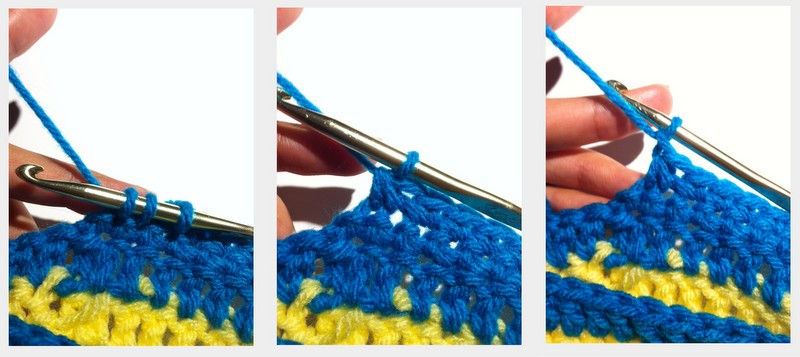
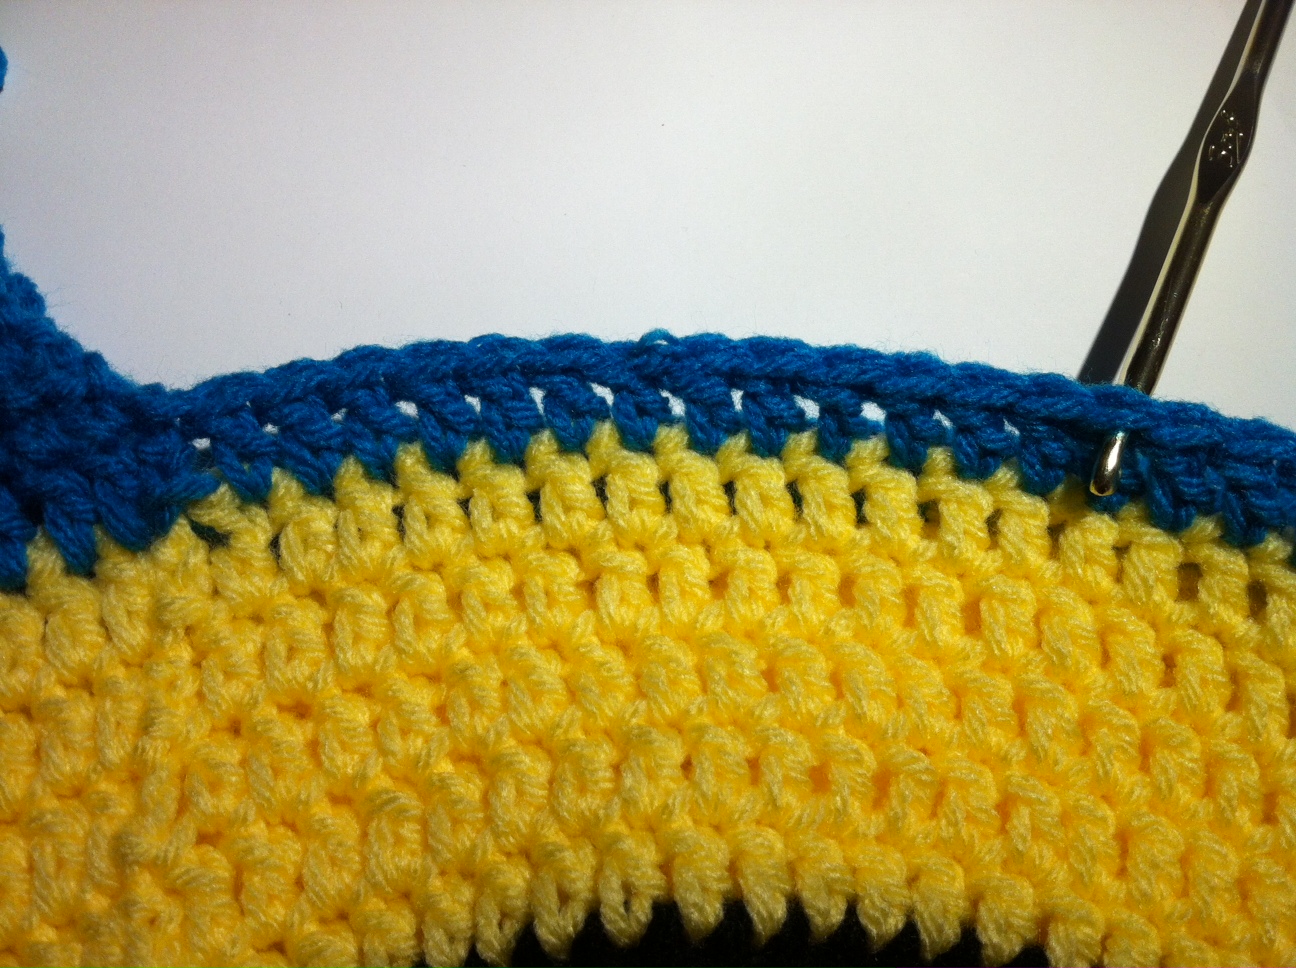
We will be adding the blue yarn in preparation for the next row, same as we did with the black yarn at the end of R6
On the last DC of the round, only partially complete the stitch, leaving 2 black loops on the hook
Pick up the blue yarn and pull thru the stitch, completing the DC
Slip st to the top of first DC at the beginning of the row
chain 2
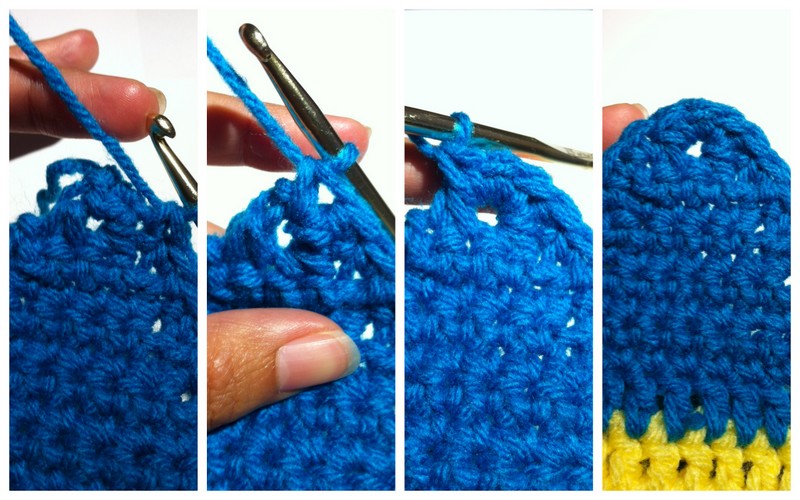
(the yellow yarn can be tied off at this point, it will no longer be used)


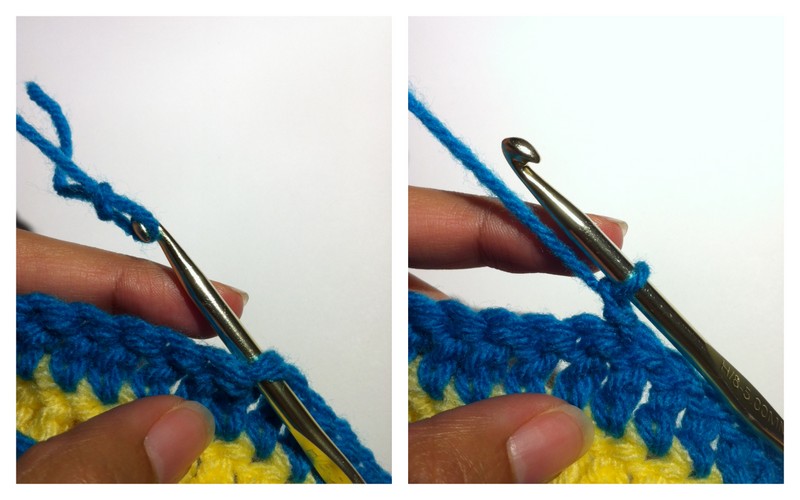
Start earflaps
R1: chain 1, 1 sc into same stitch as ch 1


R2: The next stitch will be a single crochet decrease (SCD) that will cover the next 2 stitches
A more detailed explanation/tutorial of a SCD can be seen HERE
SC across 8 stitches
SCD over the last 2 stitches in the row
chain 1
turn
The rest of the earflap will continue in the same manner, as follows:
R3: SC 10, ch 1, turn
R4: SCD over first two SC, SC next 6, SCD over last two SC, ch 1, turn
R5: Sc 8, ch 1, turn
R6: SCD over first two SC, SC next 4, SCD over last two SC, ch 1, turn
R7: SC 6, ch 1, turn
R8: SCD over first two SC, SC next 2, SCD over last two SC, ch 1, turn
R9: SCD over first two SC, SC dec over last two SC, ch 1, turn
R10: SC over two sc
Finish off
2nd earflap
Locate the seam at the back of the hat, where the earflap row started
Turn
After turning, slide hook thru the 14th chain located
Tie a slip knot onto the blue yarn and slide onto the hook
chain 1
Row 1 for the 2nd earflap will be stitched AWAY from the seam, maintaining the 14 stitches in between the 2 earflaps.
R1: 1 SC across for 11 stitches

Rest of the 2nd earflap will continue same as the 1st earflap with the following pattern
R2: Row 2: Sc dec over first two sc. Sc next 8 sc. Sc dec over last two sc. Ch 1, turn
R3: SC 10, ch 1, turn
R4: SCD over first two SC, SC next 6, SCD over last two SC, ch 1, turn
R5: Sc 8, ch 1, turn
R6: SCD over first two SC, SC next 4, SCD over last two SC, ch 1, turn
R7: SC 6, ch 1, turn
R8: SCD over first two SC, SC next 2, SCD over last two SC, ch 1, turn
R9: SCD over first two SC, SC dec over last two SC, ch 1, turn
R10: SC over two sc
Do not tie off

chain 1
SC evenly around the earflap
Once back at the beginning of the where the edging started, SC 3 into the center space created in the earflap. (notice the small *hole* visible in the first picture) This creates a rounded edge and allows an opening for braided tails to be attached if desired.
Tie off
This is a good spot to weave in any loose ends that might be hanging around
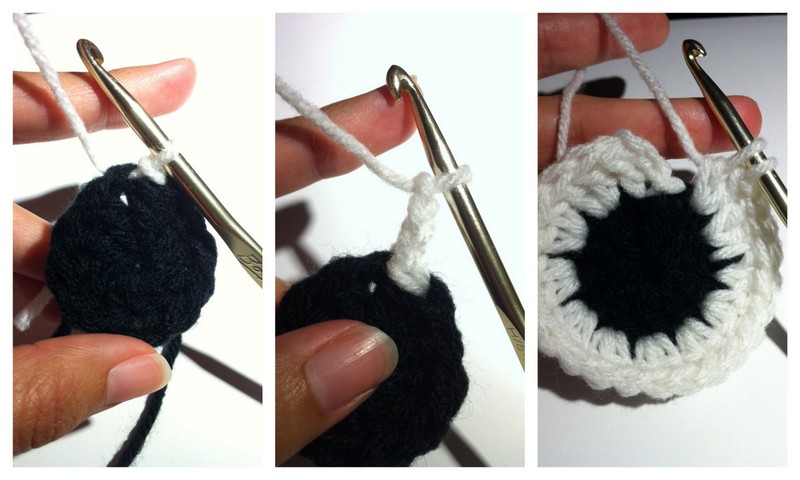
Eye
R1: magic circle
chain 3 (WILL count as a stitch)
10 DC inside circle (11 DC total)
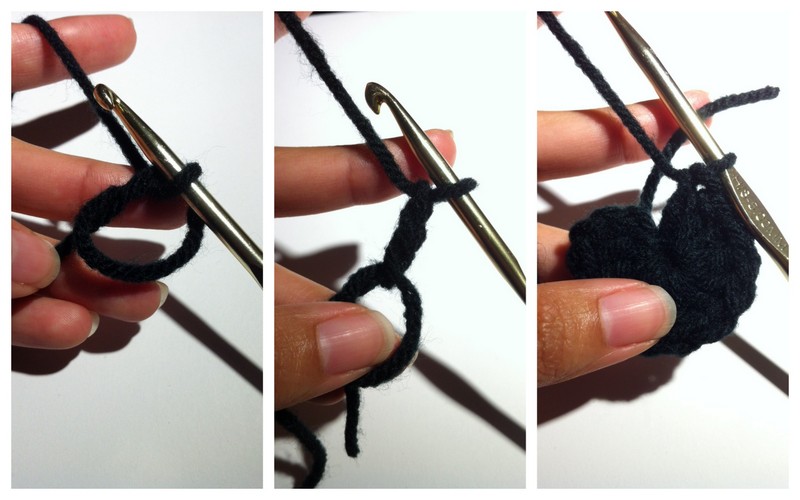
We will be adding the white yarn in preparation for the next row
With 2 black loops still on the hook, slide the white yarn slip knot onto the hook
Slip stitch into the chain #3 from the beginning of the row.
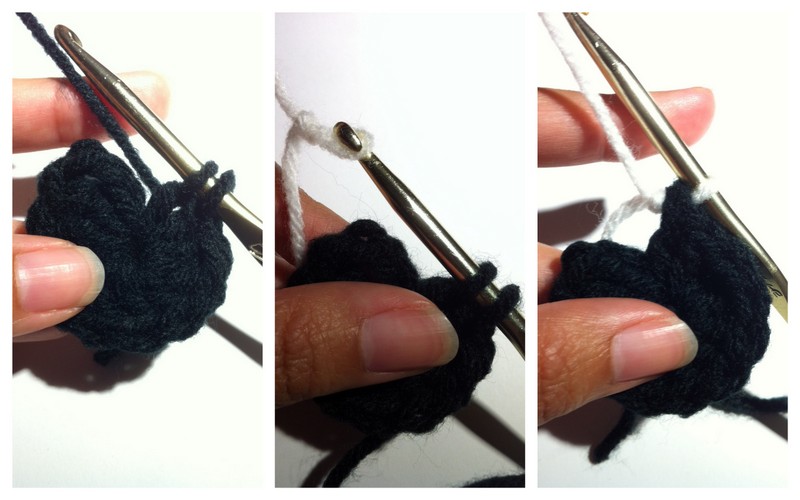
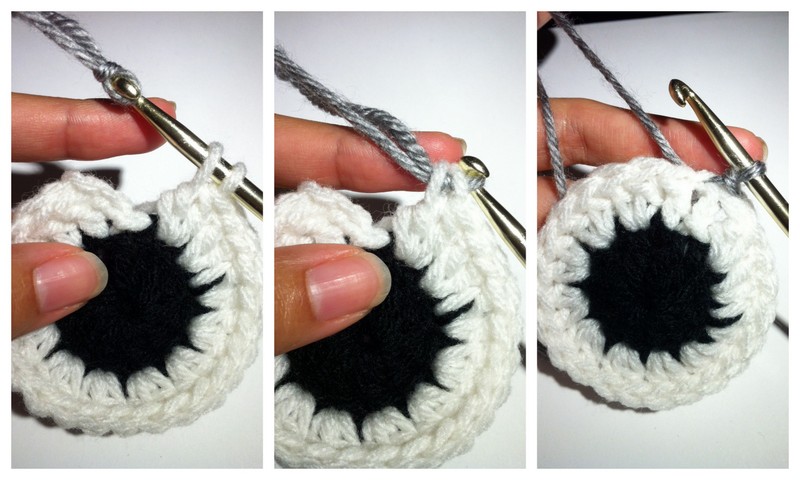
R2:
chain 3 (counts as DC)
1 DC into same stitch as ch 3
2 DC in ever stitch around (24 DC total)
Attach the gray yarn to the hook with a slip knot and pull thru the 2 white loops on the hook, completing the 24th DC of the round.
Slip stitch into the chain #3 from the beginning of the row.
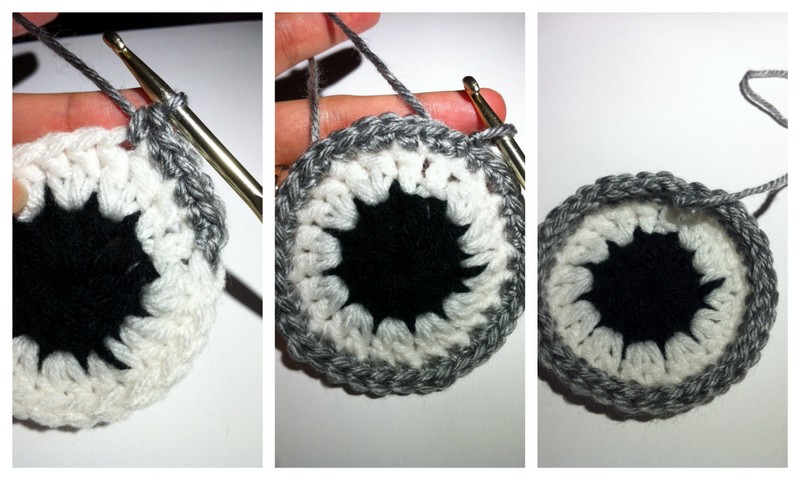
chain 1 (counts as sc)
SC 1 into same stitch
SC 1 in next stitch, 2 SC in next
Repeat the same increase around
Slip stitch to chain 1 from the beginning of the round
slip stitch into every single crochet from the previous round (this will give a nice edge to the eye resembling the goggles worn by the character)
I used a large needle to secure the eye onto the hat easily. Any method can be used
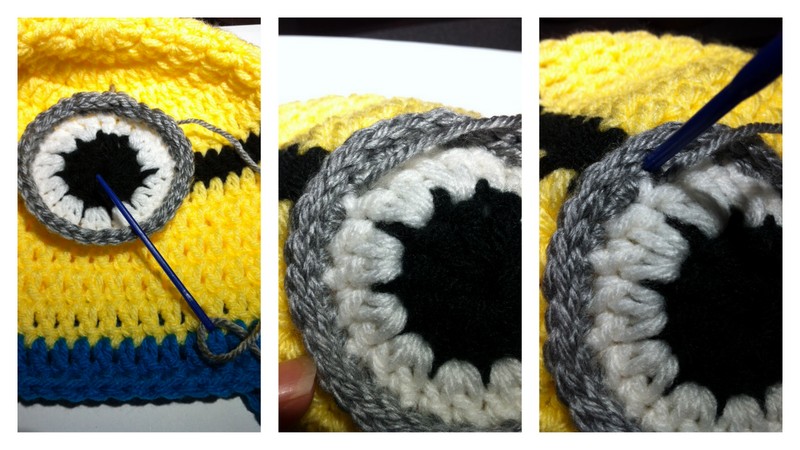
I chose an easy method
Cut 6 strands of black yarn, each approx 8 inches in length
Find a comfy spot at the very top of the hat where the hair would look good
Using a larger crochet hook, such as the N sized hook pictured, makes this step easier
Folding the group of strands in half, pull the center of the strands thru the location on the hat.

Cut the ends of the strands to the desired length
Now you have crazy minion hair


Here is an abbreviated pattern for different hat sizes:
Pattern for eye and “hair” remain the same for all hat sizes
Toddler – 19 inches around:
R1: magic circle, 12 DC
R2: increase – 2 DC in each stitch (24 DC)
R3: increase – *2 DC, 1 DC*. repeat ** (36 DC)
R4: increase – *2 DC, 1 DC, 1 DC*. repeat ** (48 DC)
R5: increase – *2 DC, 1 DC in the next 7 stitches*, repeat
R6: (no increase) attach black yarn, DC in every stitch
R7-R10: (reattaching yellow yarn), DC in every stitch, tie off black yarn
R11: attach blue yarn, DC in every stitch, tie off yellow yarn
R12: with blue yarn, HDC in every stitch
start ear flaps
First Earflap:
Ch 1
R1: SC 12, ch 1, turn
R2: SCD first two SC, SC next 8 SC, SCD last two SC, ch 1, turn
R3: SC 10, ch 1, turn
R4: SCD first two sc, SC next 6 SC, SCD last two SC, ch 1, turn
R5: SC 8, ch 1, turn
R6: SCD first two SC, SC next 4 SC, SCD last two SC, ch 1, turn
R7: SC 6, ch 1, turn
R8: SCD first two SC, SC next 2 SC, SCD last two SC, ch 1, turn
R9: SCD first two SC, SCD last two SC, ch 1, turn
R10: SCD over two SC
Finish off
Second Earflap:
Locating the 14th stitch away from the seam, attach blue yarn. Ch 1
Crochet away from the seam where the other ear flap is, keeping 14 stitch distance in between the 2 earflaps.
R1: SC 12, ch 1, turn
R2: SCD first two SC, SC next 8 SC, SCD last two SC, ch 1, turn
R3: SC 10, ch 1, turn
R4: SCD first two sc, SC next 6 SC, SCD last two SC, ch 1, turn
R5: SC 8, ch 1, turn
R6: SCD first two SC, SC next 4 SC, SCD last two SC, ch 1, turn
R7: SC 6, ch 1, turn
R8: SCD first two SC, SC next 2 SC, SCD last two SC, ch 1, turn
R9: SCD first two SC, SCD last two SC, ch 1, turn
R10: SCD over two SC
SC around for edging
Child 3-5 years – 20 inches around:
Toddler:
R1: magic circle, 12 DC
R2: increase – 2 DC in each stitch (24 DC)
R3: increase – *2 DC, 1 DC*. repeat ** (36 DC)
R4: increase – *2 DC, 1 DC, 1 DC*. repeat ** (48 DC)
R5: increase – *2 DC, 1 DC, 1 DC, 1 DC*, repeat** (60 DC)
R6: (no increase) DC in every stitch around
R7: attach black yarn, DC in every stitch around
R8-R12: (reattaching yellow yarn), DC in every stitch, tie off black yarn
R13: attach blue yarn, DC in every stitch, tie off yellow yarn
start ear flaps
First Earflap:
Ch 1
R1: SC 12, ch 1, turn
R2: SCD first two SC, SC next 8 SC, SCD last two SC, ch 1, turn
R3: SC 10, ch 1, turn
R4: SCD first two sc, SC next 6 SC, SCD last two SC, ch 1, turn
R5: SC 8, ch 1, turn
R6: SCD first two SC, SC next 4 SC, SCD last two SC, ch 1, turn
R7: SC 6, ch 1, turn
R8: SCD first two SC, SC next 2 SC, SCD last two SC, ch 1, turn
R9: SCD first two SC, SCD last two SC, ch 1, turn
R10: SCD over two SC
Finish off
Second Earflap:
Locating the 14th stitch away from the seam, attach blue yarn. Ch 1
Crochet away from the seam where the other ear flap is, keeping 14 stitch distance in between the 2 earflaps.
R1: SC 12, ch 1, turn
R2: SCD first two SC, SC next 8 SC, SCD last two SC, ch 1, turn
R3: SC 10, ch 1, turn
R4: SCD first two sc, SC next 6 SC, SCD last two SC, ch 1, turn
R5: SC 8, ch 1, turn
R6: SCD first two SC, SC next 4 SC, SCD last two SC, ch 1, turn
R7: SC 6, ch 1, turn
R8: SCD first two SC, SC next 2 SC, SCD last two SC, ch 1, turn
R9: SCD first two SC, SCD last two SC, ch 1, turn
R10: SCD over two SC
SC around for edging
Child 6-10 years – 21 inches around:
R1: magic circle, 12 DC
R2: increase – 2 DC in each stitch (24 DC)
R3: increase – *2 DC, 1 DC*. repeat ** (36 DC)
R4: increase – *2 DC, 1 DC, 1 DC*. repeat ** (48 DC)
R5: increase – *2 DC, 1 DC, 1 DC, 1 DC*, repeat** (60 DC)
R6: (no increase) DC in every stitch around
R7: attach black yarn, *2 DC, 12 DC*, repeat around **
R8-R13: (reattaching yellow yarn), DC in every stitch, tie off black yarn
R14: attach blue yarn, DC in every stitch, tie off yellow yarn
start ear flaps
First Earflap:
Ch 1
R1: SC 14, ch 1, turn
R2: SCD first two SC, SC next 10 SC, SCD last two SC, ch 1, turn
R3: SC 12, ch 1, turn
R4: SCD first two sc, SC next 8 SC, SCD last two SC, ch 1, turn
R5: SC 10, ch 1, turn
R6: SCD first two SC, SC next 6 SC, SCD last two SC, ch 1, turn
R7: SC 8, ch 1, turn
R8: SCD first two SC, SC next 4 SC, SCD last two SC, ch 1, turn
R9: SCD first two SC, SC next 2, SCD last two SC, ch 1, turn
R10: SCD over two SC, SCD over last two SC
R11: SCD over two SC
Finish off
Second Earflap:
Locating the 16th stitch away from the seam, attach blue yarn. Ch 1
Crochet away from the seam where the other ear flap is, keeping 16 stitch distance in between the 2 earflaps.
R1: SC 14, ch 1, turn
R2: SCD first two SC, SC next 10 SC, SCD last two SC, ch 1, turn
R3: SC 12, ch 1, turn
R4: SCD first two sc, SC next 8 SC, SCD last two SC, ch 1, turn
R5: SC 10, ch 1, turn
R6: SCD first two SC, SC next 6 SC, SCD last two SC, ch 1, turn
R7: SC 8, ch 1, turn
R8: SCD first two SC, SC next 4 SC, SCD last two SC, ch 1, turn
R9: SCD first two SC, SC next 2, SCD last two SC, ch 1, turn
R10: SCD over two SC, SCD over last two SC
R11: SCD over two SC
SC around for edging
===============================
Pattern can be modified to smaller baby sizes if desired.
Simply do not increase to the larger sizes and take away rows.
I hope this tutorial is helpful to anyone wanting to tackle making their own child sized minion hat.
*** I ask credit be given where it is due for anyone using this pattern **
Be kind to crafty bloggers providing free patterns, don’t take credit away from them.
Please feel free to ask questions.
Enjoy!