
After the unexpected response I received for my Ninja Turtles hat, I am FINALLY posting this tutorial post! Several readers have asked for it and I love knowing I can make atleast 1 person happy with this pattern.
Remember, I in no way consider myself an expert. This is a pattern I drafted up that works for me and I hope to provide it in a clear manner. I am available for any questions. Feel free to use this pattern to create as many hats as you desire, even to sell….Just remember to give credit where its due. Do not claim this pattern as your own. That’s not nice.
*************
What you will need:
- Crochet hook:
>>Size G and H (us size)
- Worsted weight yarn/4 :
>>1 skein green (suggested Vanna’s choice in Kelly Green)
>>second color yarn for the “mask”
>>small amount of white and black (for eyes)
- Scissors
- Crochet needle
Tutorial written in US crochet terms with US size crochet hooks
*******************
Vanna’s Choice Lion Brand yarn

suggested in Kelly Green for the perfect Ninja Turtle color
 For this tutorial I will be using a royal blue color for the “mask” worn by Leonardo of the TMNT. The size of this hat will be for a 6 month old baby. Photo tutorial can also be used as a guide for larger size patterns written at the bottom of this post.
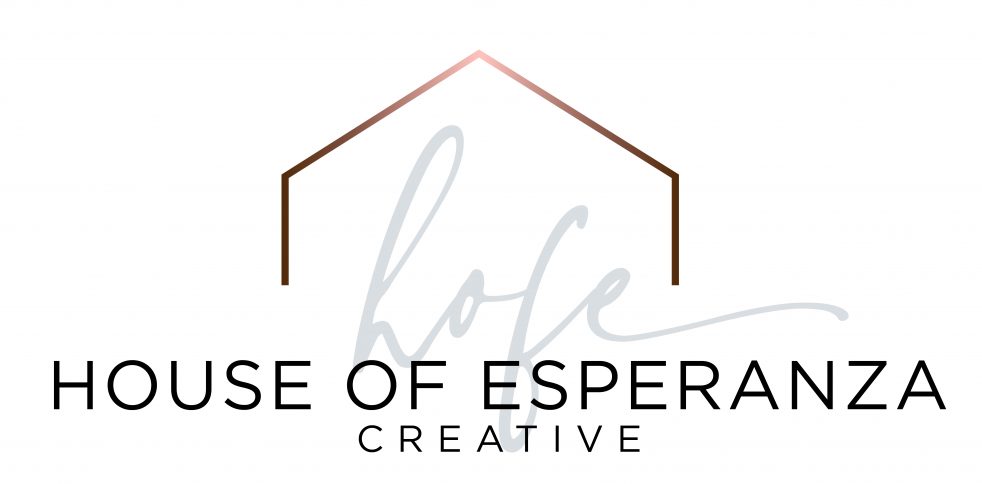
 R1: with size H hook, begin the hat with a magic circle, chain 2, double crochet into the magic circle.
(if you are not familiar with the magic circle, an easy video tutorial can be found here)
continue with 11 more double crochet into the circle for a total of 12 DC (the initial chain 2 does not count as a DC)
tighten the magic circle

locate the top of the first DC of the round, slip stitch into the top of the stitch.
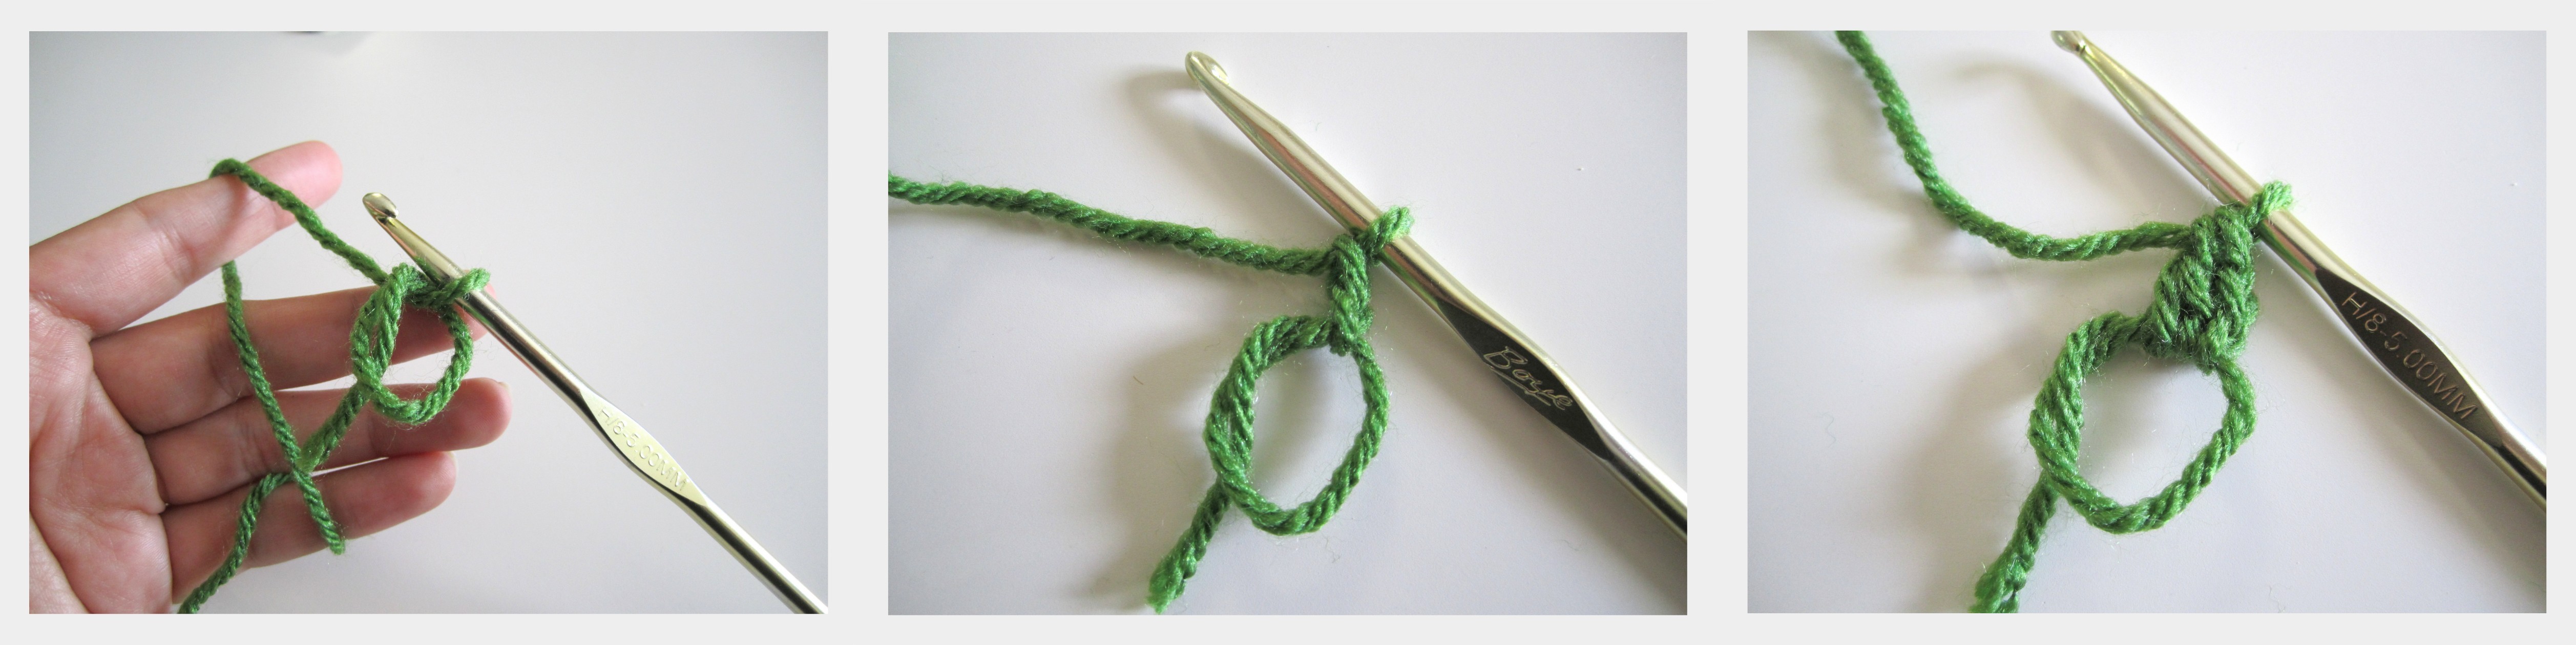
R2: Increase = ch 2, DC into same stitch where ch 2 is, DC again into same stitch, continue with 2 DC in every stitch around. (24 DC)
(remember the ch 2 does not count as a DC)
locate the first DC of the row, slip stitch into the top of the DC
R3: Increase = ch 2, 2 DC into same stitch as ch 2, 1 DC into next stitch
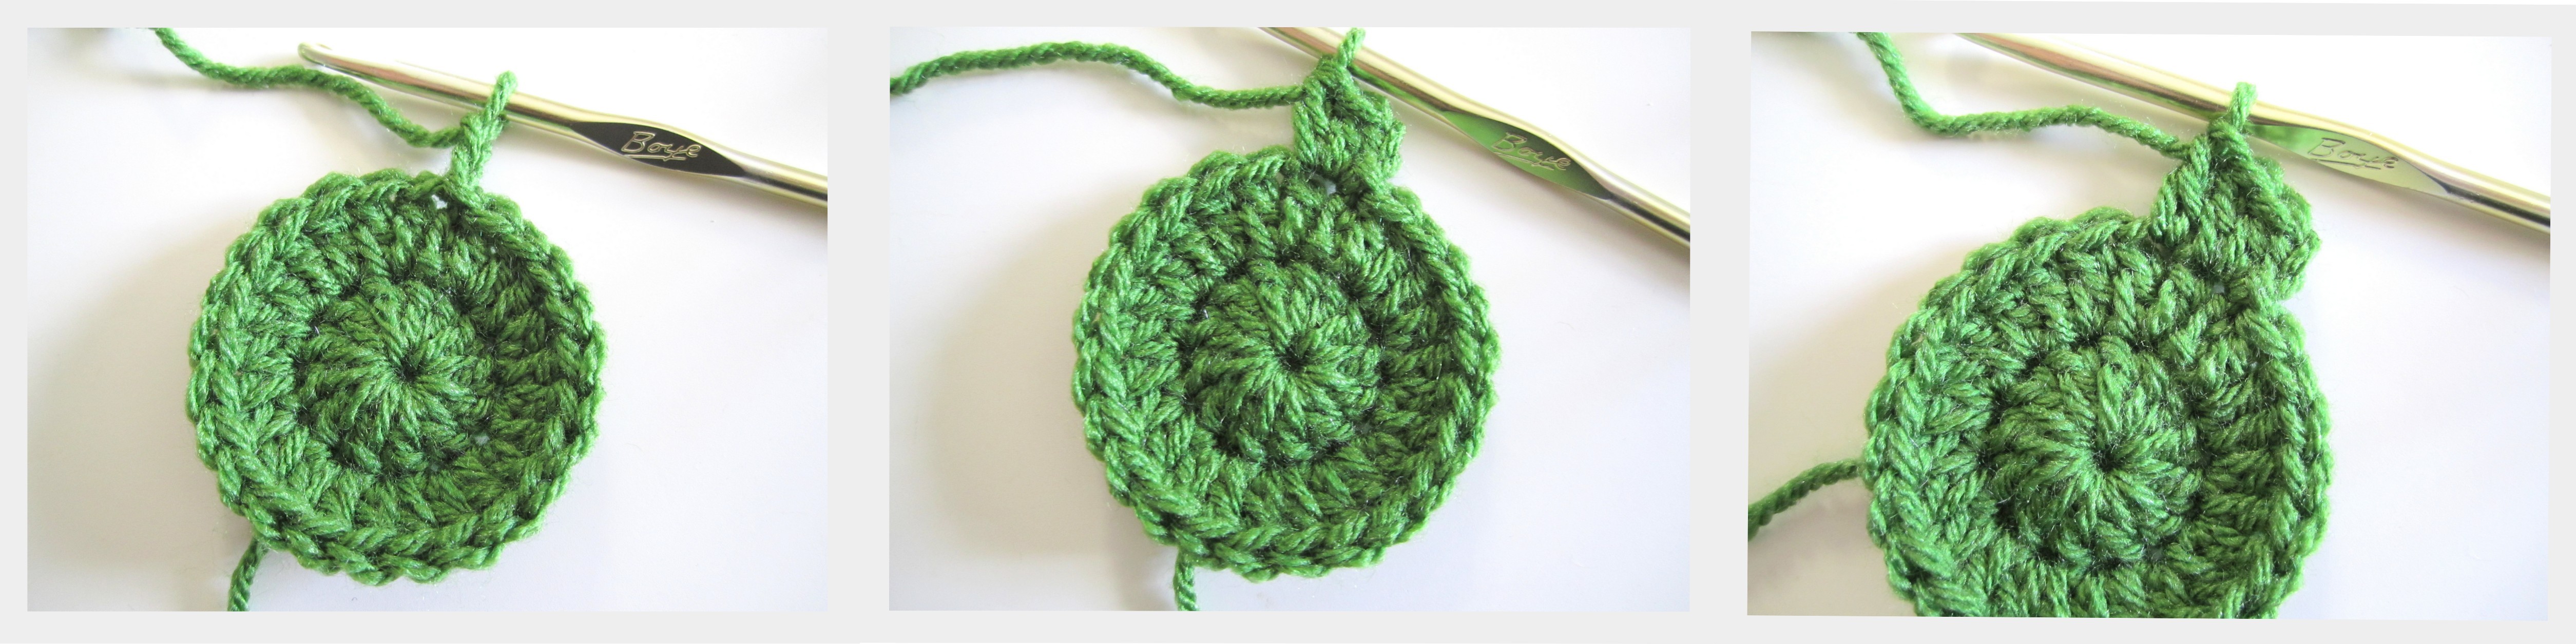
continue with this increase around *2 DC, 1 DC*. (36 DC)

 locate the first DC of the row, slip stitch into the top of the DC

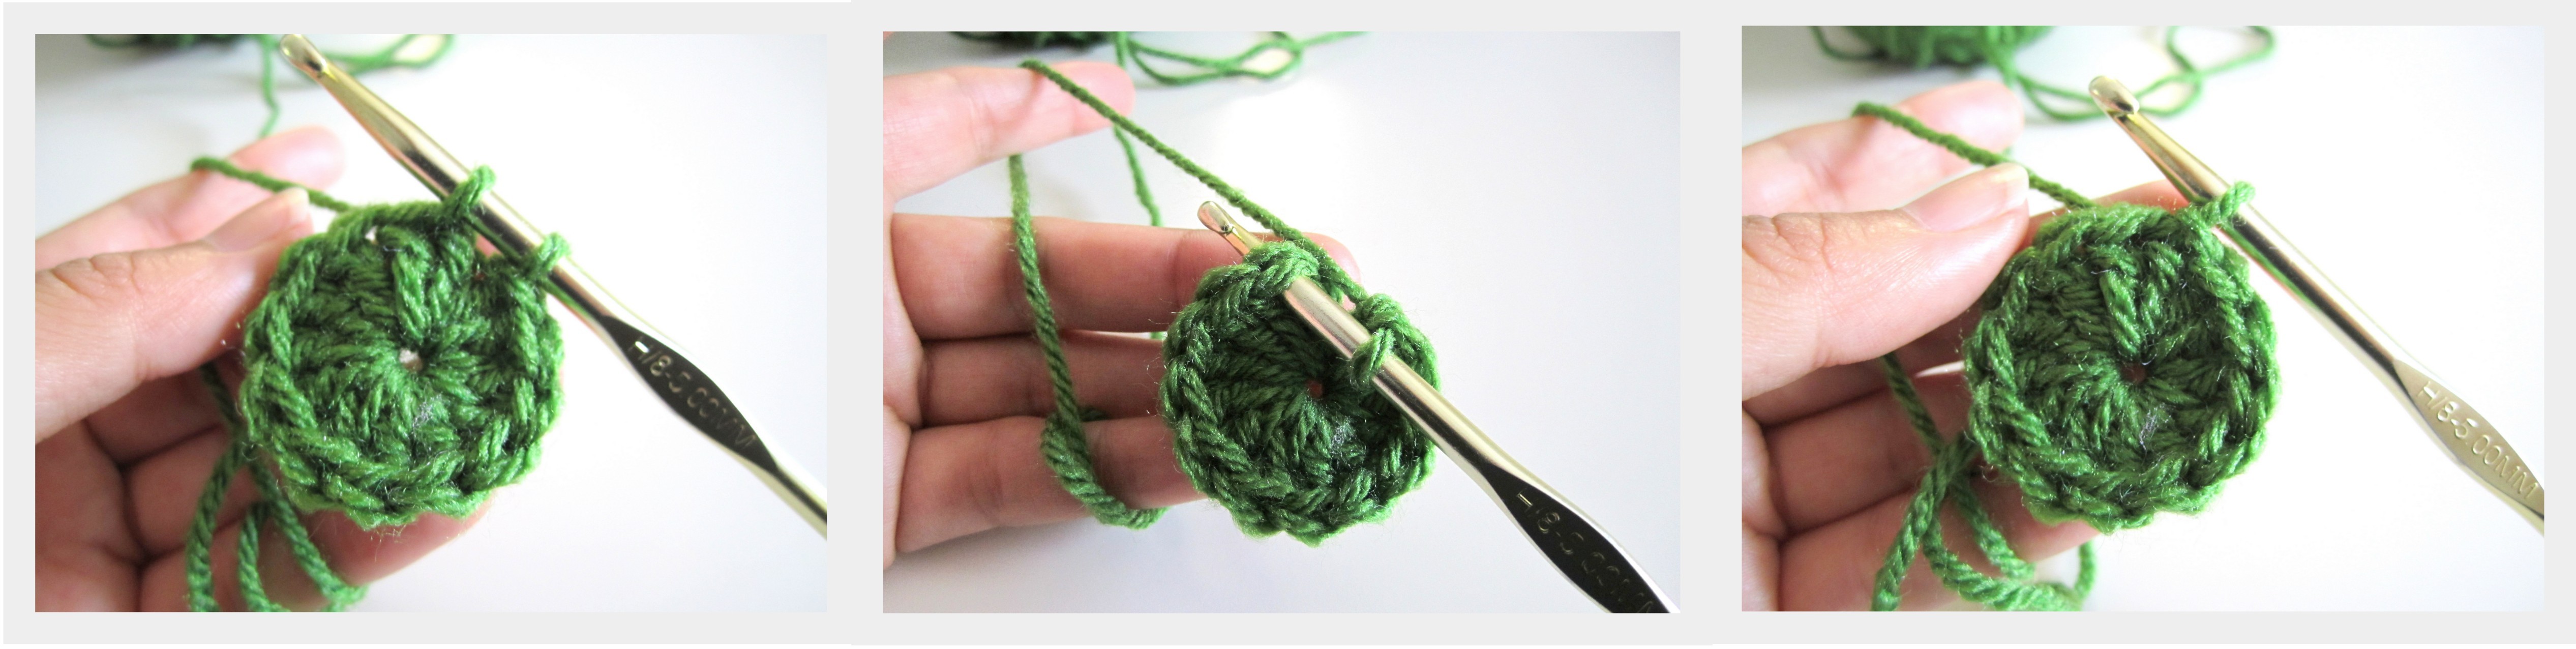
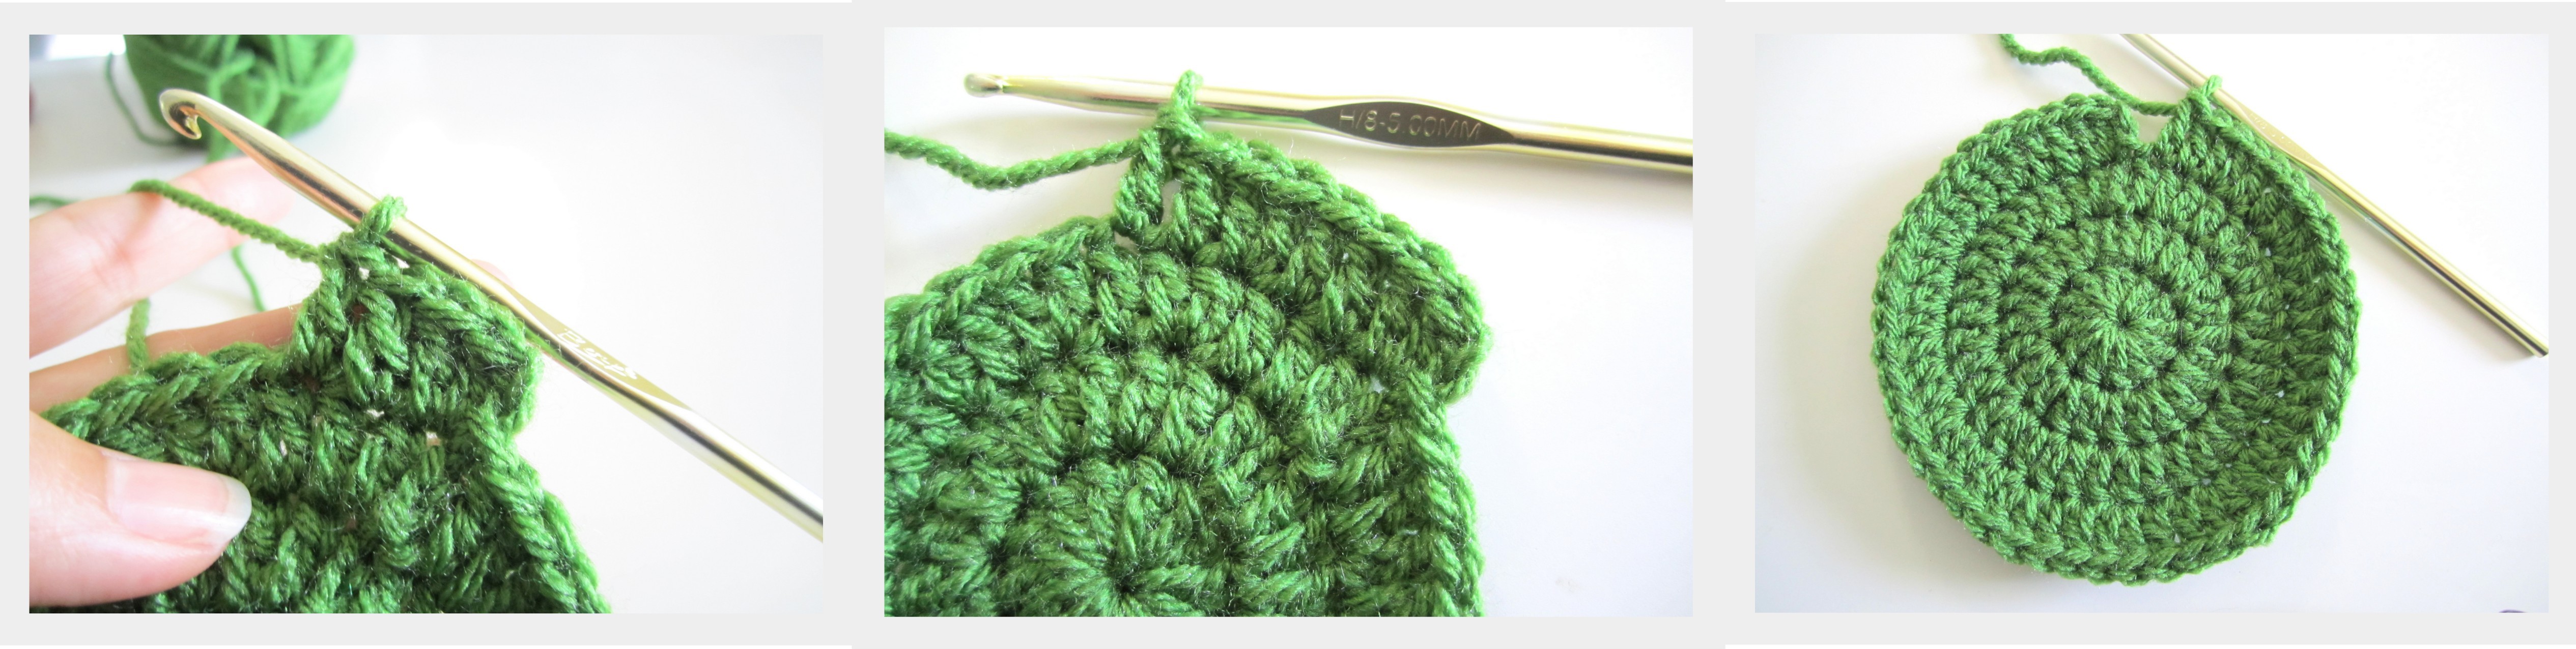
R4: Increase = ch 2, 2 DC into same stitch as ch 2, 1 DC into next stitch, 1 DC into next stitch.
continue with this increase around *2 DC, 1 DC, 1 DC*. (48 DC)
locate the first DC of the row, slip stitch into the top of the DC (like we have been doing)

R5: no more increase (for this size only)
ch 2, only 1 DC into same stitch as ch 2, DC in every stitch around
 starting with this row, our project will slowly start taking the shape of a hat.
once you reach the end of round 5, slip stitch into the top of the first DC like we have been.

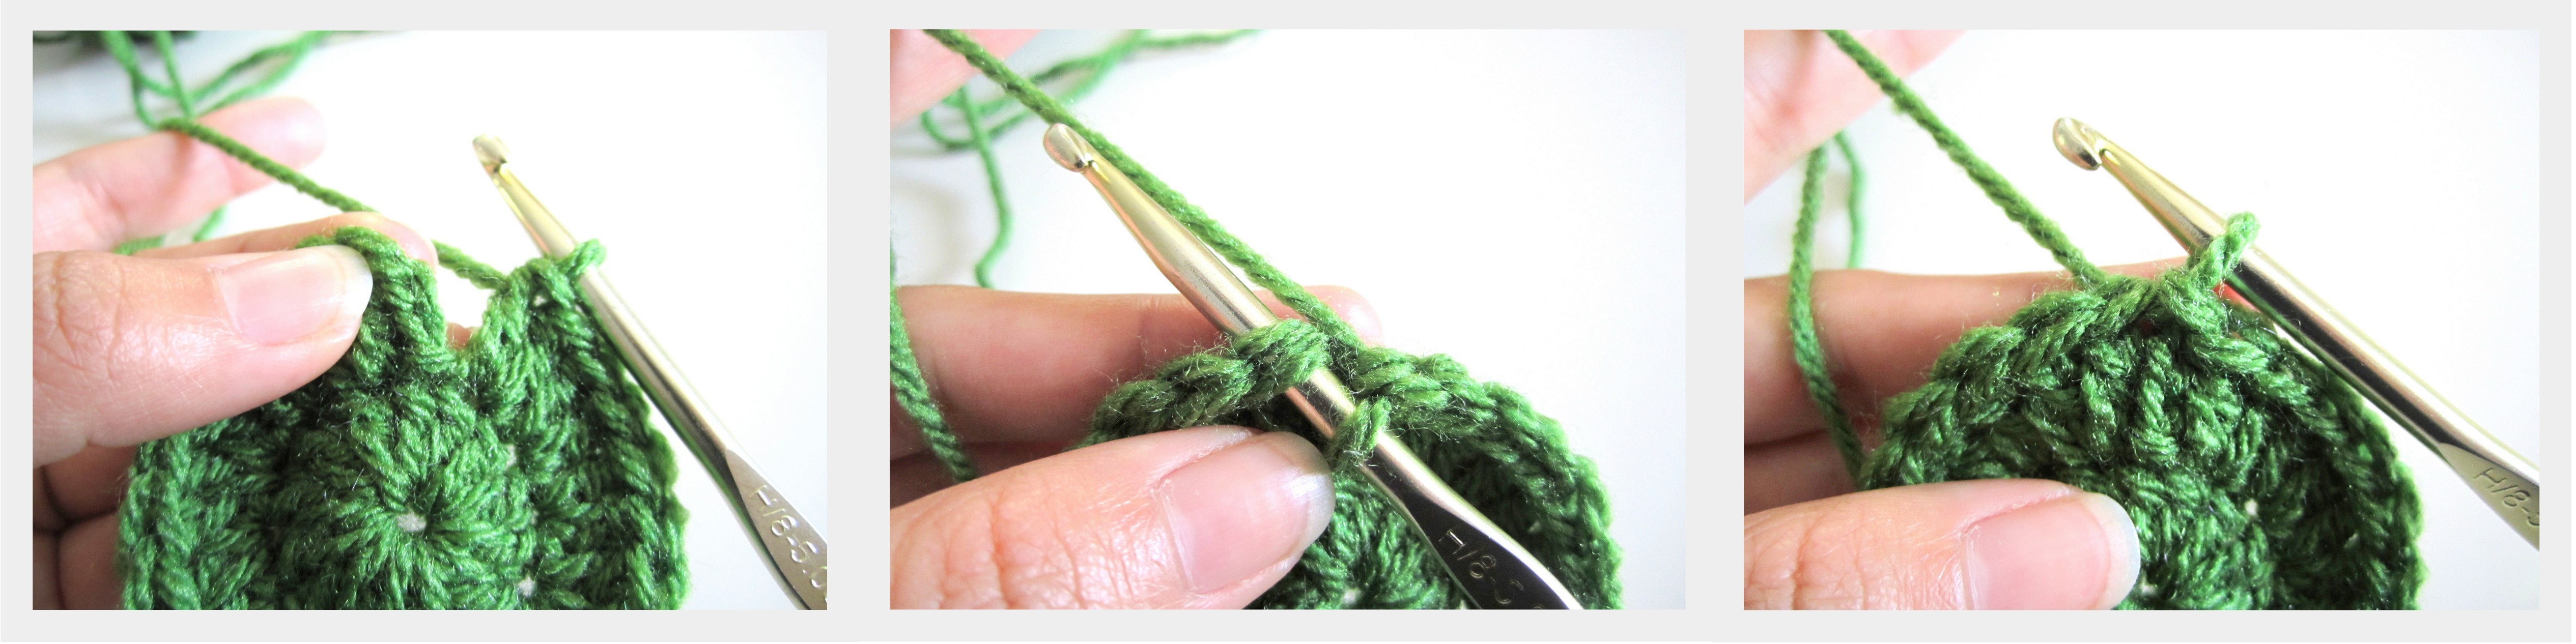
R6: ch 2, 1 DC into same stitch as ch 2, DC in every stitch around
at the end of the round, slip stitch into the top of the first DC

R7: ch 2, 1 DC into same stitch as ch 2, DC in every stitch around
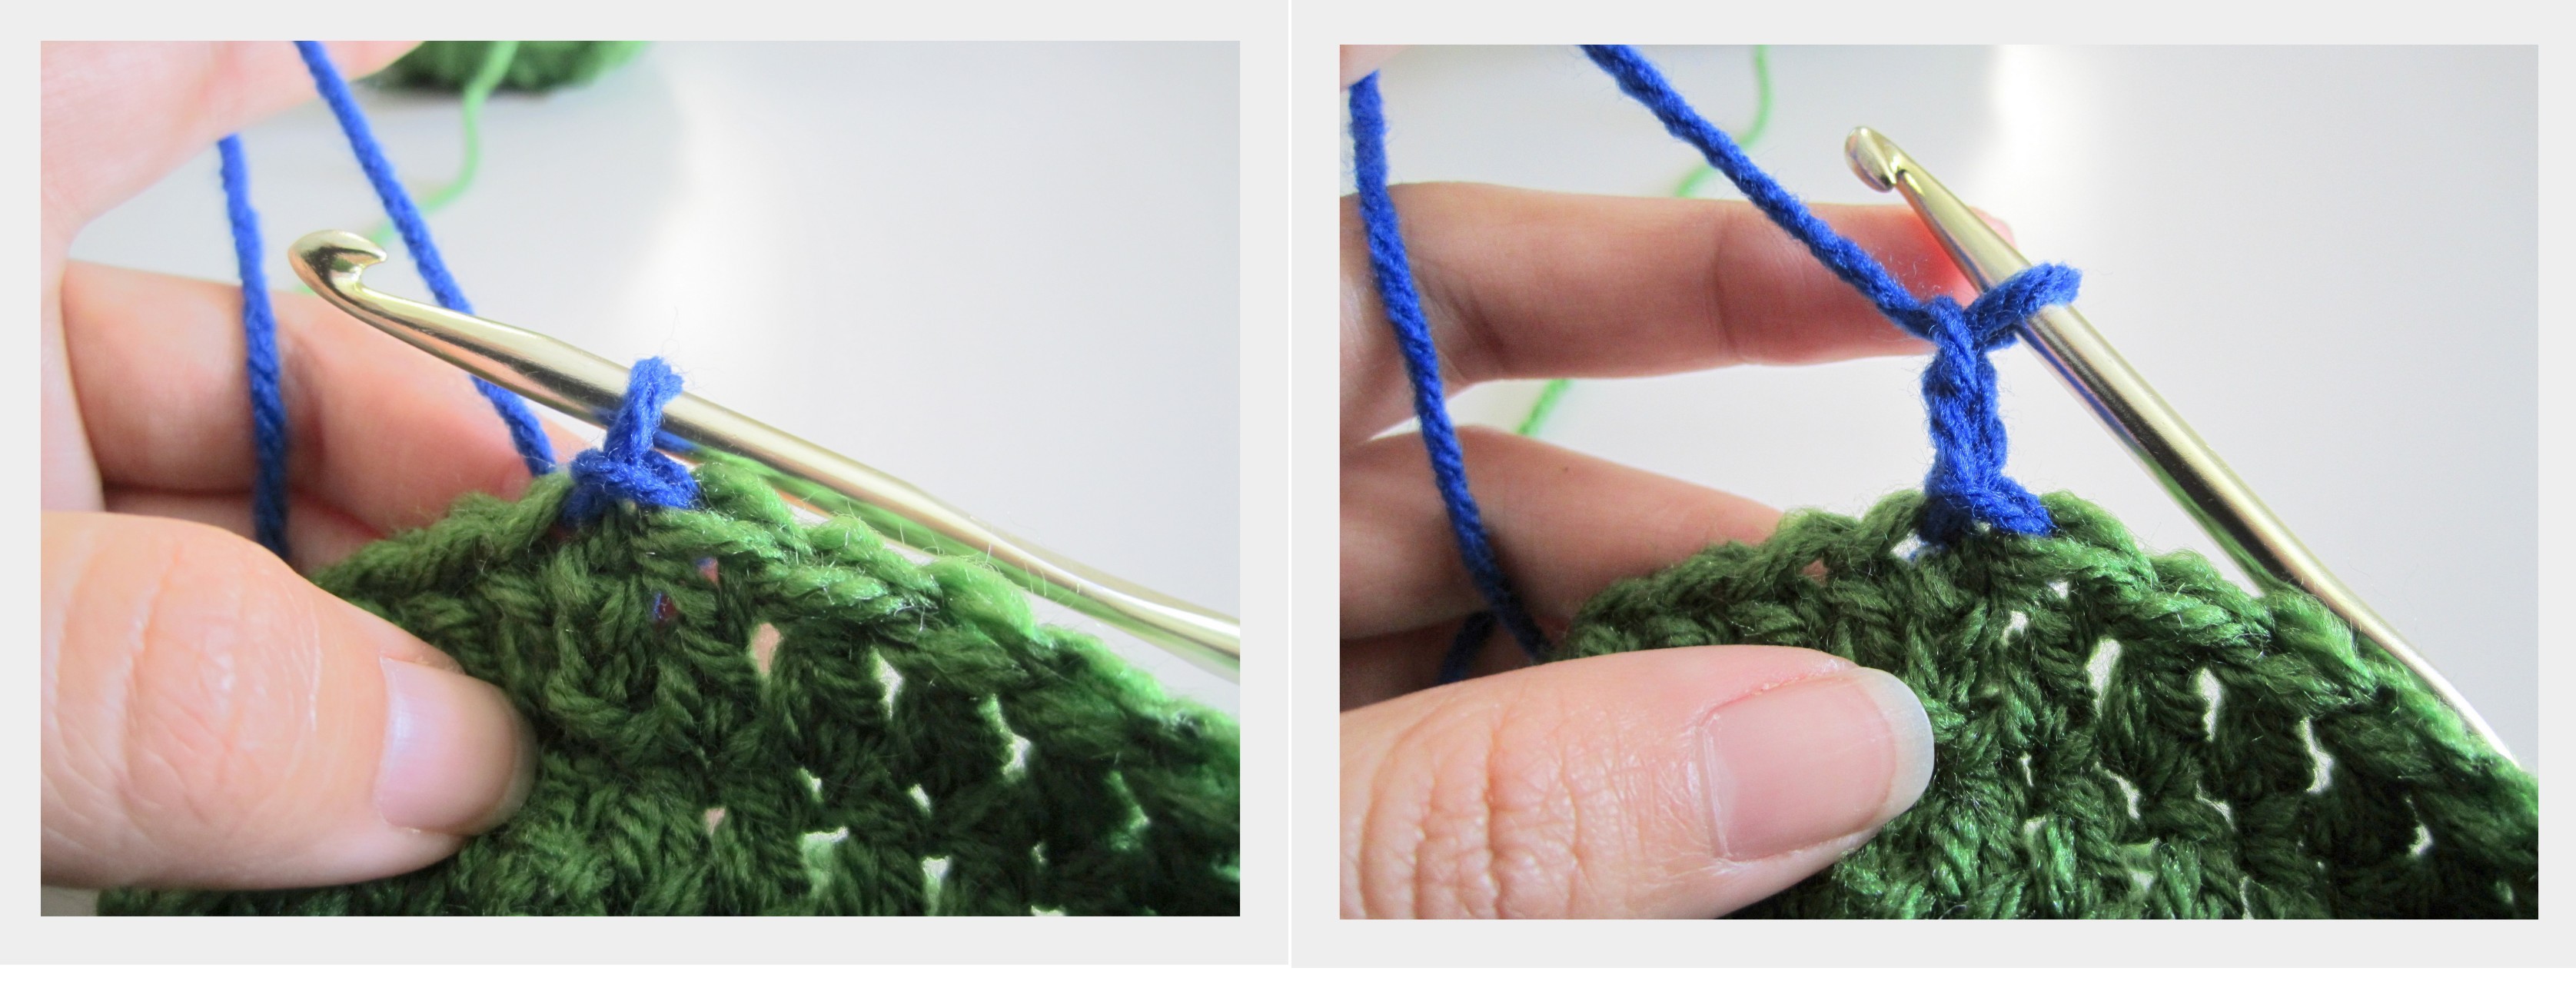
at the end of the round DO NOT slip stitch into the top of the first DC (like I did in this photo here)
 we will be preparing for the addition of the 2nd yarn color. My preferred method of doing this might be tricky at first, but it allows for a smooth color transition.
start the last DC of the round but do not complete the stitch, leave 2 green ‘circles’ on the hook , slip knot your 2nd color, place new color onto hook

pull 2nd color thru to complete the last DC of the round, tuck the green yarn behind your work (no need to tie off the green, we will be needing it again), and locate the top of the first DC of the round.
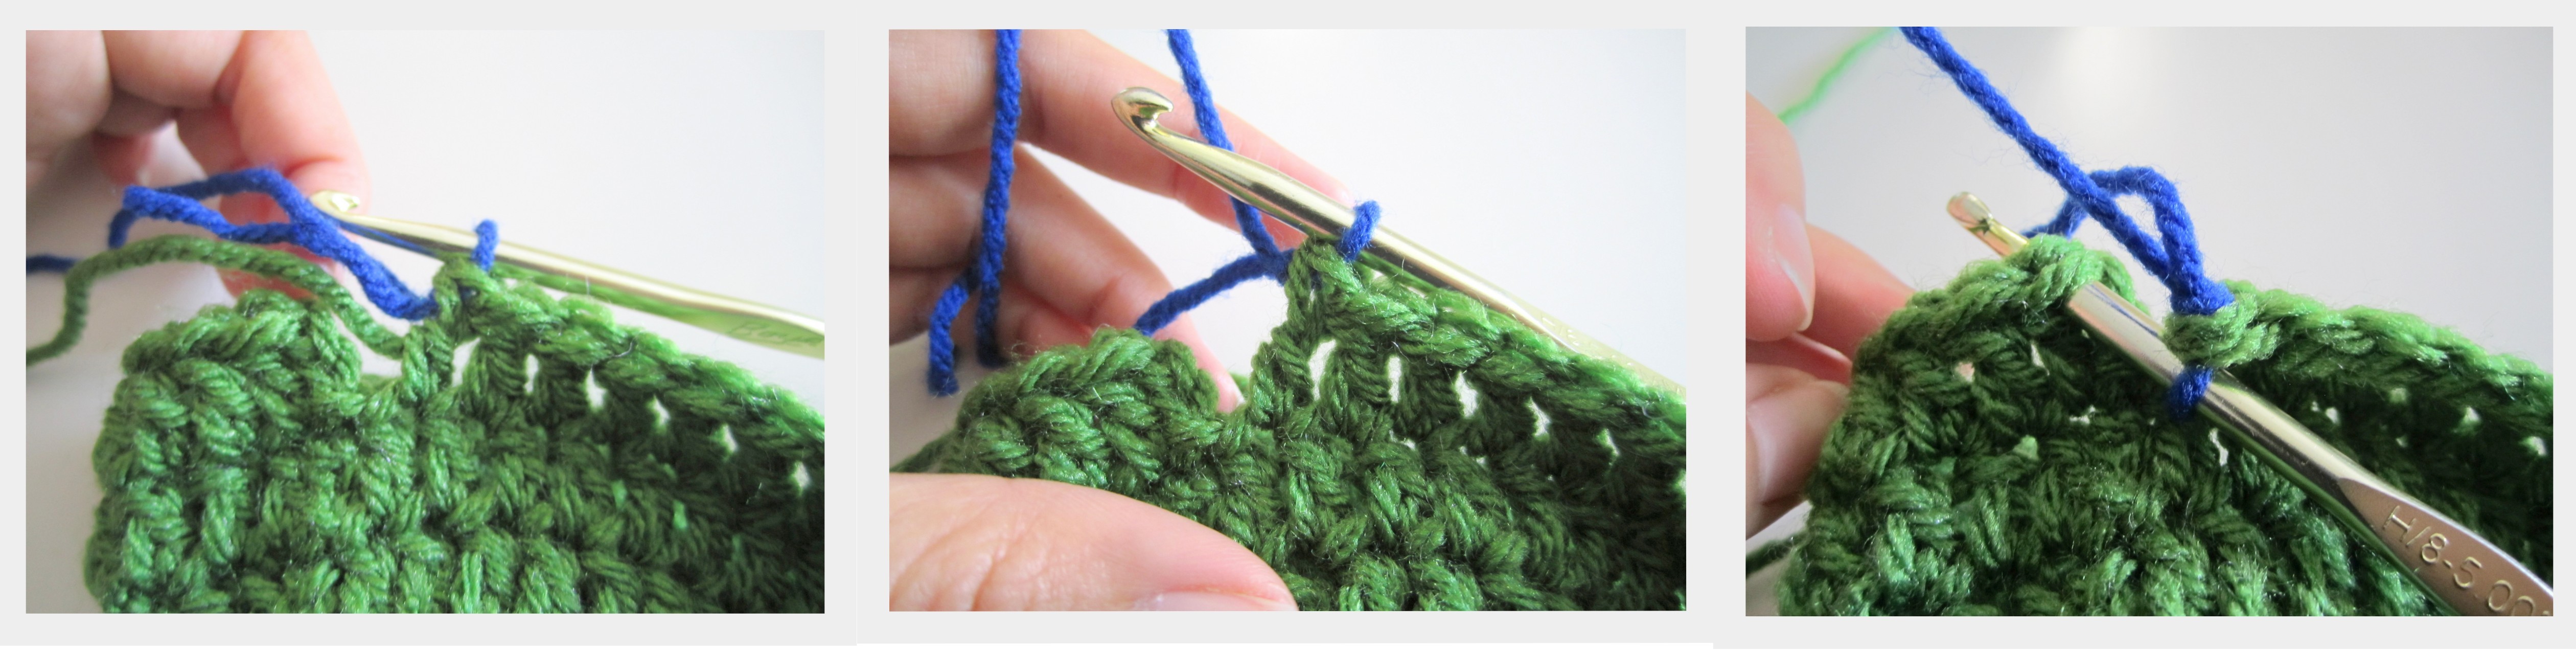
slip stitch thru top of the first DC. There you have it! A smooth color transition.
R8: chain 2
1 DC into same stitch as ch 2, DC around

slip stitch thru top of the first DC. see the hat coming together?
 R9: ch 2, 1 DC into same stitch as ch 2, DC around
slip stitch thru top of the first DC

R10: ch 2, 1 DC into same stitch as ch 2, DC around
DO NOT slip stitch thru top of the first DC, we will be adding the green yarn back in for the next round.
 just like before, leave the last DC of the round unfinished
grab the green yarn with the hook, pull thru the stitch completing the DC, NOW slip stitch into the first DC of the round
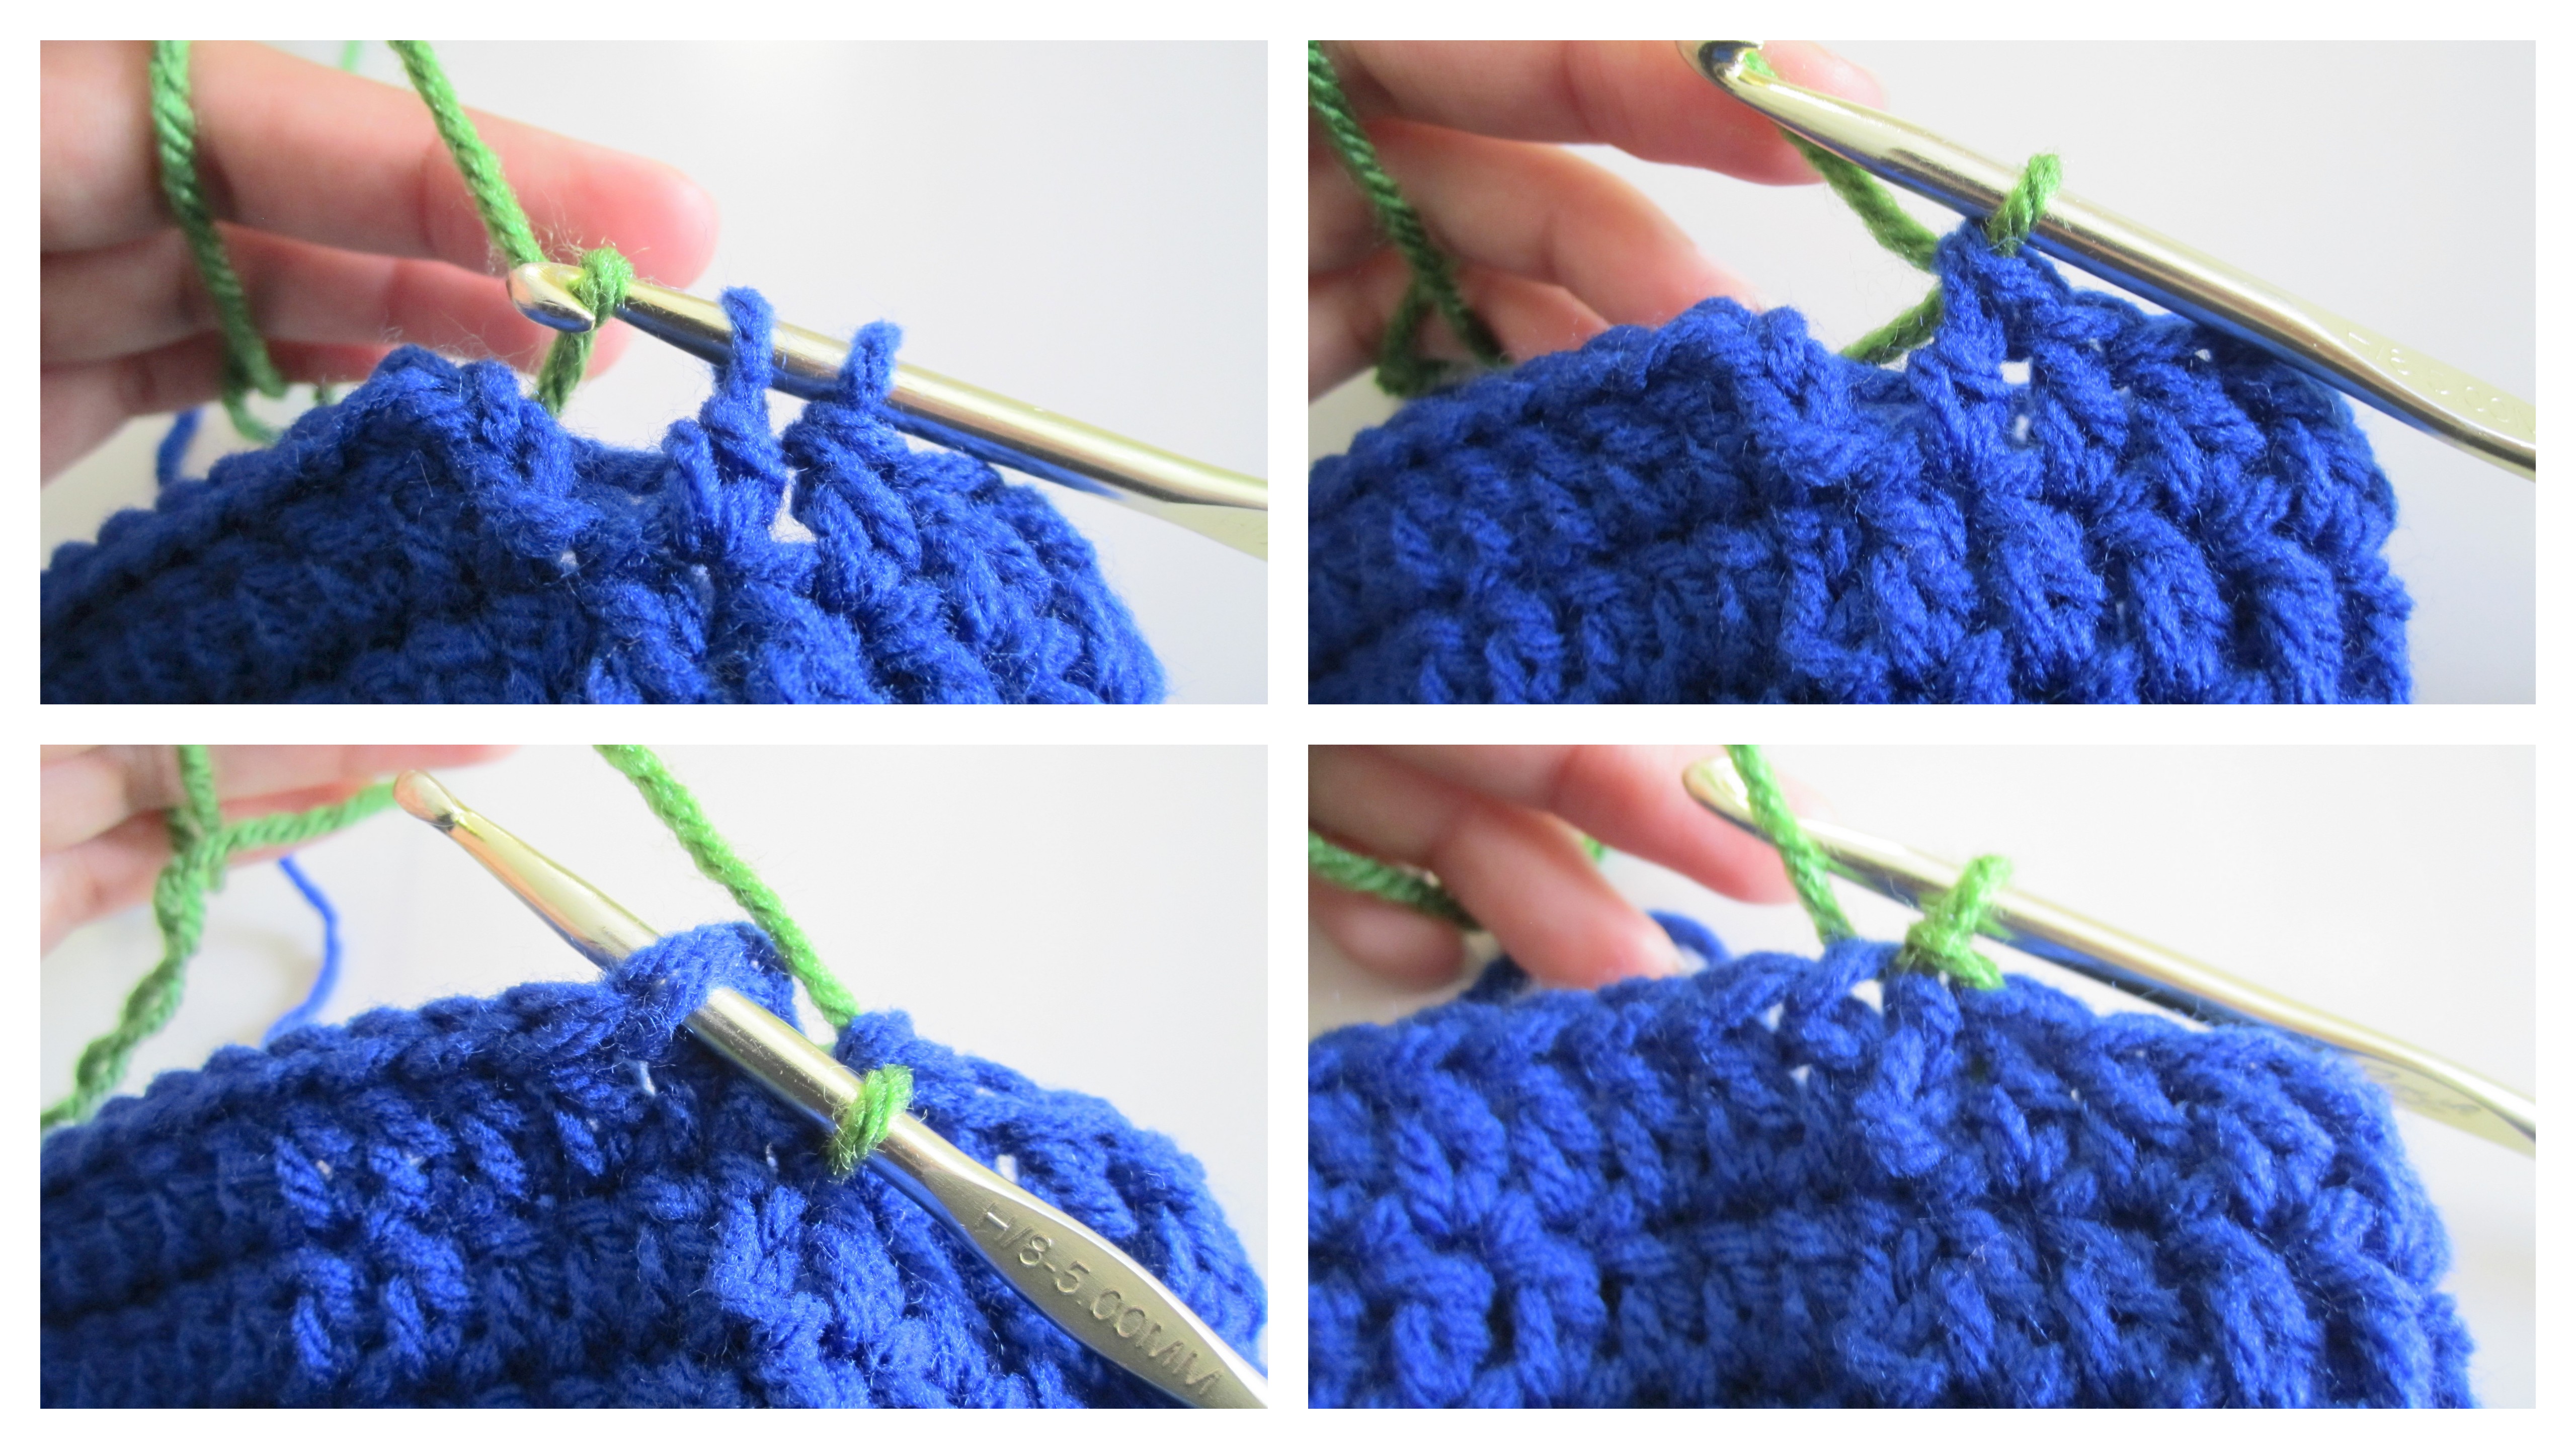
R11: tie off the 2nd color yarn now that it has fulfilled its duties, ch 2 with your green, DC into same stitch as ch 2
 DC around in every stitch
 slip stitch into top of first DC of the round
 R12: repeat row 11

tie off at the end of this row. Base of the hat is complete!
***************************
Now for the eyes. I am sure there are many ways to create the eyes needed for the TMNT look. Feel free to experiment on your own. Use felt, buttons, or anything you’d like.
This is my way.
Grab your white and black bits of yarn, size G hook, and scissors.

starting with the white (the eyeball)
make a slip knot, chain 3
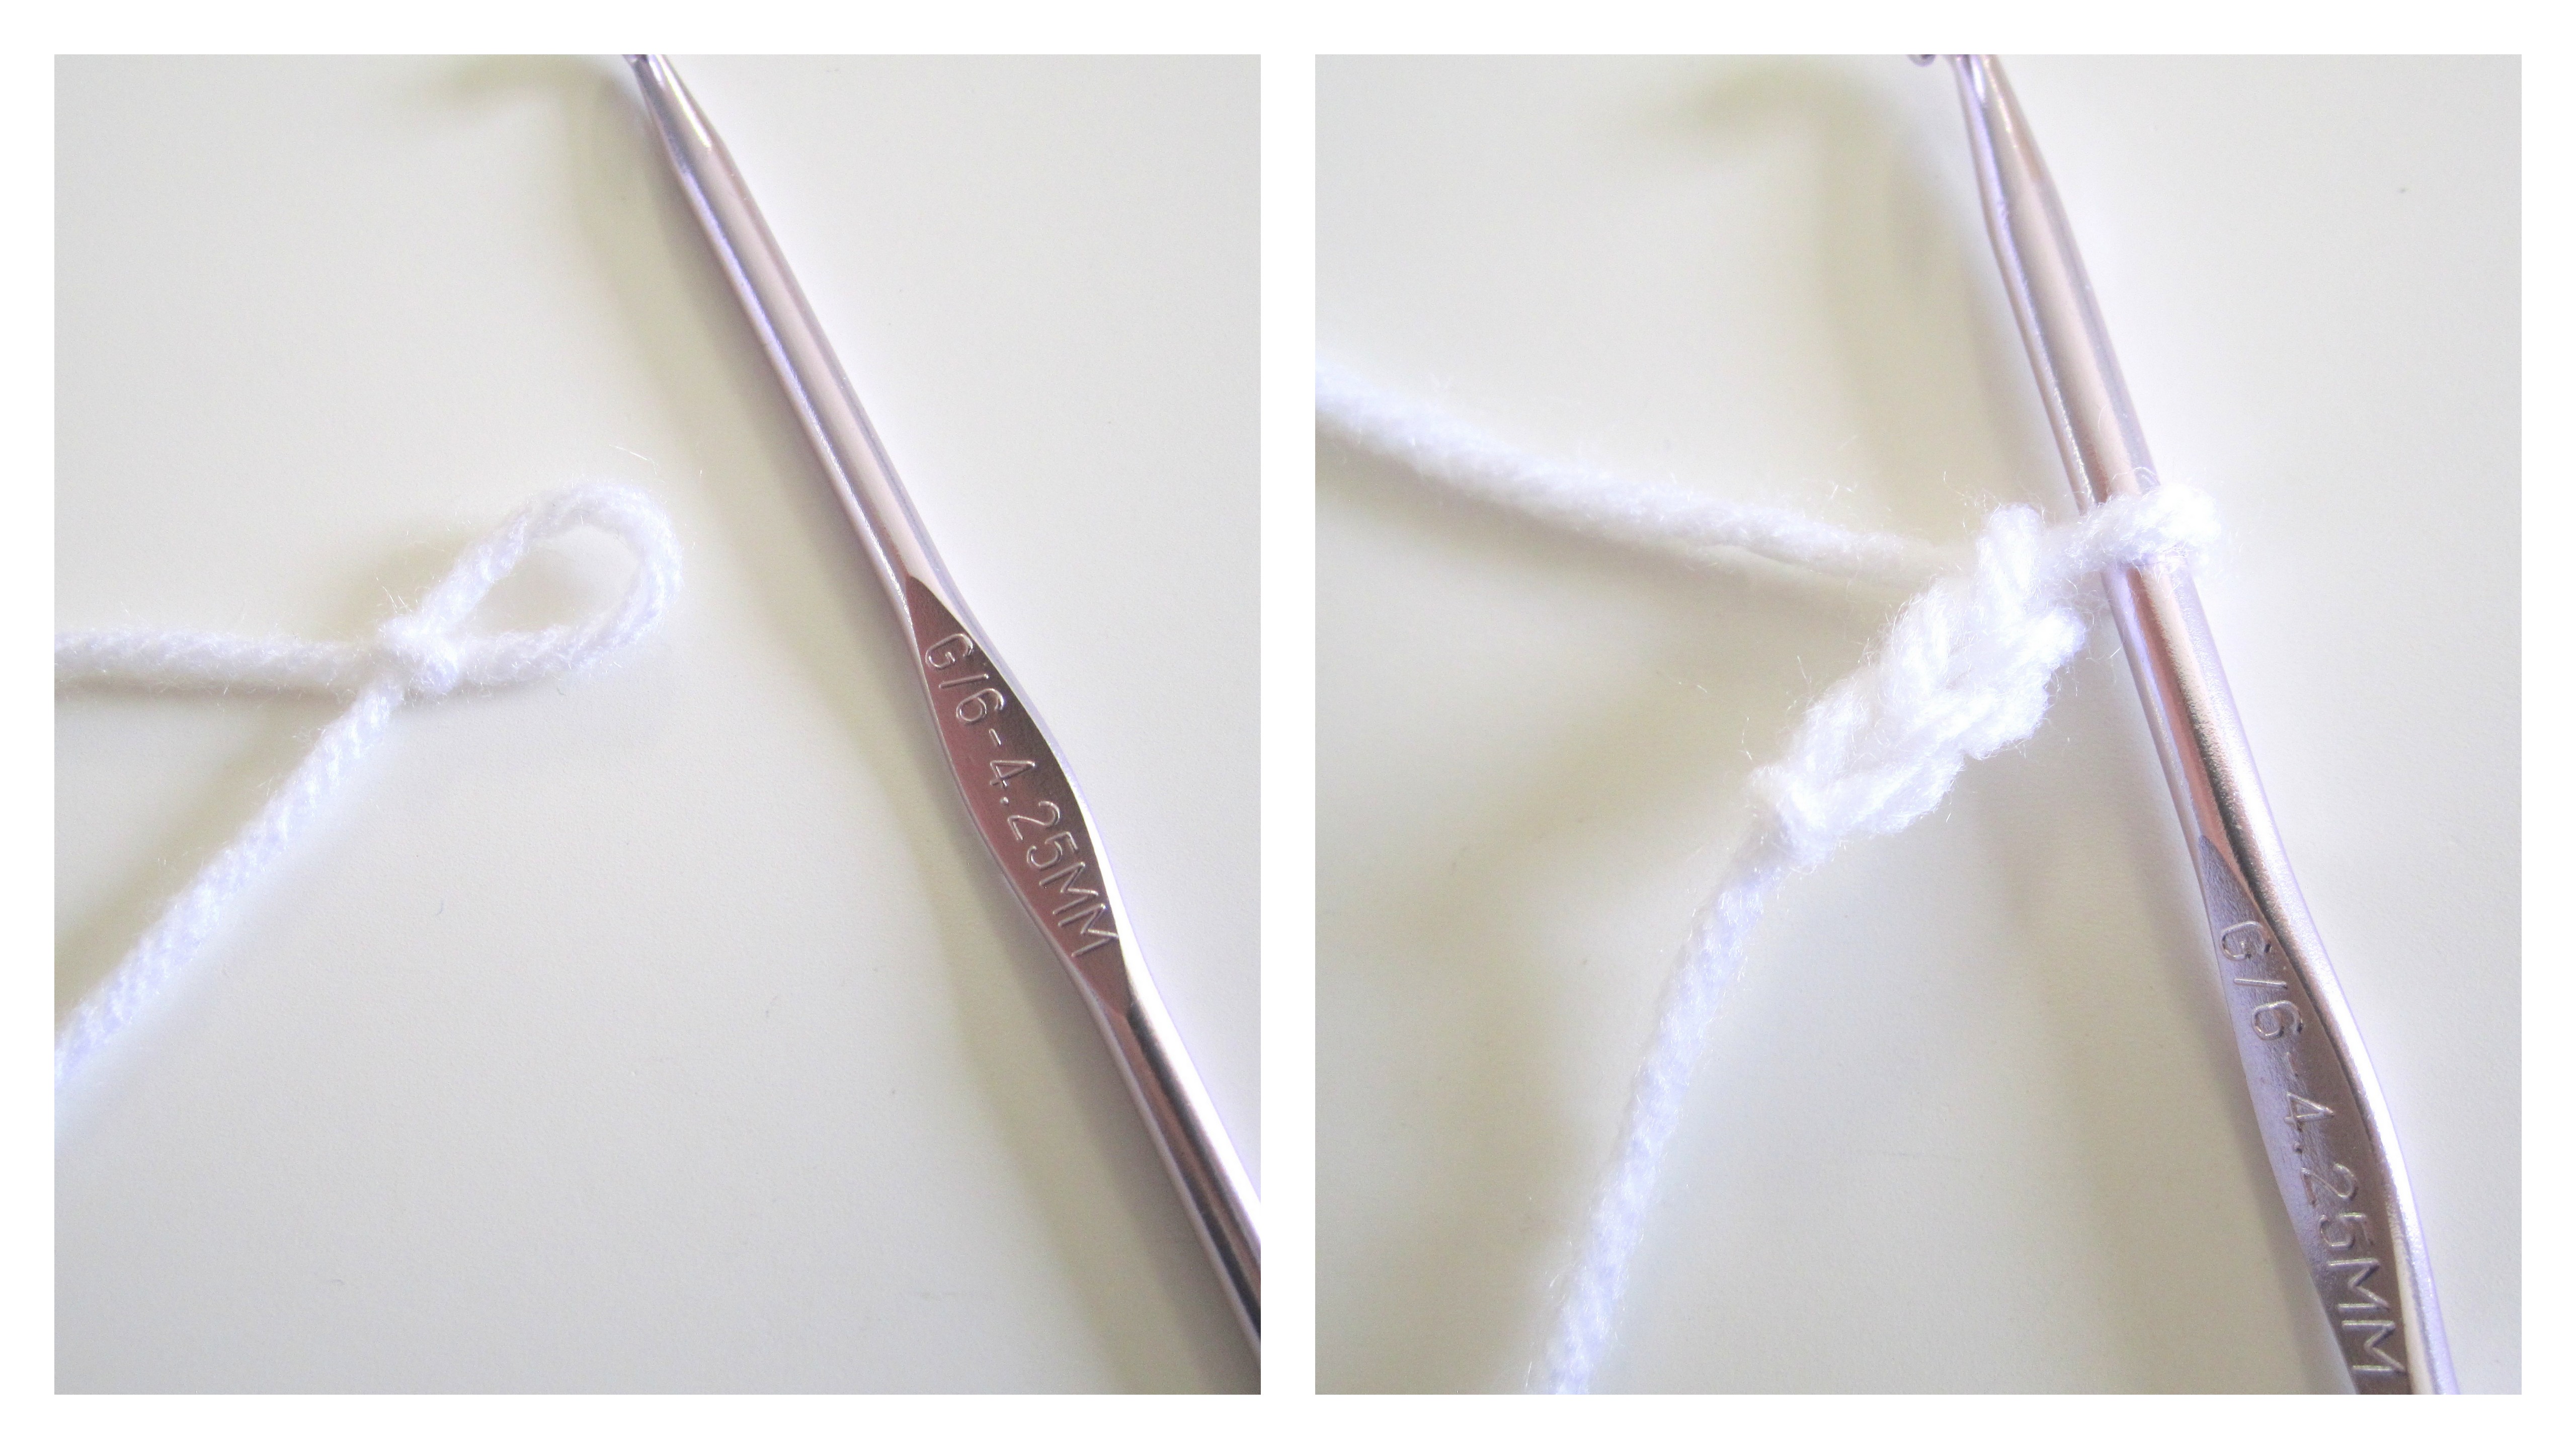
locate the 3rd chain from the hook, DC into that chain
DC 4 more times into the same stitch (5 DC total)
this creates sort of a half circle
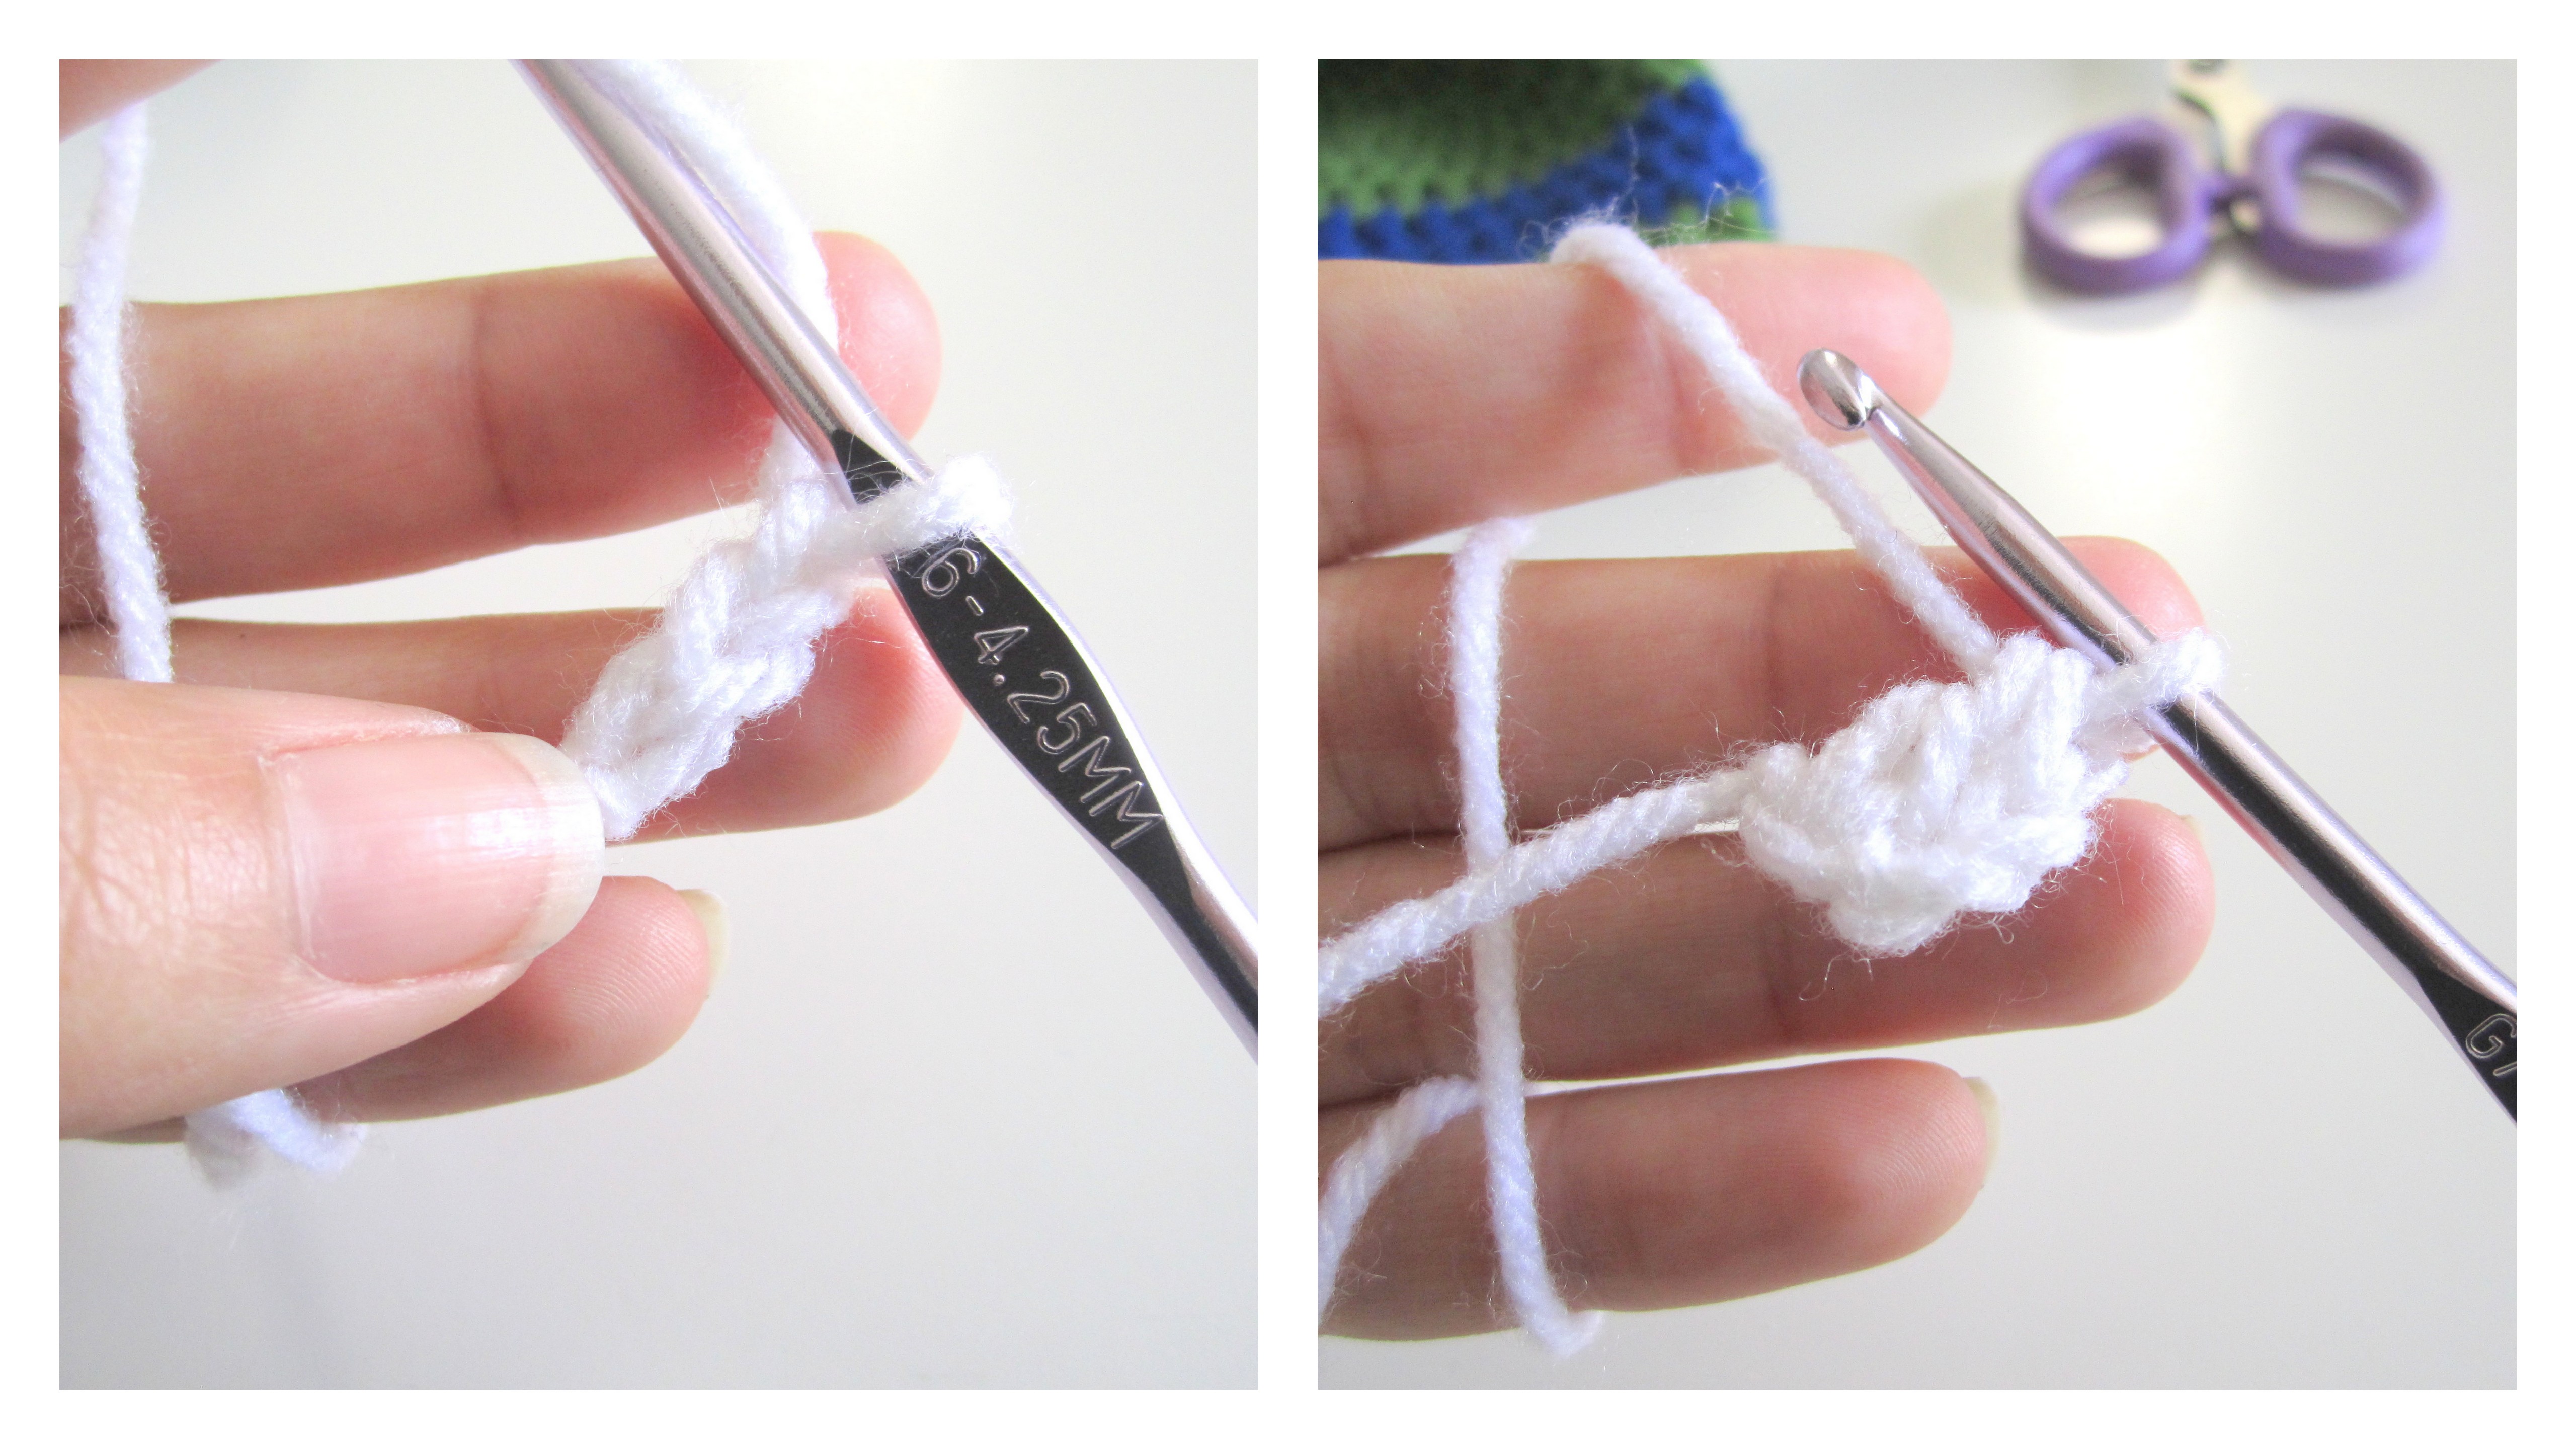
 the half circle is nice, but we want more of a “winged” look for the eyes.
in order to achieve this look, treble crochet 2 into the same stitch we are already working in.
 tie off, leaving an extra long tail for sewing onto the hat

Grab your black yarn (pupil) and same G hook
start with a magic circle, 6 single crochets inside the circle, slip stitch to the first sc of the round
tighten your magic circle
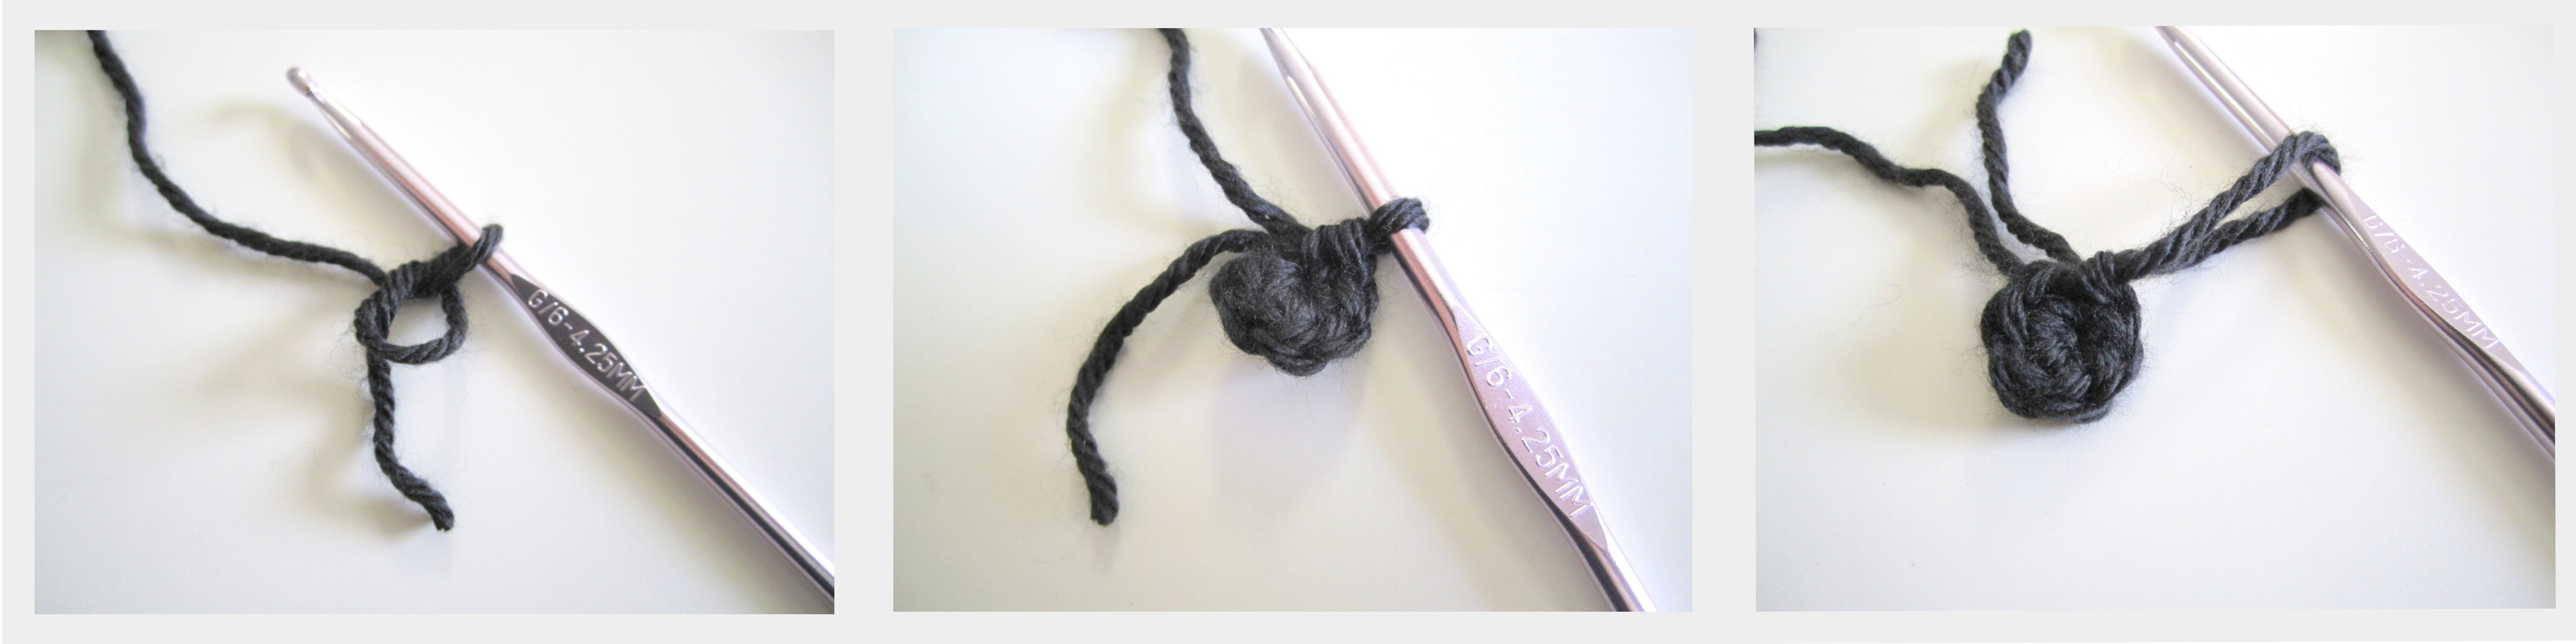
tie off, leaving extra long tail for sewing onto eyeball (white yarn)
 lets bring these two pieces together for the perfect TMNT eyes
we will need to use a tapestry needle to sew the black circle onto the white applique

thread the black yarn onto the needle

place the black circle where you like it, and start threading it directly onto the white piece.
I go thru the center space and into the single crochets on the outside of the circle. Anyway will work, as long as its secure.
I finish by tieing the ends of the black yarn on the backside to keep the pieces from coming apart.
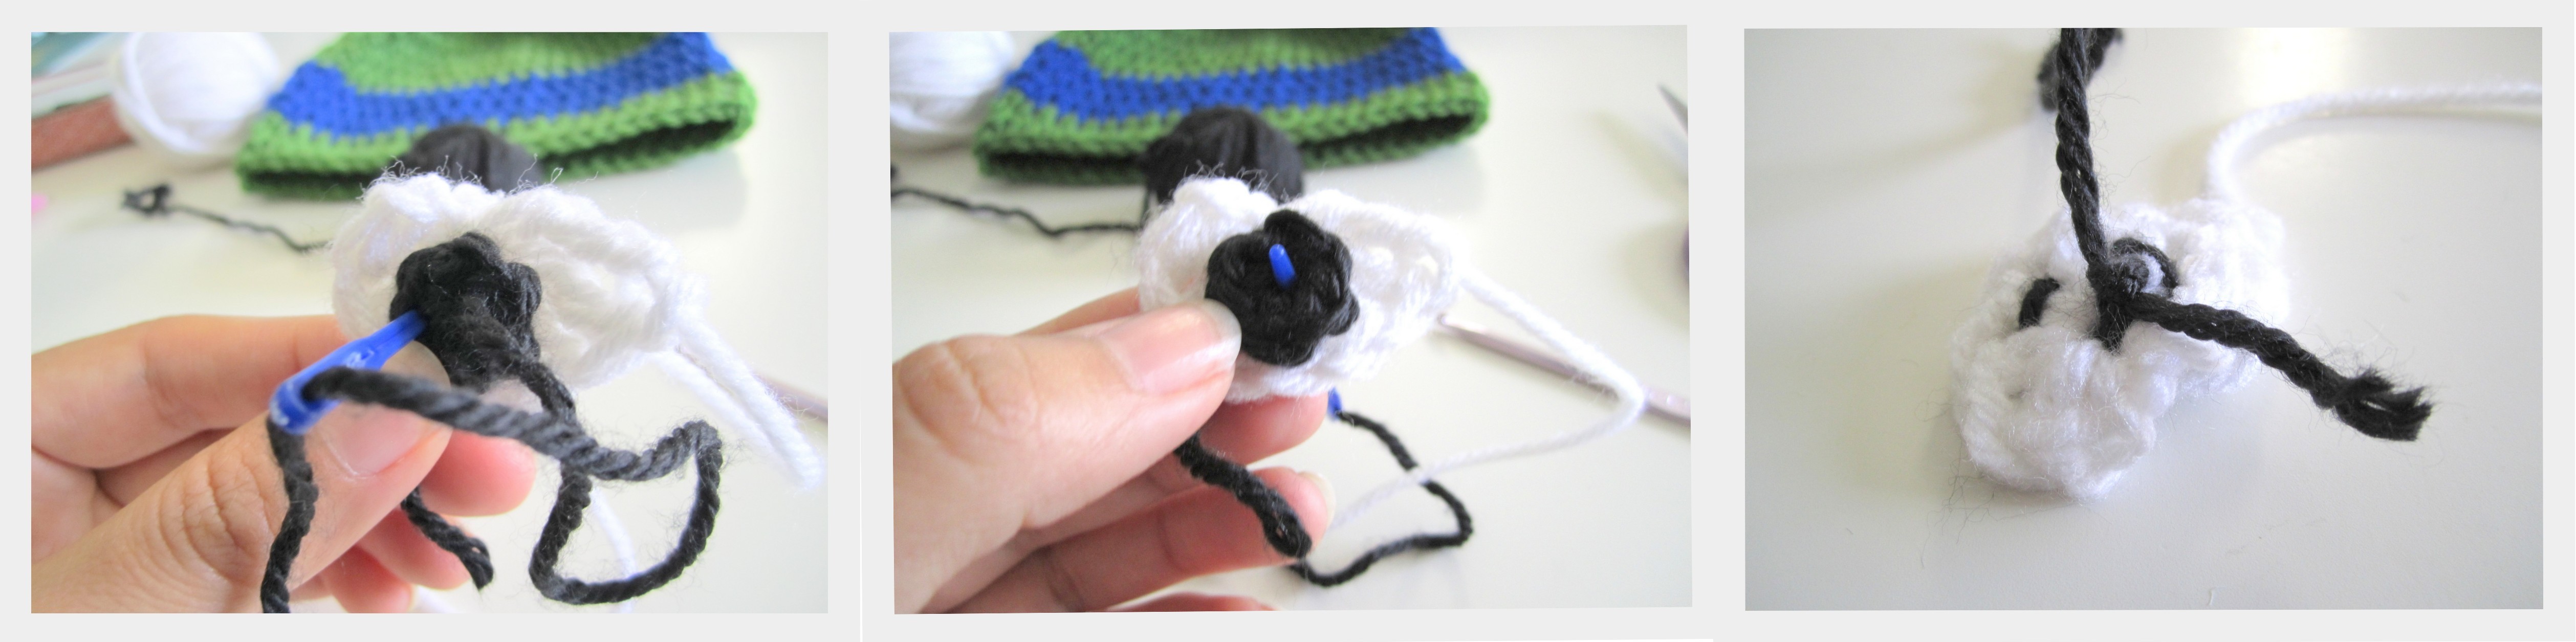 just like that, our eyeball has taken shape
 create another just like it, remember we need 2
EXCEPT the second “eyeball” (white part) will have to be flipped once complete before adding the black circle. It is necessary to finish the 2nd eye on the reverse due to the “winged” corner of the eye being on one end of the white applique. We want that “winged” end on both outsides of the eyes to give it that realistic face.
 Now, find a place on the colored strip where you like the eyes. I tilt my eyes so that the “winged” end is a little more exaggerated

thread the long white tail thru your needle

and carefully start sewing the eye onto the hat. There is no wrong way to do this really. I just do it as neatly as possible to hide the stitches on the front. The inside can look like this and its ok! make sure to weave in your ends well.

Now do the other eye.
Tada!

This finished picture tutorial measures 16 inches in circumference, perfect for a baby up to 6 months.
This pattern can easily be increased for larger sizes.
I will provide written patterns for those common larger sizes. All supplies remain the same.
**************************
Toddler 1-3 years old / 19 inches circumference, 7 inches long
R1: Magic Circle, 12 DC
R2: ch 2 (does not count as a DC), 2DC in same stitch, 2 DC in every stitch around (24 DC)
R3: ch 2, 2 DC in same stitch as ch 2, 1 DC in next stitch. *2 DC in next, 1 DC in next*, repeat * * around. (36 DC)
R4: ch 2, 2 DC in same stitch as ch 2, 1 DC in next, 1 DC in next. *2 DC in next, 1 DC in next, 1 DC in next*. repeat * * around (48 DC)
R5: ch 2, 2 DC in same stitch as ch 2, 1 DC into each of the next 7 stitches. *2 DC in next, 1 DC in each of the next 7*. repeat * * around.
R6: ch 2, 1 DC in same stitch as ch2, 1 DC in every stitch around.
R7: ch 2, 1 DC in same stitch as ch2, 1 DC in every stitch around.
R8: ch 2, 1 DC in same stitch as ch2, 1 DC in every stitch around.
R9: , ch 2, 1 DC in same stitch as ch2, 1 DC in every stitch around.
R10: ch 2, 1 DC in same stitch as ch2, 1 DC in every stitch around.
R11: ch 2, 1 DC in same stitch as ch2, 1 DC in every stitch around.
R12: < add green color back in for this round>, ch 2, 1 DC in same stitch as ch2, 1 DC in every stitch around.
R13: ch 2, 1 DC in same stitch as ch2, 1 DC in every stitch around.
tie off, weave in ends
Eyes
Size G hook
– white:
chain 3, 5 DC into 3rd chain from hook, 2 treble crochet, tie off with long tail
– black:
magic circle, 6 sc into circle, tighten circle, slit stitch into top of first sc, tie off with long tail
sew black circle onto white “eyeball” (applique)
>>for 2nd eye, place black circle onto white applique that has been flipped over <<
sew eyes onto “mask” portion of the hat where desired
——————-
Child 4-10 years old / 20 inches circumference, 8 inches long
R1: Magic Circle, 12 DC
R2: ch 2 (does not count as a DC), 2DC in same stitch, 2 DC in every stitch around (24 DC)
R3: ch 2, 2 DC in same stitch as ch 2, 1 DC in next stitch. *2 DC in next, 1 DC in next*, repeat * * around. (36 DC)
R4: ch 2, 2 DC in same stitch as ch 2, 1 DC in next, 1 DC in next. *2 DC in next, 1 DC in next, 1 DC in next*. repeat * * around (48 DC)
R5: ch 2, 2 DC in same stitch as ch 2, 1 DC in next, 1 DC in next, 1 DC in next. *2 DC in next, 1 DC in next, 1 DC in next, 1 DC in next*. repeat * * around (60 DC)
R6: ch 2, 1 DC in same stitch as ch2, 1 DC in every stitch around.
R7: ch 2, 1 DC in same stitch as ch2, 1 DC in every stitch around.
R8: ch 2, 1 DC in same stitch as ch2, 1 DC in every stitch around.
R9: ch 2, 1 DC in same stitch as ch2, 1 DC in every stitch around.
R10: , ch 2, 1 DC in same stitch as ch2, 1 DC in every stitch around.
R11: ch 2, 1 DC in same stitch as ch2, 1 DC in every stitch around.
R12: ch 2, 1 DC in same stitch as ch2, 1 DC in every stitch around.
R13: < add green color back in for this round>, ch 2, 1 DC in same stitch as ch2, 1 DC in every stitch around.
R14: ch 2, 1 DC in same stitch as ch2, 1 DC in every stitch around.
R15: ch 2, 1 DC in same stitch as ch2, 1 DC in every stitch around.
tie off, weave in ends
Eyes
Size G hook
– white:
chain 3, 5 DC into 3rd chain from hook, 2 treble crochet, tie off with long tail
– black:
magic circle, 6 sc into circle, tighten circle, slit stitch into top of first sc, tie off with long tail
sew black circle onto white “eyeball” (applique)
>>for 2nd eye, place black circle onto white applique that has been flipped over <<
sew eyes onto “mask” portion of the hat where desired
*****************************
Like I said at the beginning of this post, I am available for questions. Feel free to use this pattern just remember to give credit where its due. Do not claim this pattern as your own. Thats not nice.
Reblogged this on UK Crochet Patterns.
Reblogged this on Crochet Adventures! and commented:
Free tutorial! Very cute. 🙂
hmm…I may actually have time to make that for my nephew before Christmas! (omg, what am I saying?)
Reblogged this on acraftyday and commented:
Teenage Mutant Ninja Turtle hat, my sister is sharing here pattern after OVERWHELMING requests (yours truly included). Enjoy!
Your 4-10 says 9 inch circumference. That’s not possible….
Thank you for catching that! I meant to type 20 inches in circumference. I’ve update the post. =)
How many rounds of green on the top portion would need to be added to make this an adult size?
Hi! I would add another row of increase to the child size so that the circumference grows by atleast an inch to fit adult. Including the extra increase row, maybe 1 extra row should give you the length you need 🙂 hope that helps!
At what part would you add another row? I see on the child’s size the last increase is row 5. Would I add another identical row or would there be a new pattern for row 6? And is that the only row to add? Also, which row should the color band start and end? Sorry for all the questions! Thank you for a great pattern!
I am doing the Child 4-10 years old. Which row do I change color for the band? It says row 13 go back to green?
The first color change should happen at row 10 … And then back to green at row 13. Hope that helps!
That’s what I thought. The Toddler 1-3 years old color band starts at row 9? Great pattern thank you. My Grandson will love it.
Thinking of making these as party favors for a birthday party. How many hats for the child 4-10 do you think one skein of the green will make?
Hi there! Glad to hear you are going to tackle this project. In this particular brand of yarn with the skein shown, you could get about 1.5 larger size hats. Hope that helps!
Thank you for your tutorial……
Can you do this hat in half dc ? If so what changes would there be as far as rows done?
Hi there! Yes, the hat can absolutely be done in half double crochet. That would call for more increase rows in order to achieve the same circle diameter as in the double crochet. You would have more stitches per row as a result compared to this pattern.
Hi! Just to clarify….it seems that no matter what size you make the band color is only 3 rows. Is that correct?
Thanks, mj
Yes, correct! The accent color is 3 rows 🙂
Thank you! I have found your pattern to be both simple to follow and fun to make. My family/friends are going to enjoy these cute hats!
And I will be sure to credit you…. 🙂
Thank you very much =)
At what part would you add another row for an adult hat? I see on the child’s size the last increase is row 5. Would I add another identical row or would there be a new pattern for row 6? And is that the only row to add? Also, which row should the color band start? Sorry for all the questions! Thank you for a great pattern!
Hi there! For an adult size hat, simply add an increase row at Row 6. This row would require adding more stitches so that the total number of stitches goes from 60 to 72. In order to do that the row would be as follows: *2 DC in next, 1 DC in next, 1 DC in next, 1 DC in next, 1 DC in next* = (2,1,1,1,1). Row 7 will pick up where the old Row 6 is, 1 DC all the way around and continue with the child size pattern. This added Row 6 also counts as the extra row which should give an extra 1/2 inch of length. Hope that answers your question!
Absolutely! Thank you so much! I haven’t crocheted since I was a teenager (long time ago) but wanted a knitting diversion. This is such a cute pattern and I’m making it as a surprise for a friend in the UK.
You are my hero! Strike that…you are my son’s hero! I do all sorts of fun hats but I never thought about doing a TMNT hat. Thanks for the inspiration!
Thank you =D
Love how easy this pattern is…I actually make all of my character hats in half double crochet, as most of my customers are looking for baby size hats.
2 Questions for you: 1. have you ever added “tails” to the back of the hat (like ties)
2. have you ever made a Minion hat? and if you had, do you have a pattern for it…
thanks for this very easy hat pattern, love the shape of the eyes.
Kathy
Hi ! I have not added “tails” to the back of the masks but I have thought about it. I think the best way would be to crochet a completely separate “mask” piece and stitch it directly onto the hat. I do have a minion pattern listed under the tutorial tab =)
Hi, I (and my husband, specifically) are absolutely in love with this hat. Since my husband has a little larger head, I had to expand out to 84 stitches/row to make it fit, and now that I’m making the eyes, they seem small compared to the size of the hat. Do you have any recommendations on how to make the whites of the eyes any larger?
Thank you SO MUCH for a wonderful, easy to follow pattern. You’ve helped me make my husband’s day! 🙂
Thank you so much for trying the pattern! I hope the size of the hat turned out the way you needed it to. I can see the eyes looking a little small for a hat that size lol. I would simply add another row to the white consisting of 2 single crochet in every stitch around. That should work! Hope it helps.
Hi,, I just wanted to say THANK YOU SO MUCH for this awesome pattern!!! my husband absolutely loves the turtles and I am so happy I found this pattern for him!!! This is going to be one of his Christmas presents if I can wait that long to give it to him 🙂 hehehe
How do your seams turn out? They shouldn’t be too visible once complete.
I’m so glad I found your tutorial! This is the 1st one I’ve been able to follow and it turn out looking like a beanie, lol. I want to thank you for your tutorial, it’s very easy to follow, I look forward to following you. I’ve made 2 hats for my grandson’s and they fit perfect. Question: to make an adult size, do you just continue with additional rounds? That’s my guess. I’m a beginner to novice and reading some patterns are very difficult for me.
Thank you so much! For an adult size I would increase an extra round and then add 1-2 rounds at the bottom for the extra length. That should be easy to modify to what you need =)
Thanks so much for posting this pattern! Very easy to follow for a new crochet-er. Made one for my nephew for Christmas and added earflaps (in green) following the instructions from the minion pattern.
Next iteration will be an adult size for a friend with a large head (large even for an adult). Pattern mods I’m planning to use (in case anyone else might find them helpful): Besides sizing up the crown, I’ll be doing 5 rows of half double crochet for the “mask” rows and will make the white part of the eyes out of 2 strands of yarn (still worsted weight) crocheted with an H hook. I already made one eye this way to test it out and it’s the perfect size for a large hat. Yay for successful experimentation!
Just had to tell you…I followed the TMNT pattern instructions and it was quite easy. So I made a second hat, but using half double crochet instead of double crochet. I just added a few more rows of the green and 1 more row of the blue. It turned out great!
And the Minion pattern: You are very good at your instructions, which are easy to follow. I changed the double crochet to half double (which I like to use for my hats) and I made 2 of them in different sizes. I had a craft show a couple of weeks ago and lots of kids liked the hats. I even got a custom order for 2 hats. THANK YOU for these patterns, they worked out great.
Thank you so much for the kind words =)
Thanks for helping me make a 6 yr old boy happy ! I always find things to crotchet for his sister but he’s a lil tougher! You Rock!
Thank-you so much for sharing. My nephew wil love these and will make some for charity! Very helpful! God bless!!! 😊
I don’t cut the green so that it stays as one continuous strand of yarn =) there will be a strand of green but it will be on the inside and not noticeable. That way you don’t have to mess with joining and having to hide your ends, keeps it cleaner!
Thank you so much! I sell them for around $20 depending on the size =)
Thank you so much for posting this tutorial. I just made the Raphael hat for my son. He is going to be so excited tomorrow morning. It is going to feel like Christmas again!!!
Thanks for posting this I used the eye pattern which was very helpful 😊
THANKS I FOUND IT VERY EASY TO,AND I CANT REALLY READ PATTERNS, IM A BINGGER,I LOVE TO CROCHET,WHAT I DID WAS SUBTRACK 1 GREEN ROW FOR ANY ORANGE ROW,CUZ I WANTED TO HAVE THE ORANGE A LIL WIDTHER ALL AND ALL IT CAME OUT THE SAME STITCHES AS URS, THANKS,IM SO HAPPY
Hello! What would I need to do for it to be a newborn size?
Thank you so much for sharing but especially the tutorial. I am not a good crocheter But my daughter will love it. She has shown me so many patterns but was never at ease. I am now attempting your pattern to be used as birthday hats for my 5year old grandson. My only problem is getting the right size. Made one that fits my head. Now trying the same pattern using smaller hook. Wish me luck.
Love the hat! Love the tutorial. Your instructions with pictures made it super easy! Thank you very much. 🙂 I’ll have lots of happy little “turtles” now!
Hi,
I just love your pattern!! You have written very well. So easy to follow and the hat was finished before I knew it. Thanks so much.
Thank you for this wonderful pattern I can’t wait to make my grandson one for Christmas
I just finished this hat it was very easy to follow and well illustrated. I also made the turtles scarf to match. Merry Christms to all.. Thank you 🎄