After an unexpected positive response to my crochet minion kids hat, I was asked about providing a pattern. I thought about trying to draft up a fancy PDF file and post it for sale, but I am no crochet expert and besides, writing a formal pattern would take me f-o-r-e-v-e-r. I would be happier giving crocheters out there a fun tutorial to make their own minion characters.

Anyone else who would like to purchase the finished item can do so thru our Etsy shop where it is listed in various children’s sizes.
The following detailed tutorial is for a child 3-5 years old for a 20 inch head circumference.
An abbreviated pattern for others sizes will be towards the bottom of this post.
I apologize for the poor quality of the photos, as I was very eager to get this post out to those who requested. My vampire schedule makes it difficult to take good photos without the natural daylight. Especially when I’m stuck indoors most of the time.
======================================
What you will need:
Crochet Hook: H/8-5.00mm (US)
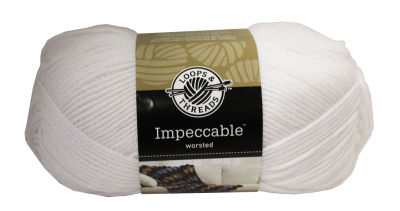
Yarn– Worsted weight medium (4) yarn, I use Loops & Theads Impeccable in the following colors:
> Butterscotch (yellow)
> Popsicle Blue
> Black (small amount)
> White (small amount)
> True Gray (small amount)
======================================
The base of the hat starts with a magic circle. For those not familiar, there are oodles of magic circle tutorials and instructional videos available online. Try this link here for an easy to follow tutorial.
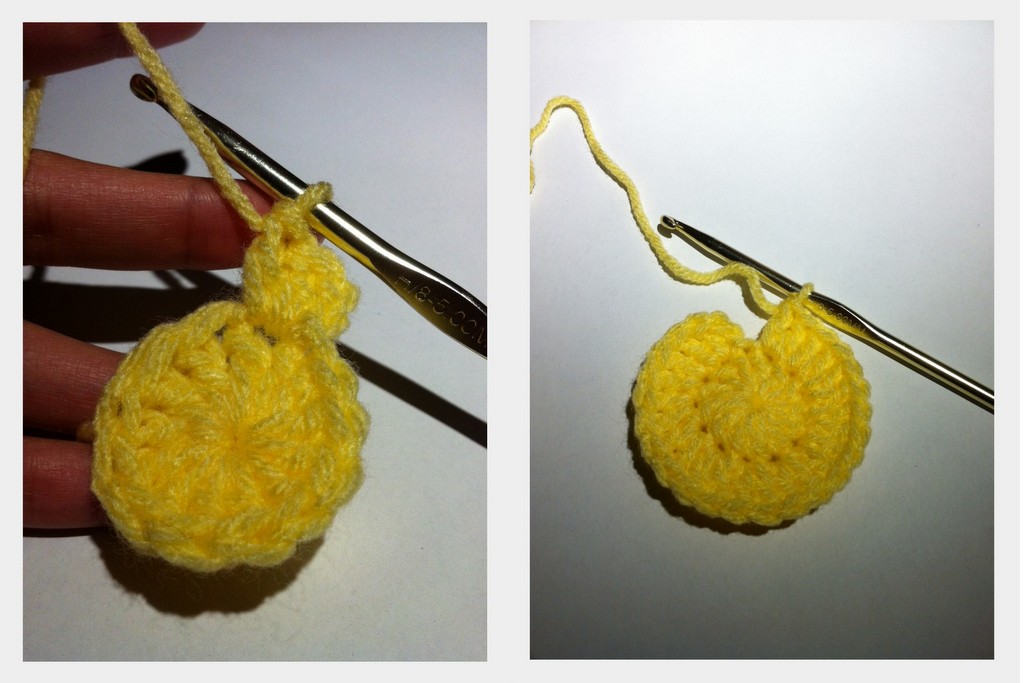
R1: starting the yellow color, create a magic circle.
Once the magic circle has been looped onto the hook, chain 2 ( from here on, ch2 will not count as a stitch for body of the hat)
12 DC (double crochet) into the magic circle, and close up the circle by pulling on the short strand of yarn.
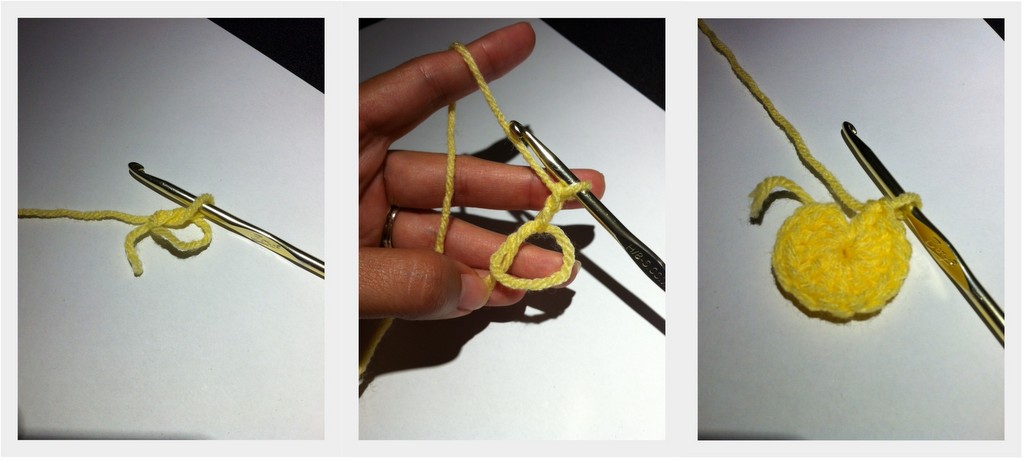 slip stitch into the top of the first double crochet of the round (not the original chain 1 or 2)
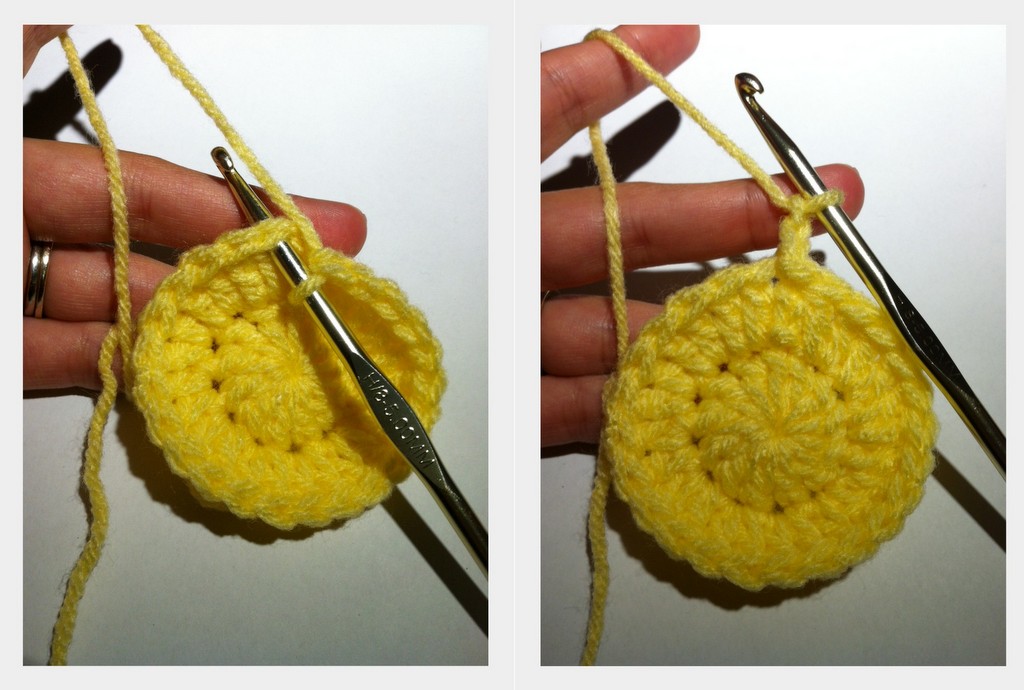
chain 2 (remember does not count as a double crochet)
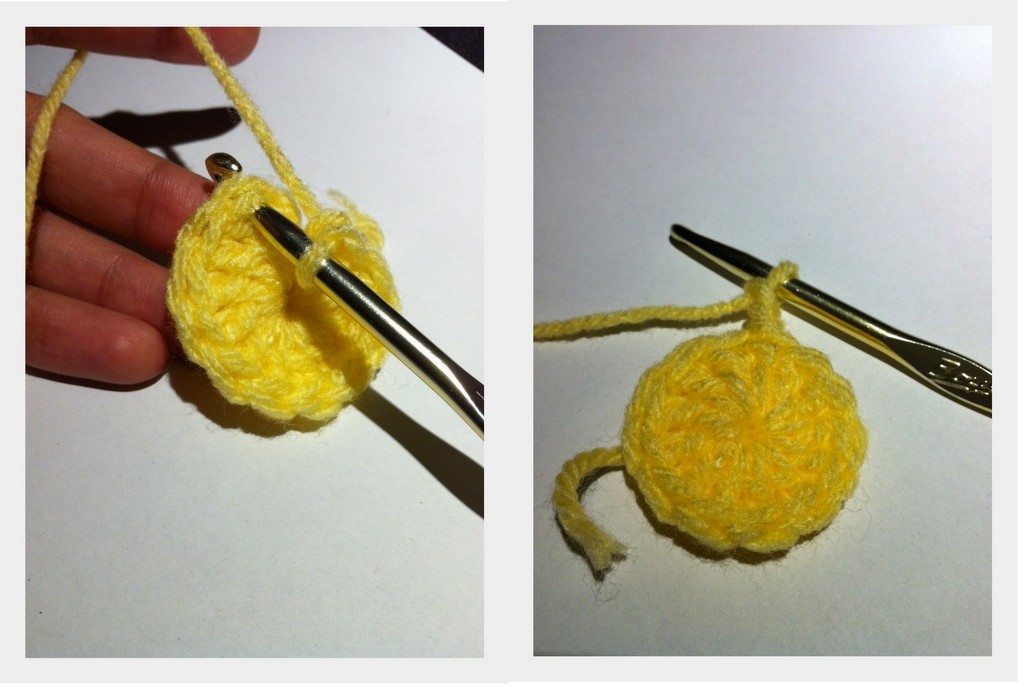 R2: start increasing
2 DC into the same stitch as the chain 2
2 DC in every stitch around (total 24 DC)
 slip stitch into the top of the first double crochet of the round (not the original chain 1 or 2)
chain 2
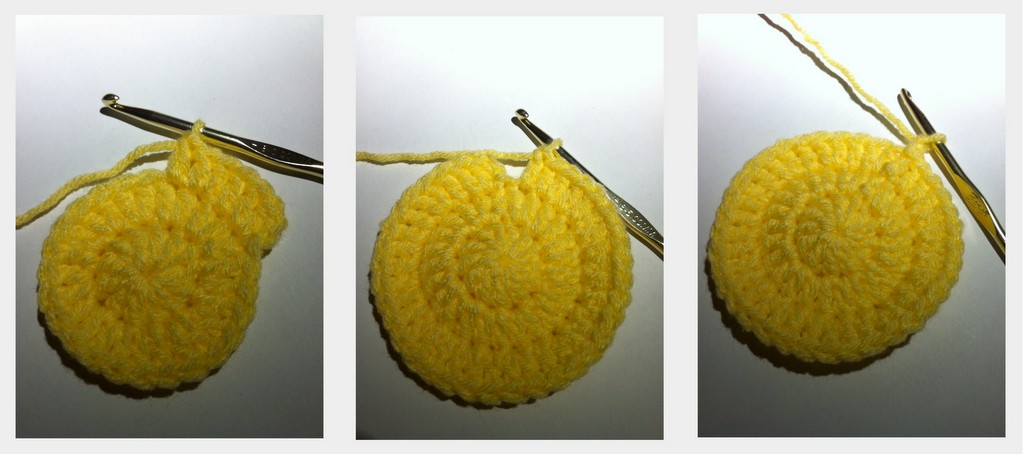
 R3: Another increase row
2 DC in same stitch as ch2, 1 DC in the next stitch
2 DC in the next stitch, 1 DC in the next
Continue with this increase all the way around (total 36 DC)
slip stitch to the top of the first DC
ch 2
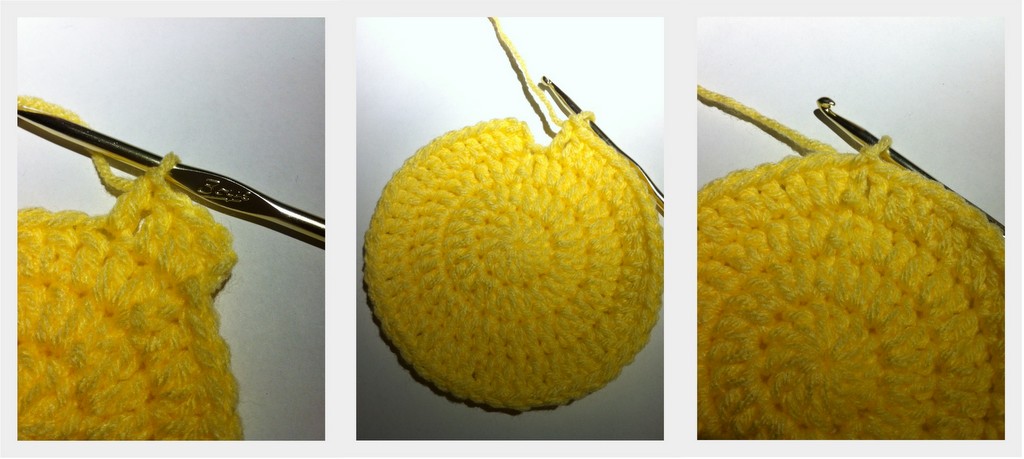
 R4: Another increase
2 DC in same stitch as ch 2, 1 DC in next, 1 DC in next
repeat increase of *2 DC, 1 DC, 1 DC* around (total 48 DC)
slip stitch to the top of the first DC
R5: another increase (not pictured)
ch 2
2 DC in same stitch as ch 2, 1 DC in next, 1 DC in next, 1 DC in next
repeat increase of *2 DC, 1 DC, 1 DC. 1 DC* around (total 60 DC)
slip stitch to the top of the first DC
R6: no more increase
ch 2
1 DC in same stitch as ch 2
Continue around with 1 DC in every stitch
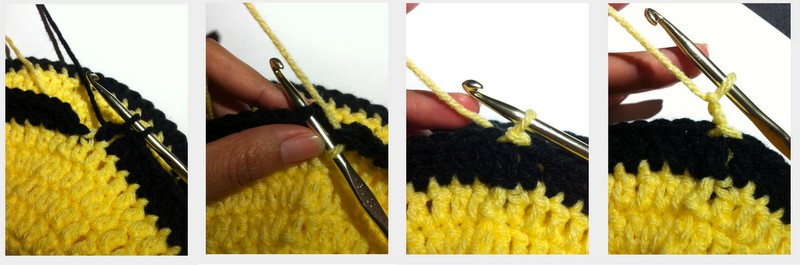
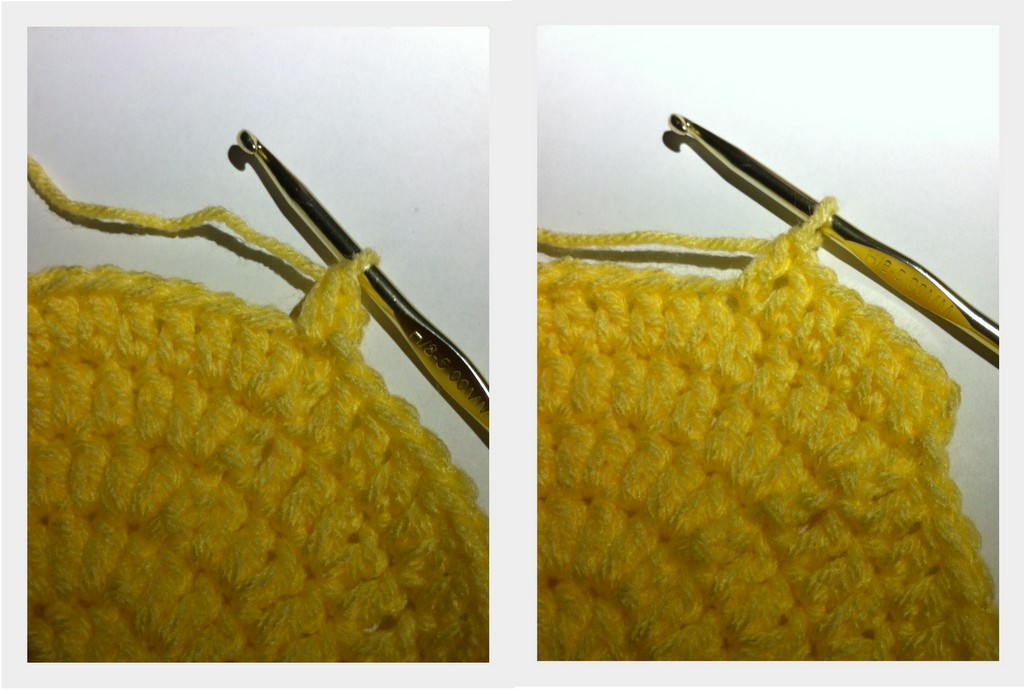 R7: Add the black yarn
We will be adding the color for the next row in a seamless way
On the last DC from R6, only partially complete the stitch, leaving 2 loops on the hook
Tie a slip knot onto the black yarn, and place onto the hook
Pull black yarn thru the stitch, completing the DC
Find the top of the first DC of the row
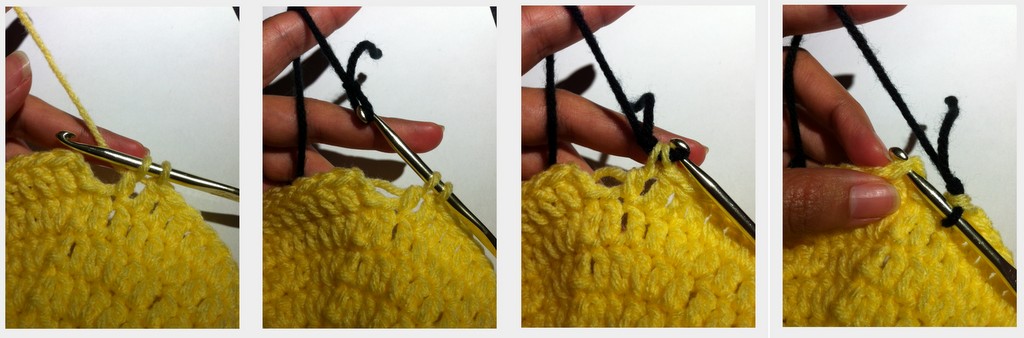 Slip stitch into the top of the first DC of the row
Yarn joining is complete!
chain 2
 Notice the yellow yarn is NOT tied off. Will be easier to pick up when needed again in the next row
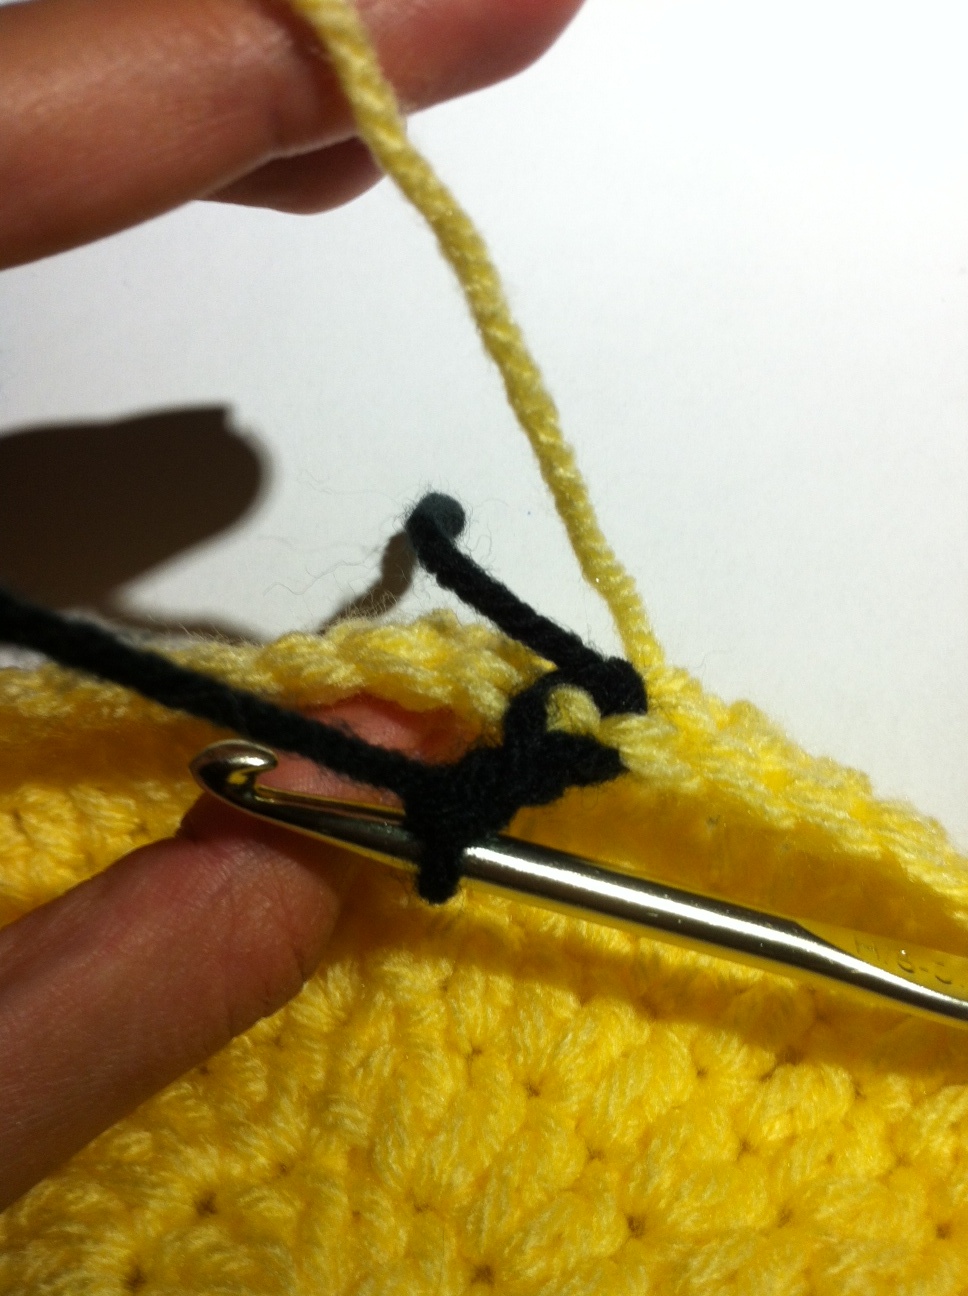
1 DC in same stitch as ch 2
1 DC in each stitch around
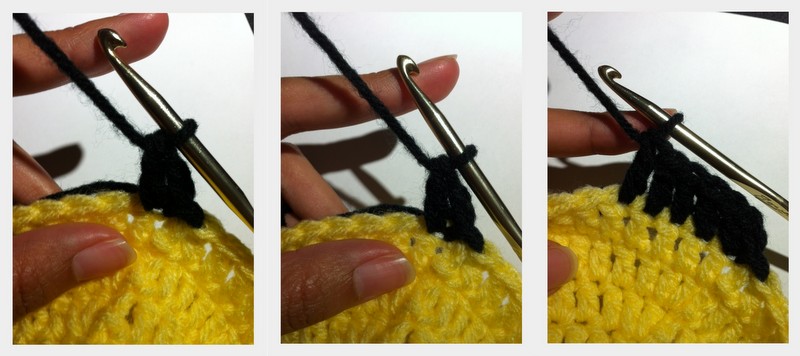 We will be adding the yellow yarn back on in preparation for the next row
On the last DC, only partially complete the stitch, leaving 2 black loops on the hook
Pick up the yellow yarn and pull thru the stitch, completing the DC
chain 2
R8: 1 DC into each stitch around, slip stitch into top of first DC
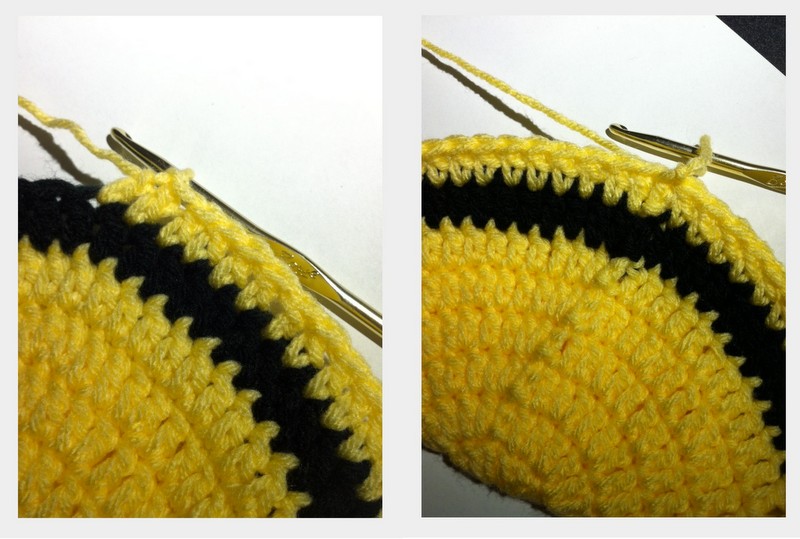
Starting to look like a hat

R9 – R12 : repeat R8
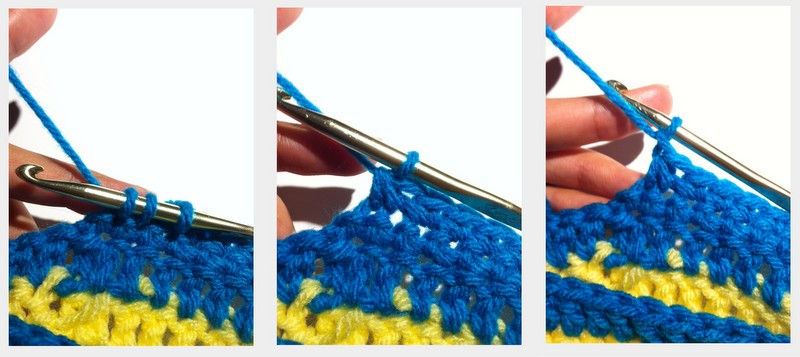
We will be adding the blue yarn in preparation for the next row, same as we did with the black yarn at the end of R6
On the last DC of the round, only partially complete the stitch, leaving 2 black loops on the hook
Pick up the blue yarn and pull thru the stitch, completing the DC
Slip st to the top of first DC at the beginning of the row
chain 2
(the yellow yarn can be tied off at this point, it will no longer be used)
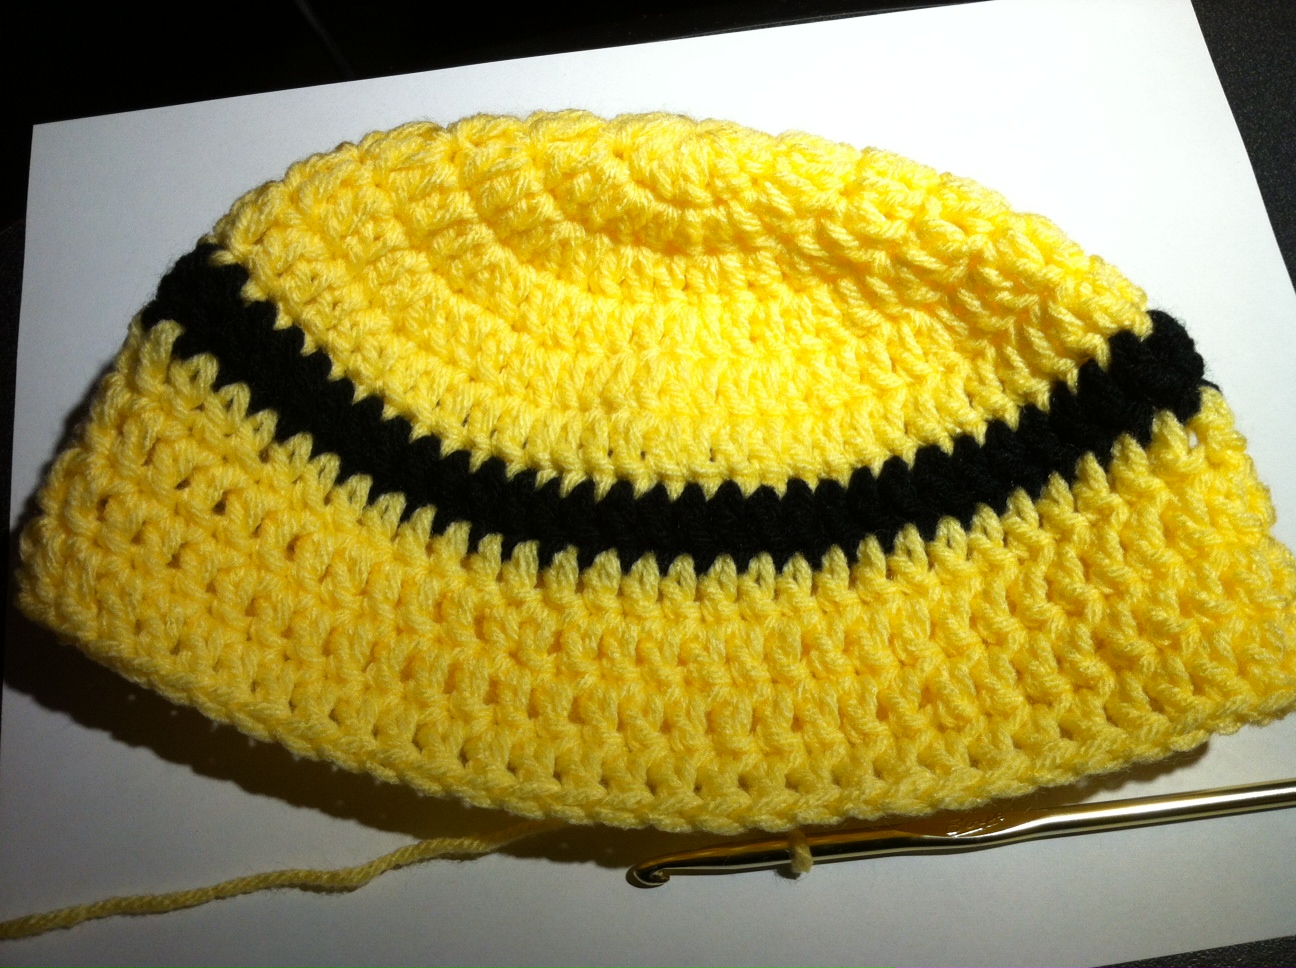
 R13: 1 DC in same stitch as ch 2. 1 DC in every stitch around. Slit stitch to top of first DC of the beginning of the row

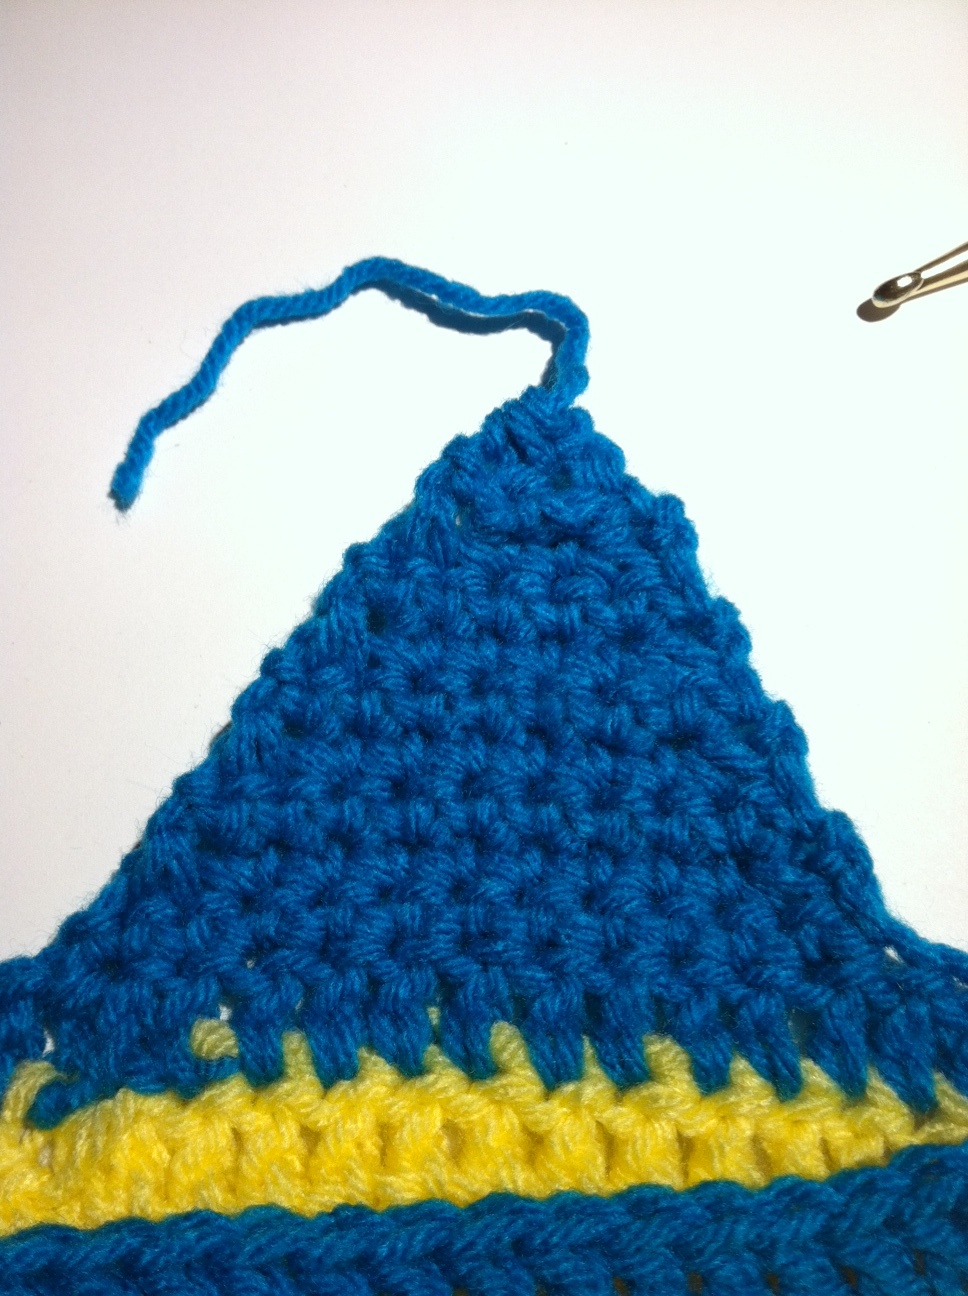
Start earflaps
R1: chain 1, 1 sc into same stitch as ch 1
 1 SC across for 11 stitches (12 sc total)
 chain 1
 Turn
Turn
R2: The next stitch will be a single crochet decrease (SCD) that will cover the next 2 stitches
A more detailed explanation/tutorial of a SCD can be seen HERE
SC across 8 stitches
SCD over the last 2 stitches in the row
chain 1
turn
The rest of the earflap will continue in the same manner, as follows:
R3: SC 10, ch 1, turn
R4: SCD over first two SC, SC next 6, SCD over last two SC, ch 1, turn
R5: Sc 8, ch 1, turn
R6: SCD over first two SC, SC next 4, SCD over last two SC, ch 1, turn
R7: SC 6, ch 1, turn
R8: SCD over first two SC, SC next 2, SCD over last two SC, ch 1, turn
R9: SCD over first two SC, SC dec over last two SC, ch 1, turn
R10: SC over two sc
Finish off
2nd earflap
Locate the seam at the back of the hat, where the earflap row started
 Count 14 stitches away from the seam, this is where the 2nd earflap will start
Turn
After turning, slide hook thru the 14th chain located
Tie a slip knot onto the blue yarn and slide onto the hook
chain 1
Row 1 for the 2nd earflap will be stitched AWAY from the seam, maintaining the 14 stitches in between the 2 earflaps.
R1: 1 SC across for 11 stitches
 chain 1, turn
Rest of the 2nd earflap will continue same as the 1st earflap with the following pattern
R2: Row 2: Sc dec over first two sc. Sc next 8 sc. Sc dec over last two sc. Ch 1, turn
R3: SC 10, ch 1, turn
R4: SCD over first two SC, SC next 6, SCD over last two SC, ch 1, turn
R5: Sc 8, ch 1, turn
R6: SCD over first two SC, SC next 4, SCD over last two SC, ch 1, turn
R7: SC 6, ch 1, turn
R8: SCD over first two SC, SC next 2, SCD over last two SC, ch 1, turn
R9: SCD over first two SC, SC dec over last two SC, ch 1, turn
R10: SC over two sc
Do not tie off
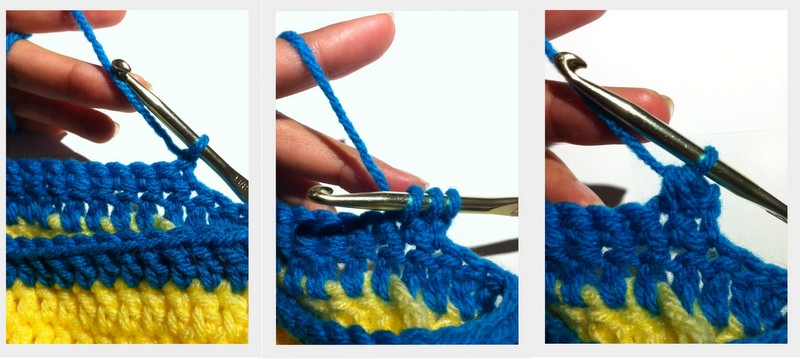
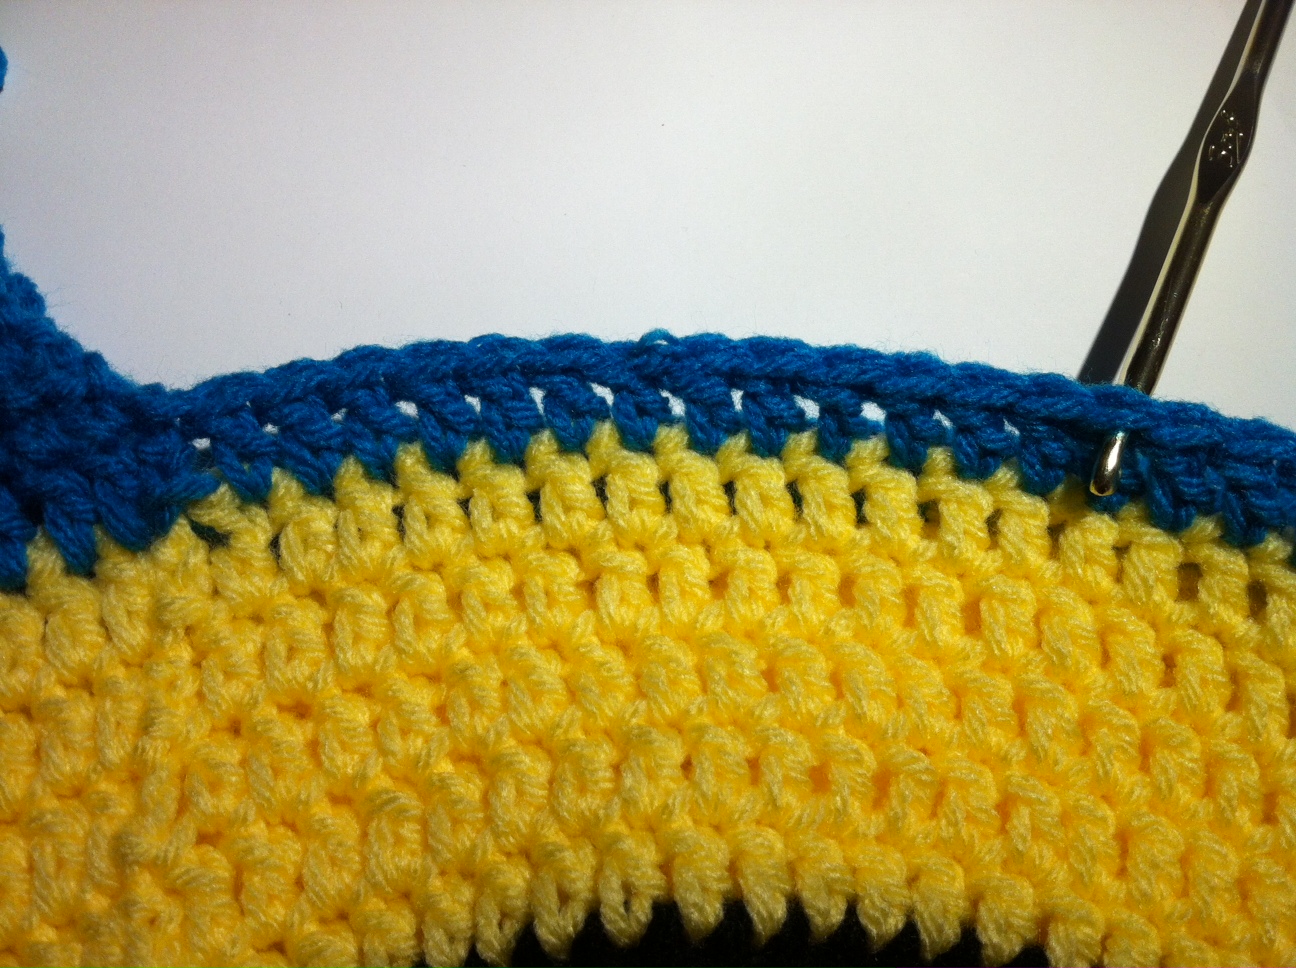
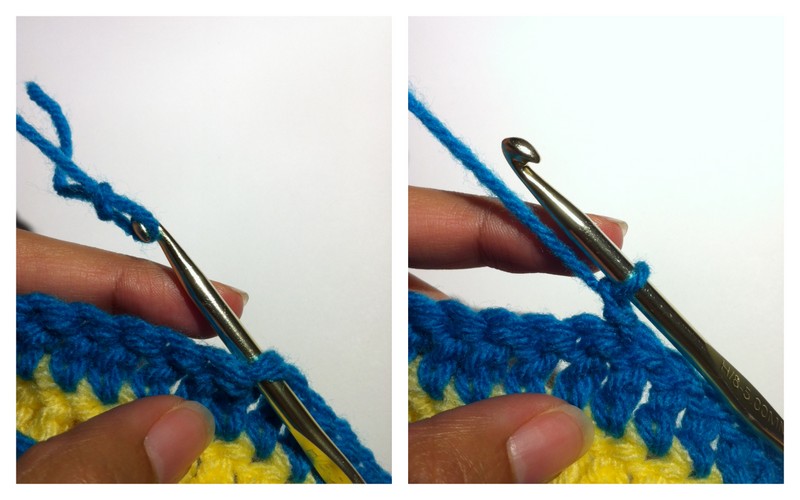
 With the outside of the hat facing you, we will start an edging all the way around the hat
chain 1
SC evenly around the earflap
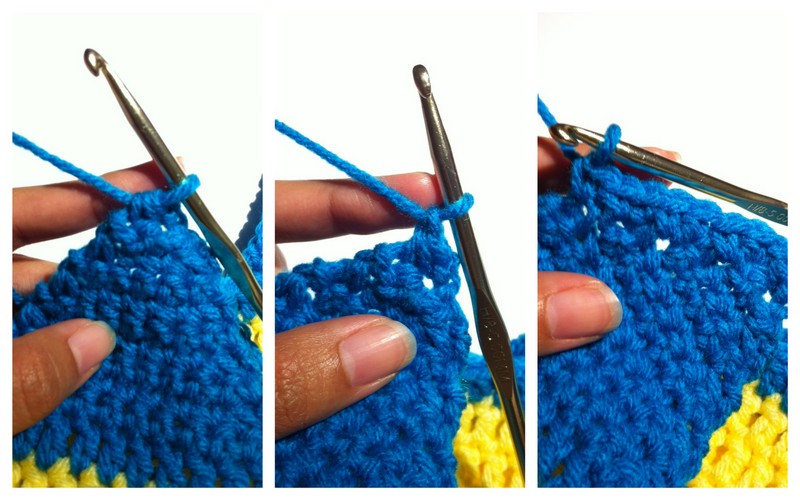 Continue to SC around the front of the hat and around the flap on the other side
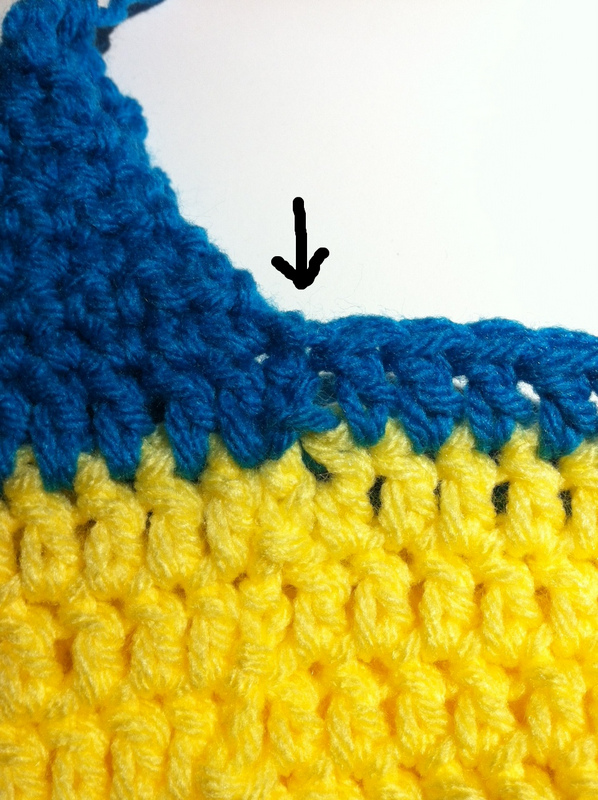
Once back at the beginning of the where the edging started, SC 3 into the center space created in the earflap. (notice the small *hole* visible in the first picture) This creates a rounded edge and allows an opening for braided tails to be attached if desired.
Tie off
This is a good spot to weave in any loose ends that might be hanging around
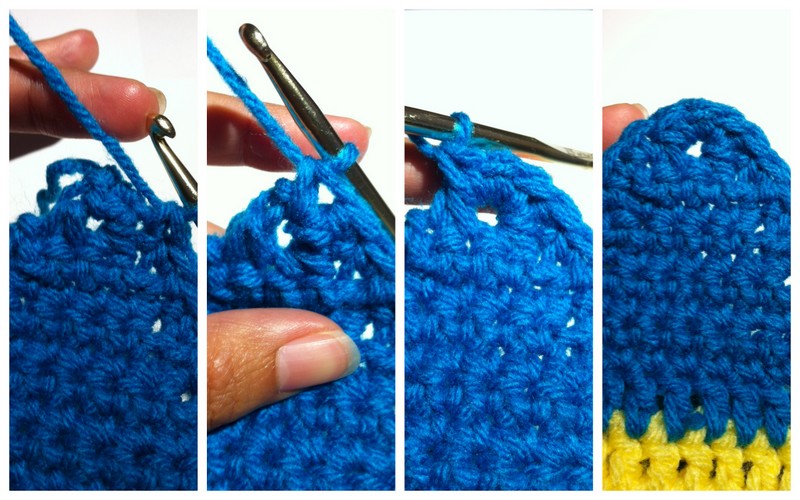 Hat is almost complete!
Eye
R1: magic circle
chain 3 (WILL count as a stitch)
10 DC inside circle (11 DC total)
 Start another DC inside the circle but do not finish the stitch
We will be adding the white yarn in preparation for the next row
With 2 black loops still on the hook, slide the white yarn slip knot onto the hook
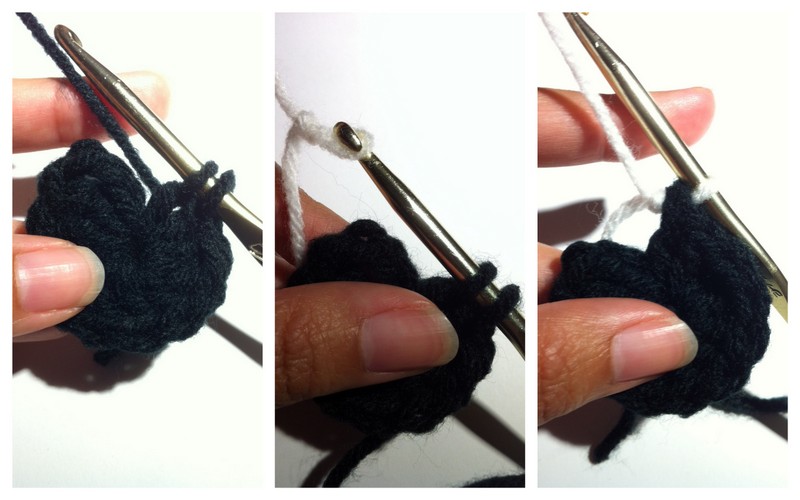 Complete the 12th DC stitch by pulling the white yarn thru the 2 loops on the hook
Slip stitch into the chain #3 from the beginning of the row.
R2:
chain 3 (counts as DC)
1 DC into same stitch as ch 3
2 DC in ever stitch around (24 DC total)
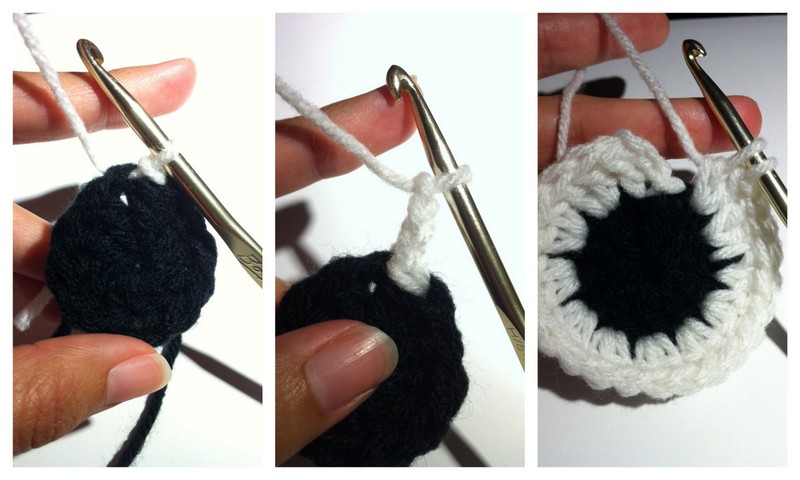 Only partially complete the last DC (#24). We will be adding a 3rd yarn color, using same method.
Attach the gray yarn to the hook with a slip knot and pull thru the 2 white loops on the hook, completing the 24th DC of the round.
Slip stitch into the chain #3 from the beginning of the row.
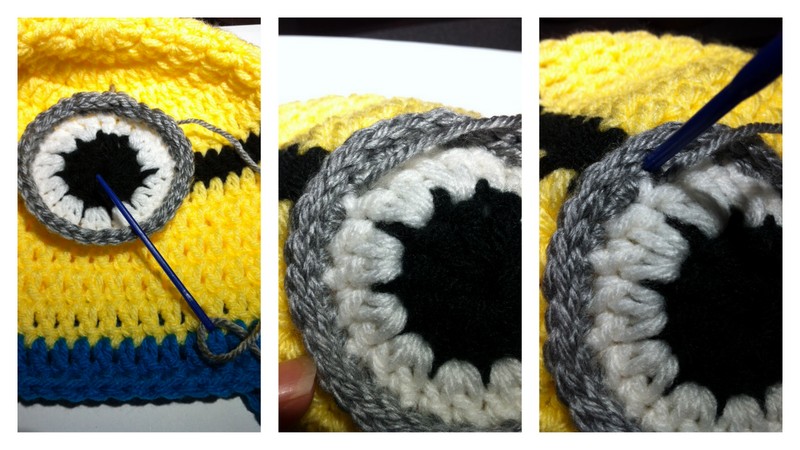
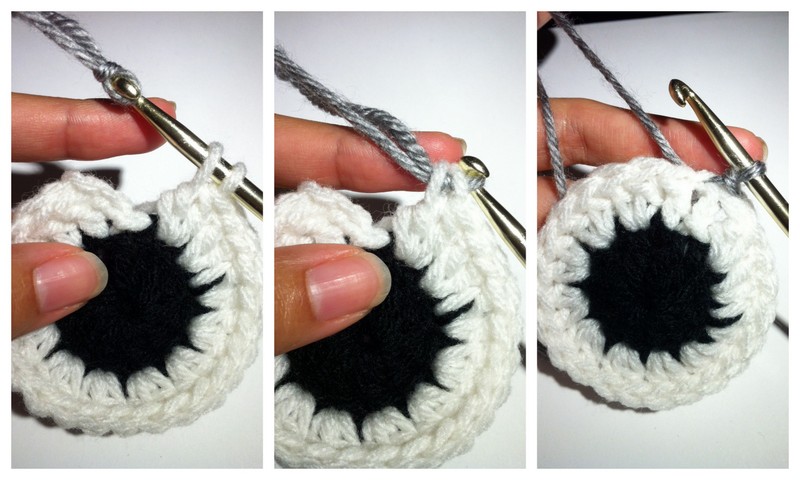 R3:
R3:
chain 1 (counts as sc)
SC 1 into same stitch
SC 1 in next stitch, 2 SC in next
Repeat the same increase around
Slip stitch to chain 1 from the beginning of the round
slip stitch into every single crochet from the previous round (this will give a nice edge to the eye resembling the goggles worn by the character)
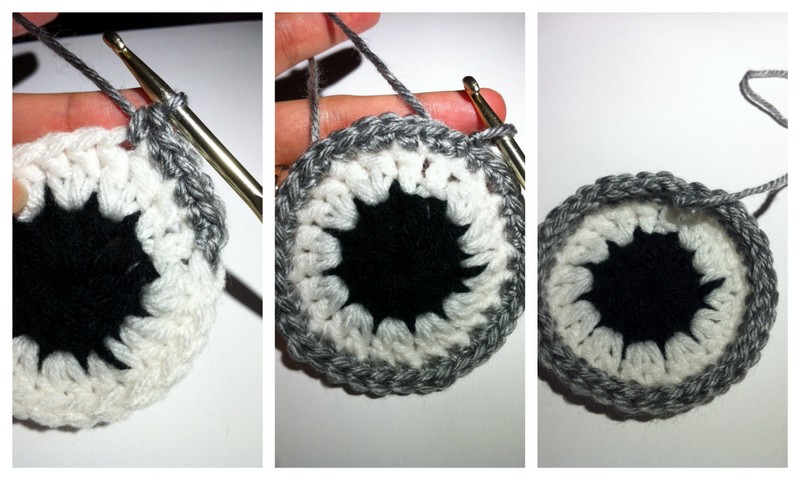 Center the eye on the hat where it looks best
I used a large needle to secure the eye onto the hat easily. Any method can be used
 Minion “hair” can be added at the preference of the maker/wearer
I chose an easy method
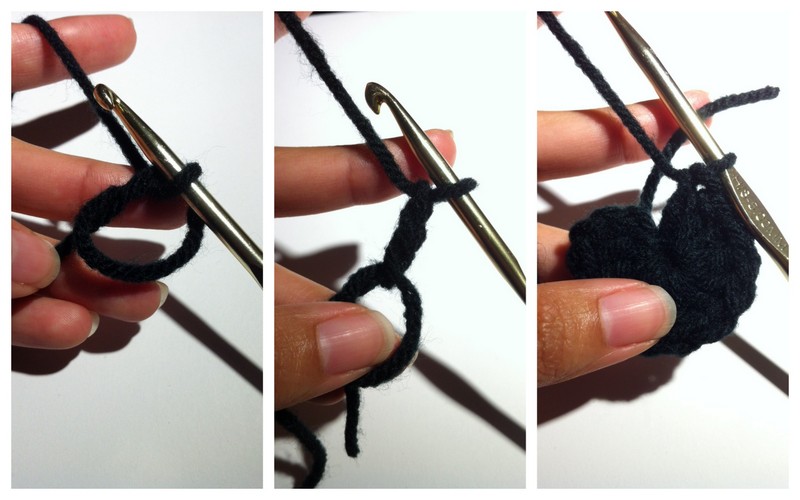
Cut 6 strands of black yarn, each approx 8 inches in length
Find a comfy spot at the very top of the hat where the hair would look good
Using a larger crochet hook, such as the N sized hook pictured, makes this step easier
Folding the group of strands in half, pull the center of the strands thru the location on the hat.
 With the hook still in the loop which is the center of the strands, pull the ends of the strands thru the loop, creating a knot
Cut the ends of the strands to the desired length
Now you have crazy minion hair
 All that is left to add is the smile. Which can be added with black yarn and a large needle. Placed wherever desired below the eye. Choose a frowny face, sideways smirk, or smile and hand stitch it into the yellow DC.

Here is an abbreviated pattern for different hat sizes:
Pattern for eye and “hair” remain the same for all hat sizes
Toddler – 19 inches around:
R1: magic circle, 12 DC
R2: increase – 2 DC in each stitch (24 DC)
R3: increase – *2 DC, 1 DC*. repeat ** (36 DC)
R4: increase – *2 DC, 1 DC, 1 DC*. repeat ** (48 DC)
R5: increase – *2 DC, 1 DC in the next 7 stitches*, repeat
R6: (no increase) attach black yarn, DC in every stitch
R7-R10: (reattaching yellow yarn), DC in every stitch, tie off black yarn
R11: attach blue yarn, DC in every stitch, tie off yellow yarn
R12: with blue yarn, HDC in every stitch
start ear flaps
First Earflap:
Ch 1
R1: SC 12, ch 1, turn
R2: SCD first two SC, SC next 8 SC, SCD last two SC, ch 1, turn
R3: SC 10, ch 1, turn
R4: SCD first two sc, SC next 6 SC, SCD last two SC, ch 1, turn
R5: SC 8, ch 1, turn
R6: SCD first two SC, SC next 4 SC, SCD last two SC, ch 1, turn
R7: SC 6, ch 1, turn
R8: SCD first two SC, SC next 2 SC, SCD last two SC, ch 1, turn
R9: SCD first two SC, SCD last two SC, ch 1, turn
R10: SCD over two SC
Finish off
Second Earflap:
Locating the 14th stitch away from the seam, attach blue yarn. Ch 1
Crochet away from the seam where the other ear flap is, keeping 14 stitch distance in between the 2 earflaps.
R1: SC 12, ch 1, turn
R2: SCD first two SC, SC next 8 SC, SCD last two SC, ch 1, turn
R3: SC 10, ch 1, turn
R4: SCD first two sc, SC next 6 SC, SCD last two SC, ch 1, turn
R5: SC 8, ch 1, turn
R6: SCD first two SC, SC next 4 SC, SCD last two SC, ch 1, turn
R7: SC 6, ch 1, turn
R8: SCD first two SC, SC next 2 SC, SCD last two SC, ch 1, turn
R9: SCD first two SC, SCD last two SC, ch 1, turn
R10: SCD over two SC
SC around for edging
Child 3-5 years – 20 inches around:
Toddler:
R1: magic circle, 12 DC
R2: increase – 2 DC in each stitch (24 DC)
R3: increase – *2 DC, 1 DC*. repeat ** (36 DC)
R4: increase – *2 DC, 1 DC, 1 DC*. repeat ** (48 DC)
R5: increase – *2 DC, 1 DC, 1 DC, 1 DC*, repeat** (60 DC)
R6: (no increase) DC in every stitch around
R7: attach black yarn, DC in every stitch around
R8-R12: (reattaching yellow yarn), DC in every stitch, tie off black yarn
R13: attach blue yarn, DC in every stitch, tie off yellow yarn
start ear flaps
First Earflap:
Ch 1
R1: SC 12, ch 1, turn
R2: SCD first two SC, SC next 8 SC, SCD last two SC, ch 1, turn
R3: SC 10, ch 1, turn
R4: SCD first two sc, SC next 6 SC, SCD last two SC, ch 1, turn
R5: SC 8, ch 1, turn
R6: SCD first two SC, SC next 4 SC, SCD last two SC, ch 1, turn
R7: SC 6, ch 1, turn
R8: SCD first two SC, SC next 2 SC, SCD last two SC, ch 1, turn
R9: SCD first two SC, SCD last two SC, ch 1, turn
R10: SCD over two SC
Finish off
Second Earflap:
Locating the 14th stitch away from the seam, attach blue yarn. Ch 1
Crochet away from the seam where the other ear flap is, keeping 14 stitch distance in between the 2 earflaps.
R1: SC 12, ch 1, turn
R2: SCD first two SC, SC next 8 SC, SCD last two SC, ch 1, turn
R3: SC 10, ch 1, turn
R4: SCD first two sc, SC next 6 SC, SCD last two SC, ch 1, turn
R5: SC 8, ch 1, turn
R6: SCD first two SC, SC next 4 SC, SCD last two SC, ch 1, turn
R7: SC 6, ch 1, turn
R8: SCD first two SC, SC next 2 SC, SCD last two SC, ch 1, turn
R9: SCD first two SC, SCD last two SC, ch 1, turn
R10: SCD over two SC
SC around for edging
Child 6-10 years – 21 inches around:
R1: magic circle, 12 DC
R2: increase – 2 DC in each stitch (24 DC)
R3: increase – *2 DC, 1 DC*. repeat ** (36 DC)
R4: increase – *2 DC, 1 DC, 1 DC*. repeat ** (48 DC)
R5: increase – *2 DC, 1 DC, 1 DC, 1 DC*, repeat** (60 DC)
R6: (no increase) DC in every stitch around
R7: attach black yarn, *2 DC, 12 DC*, repeat around **
R8-R13: (reattaching yellow yarn), DC in every stitch, tie off black yarn
R14: attach blue yarn, DC in every stitch, tie off yellow yarn
start ear flaps
First Earflap:
Ch 1
R1: SC 14, ch 1, turn
R2: SCD first two SC, SC next 10 SC, SCD last two SC, ch 1, turn
R3: SC 12, ch 1, turn
R4: SCD first two sc, SC next 8 SC, SCD last two SC, ch 1, turn
R5: SC 10, ch 1, turn
R6: SCD first two SC, SC next 6 SC, SCD last two SC, ch 1, turn
R7: SC 8, ch 1, turn
R8: SCD first two SC, SC next 4 SC, SCD last two SC, ch 1, turn
R9: SCD first two SC, SC next 2, SCD last two SC, ch 1, turn
R10: SCD over two SC, SCD over last two SC
R11: SCD over two SC
Finish off
Second Earflap:
Locating the 16th stitch away from the seam, attach blue yarn. Ch 1
Crochet away from the seam where the other ear flap is, keeping 16 stitch distance in between the 2 earflaps.
R1: SC 14, ch 1, turn
R2: SCD first two SC, SC next 10 SC, SCD last two SC, ch 1, turn
R3: SC 12, ch 1, turn
R4: SCD first two sc, SC next 8 SC, SCD last two SC, ch 1, turn
R5: SC 10, ch 1, turn
R6: SCD first two SC, SC next 6 SC, SCD last two SC, ch 1, turn
R7: SC 8, ch 1, turn
R8: SCD first two SC, SC next 4 SC, SCD last two SC, ch 1, turn
R9: SCD first two SC, SC next 2, SCD last two SC, ch 1, turn
R10: SCD over two SC, SCD over last two SC
R11: SCD over two SC
SC around for edging
===============================
Pattern can be modified to smaller baby sizes if desired.
Simply do not increase to the larger sizes and take away rows.
I hope this tutorial is helpful to anyone wanting to tackle making their own child sized minion hat.
*** I ask credit be given where it is due for anyone using this pattern **
Be kind to crafty bloggers providing free patterns, don’t take credit away from them.
Please feel free to ask questions.
Enjoy!
GREAT pictures!
Fabulous tutorial! Nice work.
Awesome, thanks for the pattern. I have a grown up friend who is mad for minions, I’ll be making her some of these to gift to her niece and nephew 🙂
Are the sizes you have listed the hat size or the head size?
The sizes listed are for the head circumference.
Thank you so much for this tutorial! It was easy to follow and I appreciate the pictures! We are minion crazy in our house right now so I am currently making these for the kids. Thank you SO MUCH!!
You’re very welcome!!! Hope they enjoy 🙂
Thanx so much for d pattern. I learnt a new way to join different color yarn. The hat turned out perfect and now my husband wants me to make one for him.
Thank you! That’s wonderful!!
Thanks for the very clear tutorial. I plan to make some of these for a charity event in December and I will be sure to give you credit for all the work you did in creating all these patterns! My minion hat is off to you!
So sweet of you!! Thank you!
Fabulous tutorial! So adorable. And great job explaining step by step! Thank you 🙂
In the child size hat for round 7 it says ” attach black yarn, *2 DC, 12 DC*, repeat around **” Is the 12DC a typo? Thanks, love the hat!
It is not a typo 🙂 its is to add a small increase in the round.
It ends up finishing the round with less than 12DC, about 7 or 8 I think. I even wen bak and counted the previous round to make sure I had 60 stitches. A little confusing!
It’s ok that it finishes the round that way. Don’t get caught up on number of remaining stitches in the round. It still gives the necessary increase for the hat 🙂
How would I increase for an adult sized hat?
Also I’m confused with your 3-5 and 6-10 yr instructions. It seems they have the same instructions to increase to 60 for both of them. The increase to 60 makes a hat for 6-10 yrs.
Sorry if it seemed confusing, the larger size instructions include a step to increase the next row following the 60 dc. The increase is described as every other 12 stitches. This adds a slight increase giving the hat approximately 1 more inch in circumference.
trying to make for adult & don’t understand the increase after the 60 can you please be more specific on what do after row 5 to make this bigger? Thanks so much!
Thank you for this! I made 2 for my kids and now I am making some for friends. I will be sure to tell them where I found the pattern!!!
Thank you so much! I’m glad the pattern is working cus I am no expert.
Thanks very much, they are so cute!
Thank you so much for taking the time to write this tutorial! I love to crochet, but have never been able to work in a round without hating how it looked. I could never get the hang of it….until I found this!! I am making these hats for my niece and nephews and can’t wait to send them! Thank you again!
I’m soo glad you liked it!! Thanks for the kind words.
my daughter asked me if I could make a minion hat for my grandson…I wasn’t sure I could. Thanks to your pattern now I know I can..and since I tried the pattern with just some spare yarn I had already I already have a cute little hat for my grandaughter. I have bookmarked your page and I will be back…thank you again This was an absolute joy of a pattern to follow 🙂
Thank you so much!! That made me smile 🙂
Thanks for the the the instructions and tuorial. They are,cute! And vy easy to follow.
Thank you so much for writing out this pattern! I have been looking for a DC hat pattern. I have made 3 hats already. 🙂 I was asked to make one for an adult. In the comments below you said I could add an increase round after Round 5. Would I do 1 or 2 increase rounds for an adult? Round 6 as an increase round would be a total of 72 DC in that round?
Would I also increase the earflap to 16 stitches in length? Sorry for the all questions, but, this is a great pattern as a basic earflap hat. Adding different embellishments and I think I know what everyone will be getting for Christmas. 😉
Thanks again for taking the time to write out the pattern and sharing it with everyone.
Thank you so much! I’m getting so many compliments and you made it so easy to follow 🙂
That great!!! You’re very welcome!
This is the cutest minion hat I’ve seen out there, great work!! I’m fairly new to crochet and would love to try this pattern for my son, but I’ve never even heard of a “magic circle”. Do you by chance have instructions? Thanks!
Hi there! Here is a link that is very helpful with describing the Magic Circle and has great photos. http://www.craftsy.com/blog/2013/09/demystifying-the-magic-ring/
YouTube also has some great instructional videos! Thats how I learned how to do the magic circle.
Thanks for the pattern I made one for my grandson. Now I’m making one for my granddaughter
Hello! Thank you for providing these awesome patterns! Do you have a pattern for an adult size as well? Thank you again..!
Hi! If you would like to make an adult size of this hat, just add another increase row to make the hat larger in circumference and a little longer as well. Where pattern reads “R7: attach black yarn, *2 DC, 12 DC*, repeat around **”, replace that step with “R7: attach black yarn, **2 DC in same stitch, 1 DC into each of the next 4 stitches** (looks like 2,1,1,1,1), and repeat around. Also add another row once the increase is complete to add some length to the hat. Hope that helps!
Hi!
Thank you so much for the pattern! I am a beginner. When I add another row after 2,1,1,1,1, do I do the same or do I just do 1 DC all around?
Thank you!
I’m happy you are trying the pattern! Sorry if it’s not very clear, the row following the last increase does switch to 1 DC in each stitch around evenly for every row after. Hope that answers your question!
it’s a great pattern just having trouble converting to adult size – I’ve made a baby one very easily – do I keep increasing after row 5 before doing above step? how can I send you picture of the one I made? Thanks so much Angela 🙂
Hi there! I would love to help with any questions. What is an email I can write to in order to contact you?
thank you so much for offer to help
dynamic2duo@msn.com
Hi, I too love the pattern. Made one and need it bigger. The questions above are exactly what I needed to know. Thank you. I’m glad I came back to the web site and found this information. Now to get busy making another one. Grandson comes in morning and will expect to have his done. The first one was to little but he wouldn’t let go of it . He said he would give it to a friend that has a little head at pre school. Funny huh. ( its the thought that counts) right.
My creation isn’t working out too well, can I email you photos so you can make some suggestions as to what is happening? Thank you
Absolutely! Mona.silva@gmail.com. Hope I can help!
Just finished one of these for my little guy…he’s going to be a minion for Halloween 😀 This is perfect; thanks so much for sharing!
Thanks for this I have been looking for a childern pattern
You’re very welcome!
Any tips for making the mouths mine don’t look good! :-((
I’m so sorry that finishing detail isnt coming out good for you. There are a couple of ways of creating the mouth. You could slip stitch the design directly onto the hat or use a tapestry needle to sew a mouth onto it. Here is a link to a video that shows the slip stitch method
hope that helps!
Please help! I love this pattern, but am stumped at Row 7 where it says 2DC,12DC. Does that mean I’m supposed to 2 DC in each stitch, but do not know what 12 DC means next?
I’m sorry for the confusion. Perhaps I should me more clear. The first says 2 double crochet into the first stitch, and then 1 double crochet into next 12 stitches. After the 12th stitch, repeat the process. This creates enough of an increase in that row to make the six suitable for that age. Hope that helps!
Got it! Thanks! I was reading as if to DC12x in one stitch, then figured it must be DC into next 12 stitches. Great pattern, thanks for sharing!
Am I the only one having probs with this pattern? I tried
making the one for 6-10 year old. I followed the very easy very
clear instructions and it ended up enormous! I couldn’t even finish
all the rows it called for at the bottom after the black section. I
used a wool blend yarn which was very soft. Could this be the prob?
Would love to try it again.
Hi! I’m glad you’ve tried the pattern but sad you’re having problems!! I wonder if you’re interpretation of the increases is causing the hat to end up that way? I did my best to explain it but I’m no expert. Make sure to count the number of stitches at the end of every row to make sure you are not adding too many. The last increase for the larger size should only add a few from the total on previous row.
No I haven’t had any problems with this pattern. Its very easy and I’ve already made 3 for ages 8,10 and 23yr old using the 6-10 yr pattern. Takes me less than 3 hrs each.
Thank you 🙂
I made the hat babysize following your instructions 🙂 it looked absolutely adorable and my friend was very happy with it .Thank you :))
Love the pattern..and you made it so easy to follow. Thank you for taking the time to provide a free pattern for this minion hat. I just finished 4 for my grandkids. You did a great job with the pattern. Thanks much
Thank you for such kind words 🙂
Thank you for this pattern! I have made about 8 in the past week! So much fun!!
Thank you thank you thank you for this tutorial! I was dead set on dressing my twins up as minions for Halloween this year, but I couldn’t find ANYTHING that would work. This tutorial was excellent and I am proud to say that it was my FIRST crochet project. You can see my hats here:
http://sewinsomethin.blogspot.com/2013/10/happy-halloween-i-crocheted.html
Thanks again!
Thank you so much for the kind words!!
Just finish three hats Ty! I did very well thanks to u!
I love your minion hat pattern. I made 2 and came back to make 2 more but I can’t read the pattern anymore since you changed your wallpaper. Please help!
I’m sorry your are having problems viewing the site. I haven’t changed my wallpaper or anything about it. Have you tried accessing the site from a different device? There might be an update of some kind needed for your software. 🙁
Thank you so much! This is awesome and the way you broke down the pattern step by step and with so many photos was incredibly helpful! I never thought I would be able to make one of these 🙂
That so nice of you to say!! Thanks!!
Thank you so much for this! I am a beginner to crocheting, and this was very easy to follow and understand. I made it in a day! Both my nephews will get one for Christmas, and if I have time I’ll for sure be making more for some friends! Thanks!!!!
Thanks for the awesome pattern. I made one tonight for my nephew, had so many positive comments. I’m definitely going to make a few more for friends kids 🙂
Thank you so much!
By far…THE BEST and easiest to follow pattern I have found on the entire internet…you did an awesome job with the pictures and details…thank you so so very much…all of this entire year, I have been making my hats wrong but could not figure out where the problem was at…NOW I know….THANK YOU.. <3 <3 <3
=) thank you so much for that!
Hello I managed to make the child size one perfect and love the pattern was very helpful!!
Am trying to do the 6-10 one but at the moment am on r6 and it is flat and round and looks too big so am confused??? Any help appreciated.
I’m glad you are tryin the pattern! The hat will look abnormally big but I promise it’s ok. Keep in mind most that she have a 20+ inch head so it will look big but it will fit 🙂 keep going, do a few more rows and if it still doesn’t look right then we can troubleshoot together.
Thank you I shall keep going and hopefully it will start looking more like a hat but at the moment it isn’t even going up like a hat it’s just flat.
It will lol flat til you get to row 8-13. At that point the increases will be done and the hat will start to curve and take shape 😉
Did the hat turn out for you? It could be the last increase giving you trouble.
Hi!! I love this pattern! It is so easy to understand. However I seem to be having the problem as Vanessa. I am on row 10 and its starting to take shape but for some reason the top of the hat is flat. I have restarted several times and it still looks like Frankensteins head. Lol! Any thoughts on what I might be doing wrong? If you don’t mind could you please email me at kkerr714@yahoo.com. I would like to be able to send you a pic of what my hats are looking like to give you a better idea. Thanks!!!
Great tutorial!! Thanks a lot for sharing it with us.
Thanks!! Great tutorial ,
Best tutorial I have ever used. I made this very quickly..
thank you so much for the pattern i am done with mines it didnt take long at all
I must be doing something wrong. When I get to the 3rd row my circle doesn’t lay down flat, it pops up like I’m trying to make a bowl. Any tips you can give me? I am teaching myself how to crochet off of youtube. I got the pot holder down. LOL Thanks in advance
Hi! I’m glad you’re trying the hat. It sounds like your increases aren’t going along as they should in those first few rows. Make sure you count your stitches at the end of the row to ensure you didn’t leave any stitches out. The circle should lay flat until you get to the rows with no increases left. Hope that helps! If not, feel free to come right back.
Mayb I can send a pic too as for some reason I’ve done something wrong and the hat is huge.
Of course! Send me an email at mona.silva@gmail.com and we can figure it out together 🙂
I love this pattern and it was so easy. It’s been years since I crocheted anything, but I had to try this one. Now my granddaughters have hats to match the tees I made them with a minion appliqued on the front! I posted pictures of the hats on my FB page, but I didn’t have your website handy. I remedied that–now it’s posted there! Thanks so much!
Thank you so much !!! So very sweet of you.
Great crochet pattern
OK. so here I am, an avid crafter, but very new to crochet ( started teaching myself 3 weeks ago) , my small person saw me browsing patterns and went nuts when she saw this one and MUST have one for school, so I’m off to buy some yellow wool this afternoon. I’ll keep you posted on how it goes ( and if it goes well I’ll make sure to link to this blog with any pictures!!). Wish me luck!
Sounds wonderful!! Good luck!
I just finished making my 6 minion hat for my grandkids. I haven’t crochet for over 30 years. Your instructions were easy to follow. Thank-you. And my grandkids are going to thank you also. After Christmas that is.
Thank you for providing a free tutorial on this! You will definitely receive credit! I can admit I need to follow a pattern as I don’t like to try and make my own :). I’m making this for my granddaughter. I’m sure she will be thrilled!
Thsank you for this great tutorial I have made three of these hat in two weeks. I have to make and adult size can you tell me if I should use a larger hook or where to i increase to make it fit an adult size
Thank you for the great tutorial 🙂 They make brilliant Christmas presents ! I want to make one fora baby.You said that for the baby, you don’t increase the stitches.So in which rows do I not increase ? And also for the flaps,do I still keep it 14 stitches apart ? Thank you 🙂
Thank you!!
Here’s an easy tip for increasing, for a smaller baby sized hat, increase 3-4 rows until you get to a circle that measures about 5 inches across (the circle should be completely flat and measure from one end to the other). The amount of increase/rows will vary depending on the yarn you choose and your tension. So, good rule is if you can get the circle to measure 5 inches, and do not increase anymore after that, continue with 1 DC into every stitch around, that should give you a hat that will fit 6-12 month old. In the same vein, a circle measuring across 4.5 inches will give you 3-6 months. I hope that helps, its much easier than having to explain every row. =) Good luck!
Thanks for such a quick reply 🙂 I am going to make one and will let you know how it comes out 🙂
I’ve been searching the wild wild web, for a couple weeks to find an ear flap hat, I’m simply blown away by your incredible tutorial! Thank You Thank You! You Are A Rock Star!
Thank you!!!!!!!
Thank you! Your instructions were great …. made my first hat!
Hello. Thank you for doing this tutorial. I love the Ear Flap Minion Hat. My grandson wants the hat with braids or something like that. Can you please tell me how to add these on to the ear flaps? And again that you for supplying this hat pattern.
Hello! You’re very welcome. The braid can be added very easily to the flaps on this hat. Here is a link to a very helpful tutorial on how to add the braids. I started out by typing out the explanation but do not want to leave any room for confusion. So I figured I would allow someone else who has already worked really hard to provide this information get the credit =)
http://www.jennyandteddy.com/2012/09/adding-braids-t-earflap-hat/
Thank you so much.
I love this pattern but I followed your pattern for the 6-10 year old hat and I’ve done it twice. First with a 5mm hook and second with a 5.5mm hook. They both turned out the same size which fits my 6 month old daughter and obviously no where near the size my 7 year old could wear.
I have no idea what I’m doing wrong! Help!
I’m so sorry you’re having trouble! =( Which type of yarn are you using? If it is different (thinner) from the one I used it could be the cause of the size difference. Is your tension normally tight? If its not those things then we could trouble shoot this together. Feel free to leave your email and We can figure it out. Hope that helps!
Thank you. I am using size 4 worsted yarn. I may hold my yarn too tightly or just crochet tightly in general. I will try once more and try to loosen up a bit. Thank you. I will let you know how it goes.
I just love you for this.
Hi, I made this hat today and it is so stinking cute! I can’t wait for my son to find it tomorrow morning when he wakes up! My only question is how to stitch the mouth without the yellow showing in between the stitches…I kinda made it work, but just wondering if there is a more obvious way to do it that I am not getting. Thanks so much for posting this tutorial!!
Thank you !! It is possible to slip stitch the mouth directly onto where you want it and it comes out beautifully.
Hello I want to make some adult hats. I am on Rnd 6, could I just increase to (72 DC) And then on for Rnd 7 do 1 DC around. R8 add the black yarn, 1 DC around, then RND 9-13or 14 then for Rnd 15 add blue. I wasn’t sure if 14 Rnds would be big enough, but I am also not sure if 15 Rnds would be either. I don’t want the hat to look disporportioned. I have looked at a few Minion hat patterns and even though they are supposed to be sized for small adult to adult it wasn’t turning out big enough. Please help.
Hi there!! I’m so glad you are trying out the pattern! I understand your concern for making sure the fit is just right. If it seems like the size isn’t going to be big enough at R15, go ahead and add another row of the blue with a R16. The pattern is very forgiving and a slight change like that should throw off the proportions too much. I really hope that helps, if not I am here!
Thank you for sharing such a great tutorial ! I haven’t made a hat yet and our little boy is really into Despicable Me right now. He loves hats and shoes and of course Minions. It’s summer here now but maybe I could finish one of these by the time it gets cold again. Love your blog I will be a frequent visitor now 😊😊
Thank u so much for the minion pattern. So simple I loved making all different sizes
This is great i love it
This is great, love to do the monion, hat, i make different style with just a single patterns thank u to yours guys
Thanks for the pattern. My niece and grandkids will love it.
Great Pattern. Thanks
Thank you so much for great tutorial !! Very easy to understand , also great pictures !!! I made the hat for a 3 year old little boy that has cancer .
thank you so much for a lovely pattern that was really easy to follow (I have only been doing crochet for a couple of months) My son loves his new hat, thank you again and please if you have any more lovely patterns that you would like to share, please do because your instructions are easy peasy for us newbies.
So sweet of you!! Thank you!
Hi I think your work is brilliant.
I wanted to know if you knew what size I do for a 9-12 month as I’m doing the one for toddler who is 4 yrs old but would love to do one for 9-12 month thanks xx
Hi I’m just wondered how big should I do for hat thank you
Sorry my last comment senrpt to quick. I was wondering do I do the 6-10yrs old one for a 22-23″ thanks
Thanks you for posting this pattern! So easy to follow, I’ve made 6 hats now ranging from infant to adult!!
Thank you very much for the pattern! My son (age 3) likes “the minion with one eye” (doesn’t know the name :-)), so I will try to crochet a hat for him. After translating the abbreviations in German, I can start! 😉
Thank you so much for the pattern and the tutorial! It was very easy to follow! I haven’t done many character themed hats, and this is the first was that I’ve been able to finish. You have found a new fan of you blogs here =)
The adult size hat pattern is to small for the head . How can I make the hat bigger for a large adult head_?
One of the best tutorials I’ve followed!! So easy to understand and follow step by step!! Thank you so much!!!!
Thank you very much for the pattern. Please can you let me know if the D C is the old English treble? Thank you
excellent work….
Thank you for sharing. I always have trouble placing the ear flaps. Your explanation is clear and thanks for the pics.
Thank you very much for the tutorial! I made a box of minion hats and sent them to my son and daughter in law for the grandkids for Christmas. I also included a few adult sizes. I know my son 🙂
Thank you for posting this! My two young grandsons will think I am the coolest Omi (grandma)!
Thank you ! I’ve been searching for a free minion earflap hat pattern for my grandson!!